1/8 teaspoon salt optional, add if your peanut butter isn’t already salty
For Dipping:
2 cups semi-sweet chocolate chips or melting wafers (12-ounce bag)
1 tablespoon shortening, coconut oil, or vegetable oil optional, to help chocolate chips melt thinner and make dipping easier
Instructions
In a medium-sized bowl, use an electric mixer to mix peanut butter, melted butter, vanilla extract, and salt (optional) until combined. Slowly add in powdered sugar and mix until incorporated.
The consistency should be a bit like a play-doh and shouldn’t be sticky. If it is sticky, add a bit more powdered sugar. If it’s dry and not holding together when pressed, add a bit more melted butter.
Roll into balls, flatten, then shape into eggs. You can also use a rolling pin to roll the dough 1/2″ thick, then use an egg cookie cutter or round plastic cup or lid (that “squishes” and is about 2″ in diameter) to cut out oval shapes.
Freeze shaped eggs for 20-30 minutes.
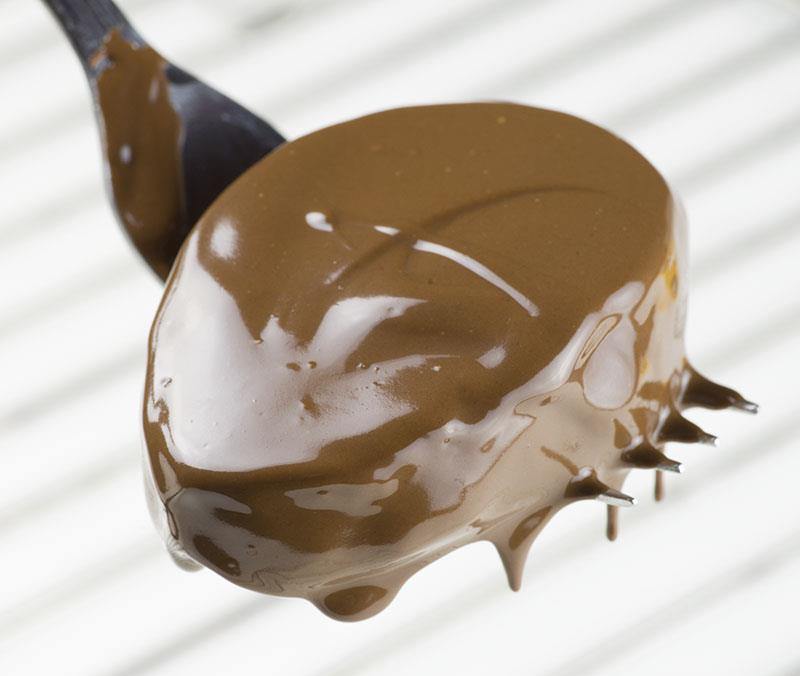
Melt chocolate chips and shortening (optional) in the microwave at 50% power in 30-second increments, stirring in between each increment. If using melting wafers, follow instructions on package.
Dip the frozen eggs in melted chocolate chips or melting wafers. It’s easiest to place them on a fork and then use another fork to scoop chocolate on top.
Tap off the excess chocolate, then place on a piece of parchment paper. Before they fully harden, it can be helpful to carefully move them to prevent the chocolate from “pooling” on the parchment (which will help you get crisp-edged eggs!).
If you have extra chocolate, use a fork to drizzle it on top of the eggs. While the eggs are still wet, you can also add fun sprinkles.
Let harden, then enjoy! You can place these in the fridge or freezer to help them harden quicker.
Recipe Notes
Storage: Store homemade peanut butter eggs in an airtight container for up to 1 week. Depending on the chocolate you used and how well it hardens, you may want to store these in the fridge so that the chocolate doesn’t get tacky and melt so quickly in your hands.
Freezing: I actually prefer these frozen, as you can grab one when a craving hits! After the chocolate is hardened, place in an airtight container (you can place a piece of wax paper or parchment in between each layer to prevent from smearing).
How do you get your chocolate chips smooth for dipping? Chocolate chips are naturally designed to hold their shape, so whenever I melt chocolate chips, I always add a heaping tablespoon of Crisco shortening before melting to smooth it out.
If you want to make these peanut butter eggs without shortening, you can instead use melting wafers (naturally designed to melt better) or just add coconut oil or vegetable oil to the chocolate chips instead (add before microwaving).
Seriously, is there anything better than the heavenly mix of chocolate and peanut butter? There’s something about Reese’s that’s just right. It doesn’t matter if you’re craving something sweet or something salty, Reese’s has you covered.
The Reese’s Peanut Butter Cup is the third most popular candy in the US (passed only by M&Ms and Hershey’s), and of all those surveyed, an overwhelming 81 percent liked them. (Only 6 percent didn’t, and who are those people?) The data is interesting: for the most part, people can agree that Reese’s are delicious, regardless of what generation they belong to. When someone wonders what millennials and boomers have in common, the answer is, “A love of Reese’s.”
Reese’s had very unlikely beginnings
While you might expect the culinary genius behind Reese’s to be a lifelong candy-maker, that’s not the case at all. The “Reese” that the candy was named for is creator Harry Burnett Reese, and according to the Hershey Archives, he labored away at a long list of jobs before he even came up with the idea of making candy. He was a factory worker, a farmer, and he even managed a fish hatchery, all before becoming a dairy farmer employed by none other than Milton Hershey.
Even then, the road to success wasn’t a straight one. Reese found himself needing to make some extra cash to support his growing family, and in 1919, he met a man at a Harrisburg, Pennsylvania market who gave him a recipe and asked him to make hard candies. It didn’t work — the candies stuck together — so it was back to the drawing board. Reese tried making a candy bar named for his daughter, a coconut caramel bar, and finally, he started making candies with various centers covered in chocolate. Originally, the chocolates came in assorted boxes: centers were cherry, dates, coconut, and, of course, peanuts. Starting to sound familiar? It absolutely should, because it was the foundation of a great idea.
Reese and Hershey were a match made in heaven
According to Business Insider, Reese always used fresh ingredients for the centers of his candies, as well as Hershey’s chocolate. He had started on one of Hershey’s dairy farms in 1917 before he eventually made the jump to working in the chocolate factory. Reese was still working for Hershey when he decided to strike out on his own. He quit his job in 1923, but first, he went to Hershey and asked for his permission not just to quit, but to set up his own candy company. Hershey said yes under the stipulation that all of Reese’s chocolate had to come from the Hershey company.
He agreed, and five years later, a simple suggestion would change the course of the company. A shop owner Reese was visiting on a sales call asked him if he could make something that was peanut butter on the inside and chocolate on the outside. Fortunately, he said he could, and it would go on to become the company’s flagship product.
Here’s why Reese’s only makes peanut butter cups
Reese’s started out making all sorts of candy, so why do we only get peanut butter cups today? Part of the reason is just that they were an outstanding success – when Reese was first trying to figure out how to make his peanut butter cups, he roasted his peanuts to the point where they were on the verge of burning — and that’s what still gives Reese’s peanut butter that oh-so-distinctive, unmistakable taste. Times were tough but sales were strong, and he was able to weather the lean years of the Great Depression.
But then came World War II and with it, food rationing. Sugar was on the top of the list of ingredients that were suddenly in limited supply. Some of his candies simply had to go and in the end, he kept only the peanut butter cup. It was a practical decision that ended up being a very good one since his peanut butter cups required the least amount of sugar to make.
Reese’s had an unusual ad campaign strategy
Ad campaigns can make or break a product, and in the case of Reese’s, their biggest ad campaigns definitely helped raise their profile. While you might think a well-established brand would want to market their longevity, Reese’s did the opposite. They launched a major 1970s campaign by pretending the candy was something new and that most people didn’t even like the idea of chocolate and peanut butter together.
The premise was simple: ads showed two people, one eating chocolate and one eating peanut butter. The people would collide and say, “Hey, you got peanut butter on my chocolate!” and “Hey, you got chocolate on my peanut butter!” They would then suddenly realize the amazing combo.
Reese’s Pieces stuck around because of E.T.
In the 1970s, Hershey launched a new product that they originally called PBs. These candy-coated peanut butter bits were eventually renamed Reese’s Pieces, and you’d think that the name “Reese’s” would have been enough to make them a major hit. At first, they kind of were. The candies had a successful launch, but according to the Hershey Archives, it wasn’t long before sales started tapering off. That’s not something any company wants to see, so when they got a phone call from Universal Studios, it was a big deal.
The phone call was about a movie called E.T., and Universal wanted to let Hershey know that Reese’s Pieces were going to be in the movie. Not surprisingly, the candy company jumped at the chance to help promote the movie. Hershey took a gamble and agreed to give Universal around a million dollars worth of marketing for E.T. without even seeing a script. Remember, in hindsight, we know what a huge hit the movie was, but at the time, Hershey was essentially taking a chance with a hefty wad of cash.
It paid off. Sales of Reese’s Pieces skyrocketed, and supposedly, it only happened because someone else had said “No,” first — and that was M&Ms.
Some Reese’s have a lot more peanut butter than others
Sure, the chocolate is great and all, but it’s Reese’s unique peanut butter that makes them amazing. If you’re in Camp Peanut Butter, you should know that not all Reese’s are created equal — and fortunately, someone’s done the math so you know just what you should splurge on. Redditor Rustid took a handful of various Reese’s candy, scraped out the peanut butter, and weighed it to come up with a definitive chocolate-to-peanut butter ratio rating. The findings are pretty surprising, and include the fact that the Small Heart contains the least amount of peanut butter — just around 19 percent! Yikes!
On the flip side, there’s the egg and the heart, which have a much more generous amount of about 60 percent peanut butter. The pumpkin and the King Size come in just below that with a touch over 50 percent peanut butter. That means all you peanut butter lovers out there should probably keep in it in mind that Valentine’s Day and Easter are the time to stock your year’s stash. What about those that are on the bottom? Minis come in pretty low on the ratio, too, as they’re around 28 percent peanut butter. Now you know, and you can plan accordingly.
If you get a bad Reese’s, they’ll replace it
No one’s perfect, and sometimes, things slip through the cracks. That’s even happened with Reese’s, and there’s a valuable lesson to be learned here — if you get a Reese’s without the peanut butter, definitely reach out to them on social media. In 2018, an Iowa man named Alex Hentges headed over to their Facebook page to post about his peanut-butter-less Reese’s and ask the company what the heck was going on.
They responded, and Today says that at first, they told him they were going to be sending him some coupons to replace his defective Reese’s. When mail showed up a few days later, it was something much more substantial. Hentges received a letter of apology and a massive box containing about 5 pounds of various Reese’s candy. Win!
While they said that they weren’t sure just how that particular cup missed getting its peanut butter, they said: “…The brand had to make things right!” Now that’s just great customer service.
There’s a scientific reason Reese’s taste so good
Reese’s mix of chocolate and peanut butter is nothing short of magical, and it turns out that there’s a scientific principle at work here. According to Penn State University professor of food science Gregory Ziegler (via Mic), it’s something called “dynamic sensory contrast.” What’s going on here is that your taste buds essentially love it when you eat something with completely contrasting textures — like the smoothness of the chocolate and the slightly crunchy peanut butter.
Couple that with another contrasting combination — the sweetness of the chocolate and the saltiness of the peanut butter — and you’ve got a winning team that no one can resist. There’s a catch, though — these contrasting flavors and textures are so good that it makes you sort of forget how much you’re eating. Ever powered your way through half a bag of Minis without realizing it?
It wasn’t you just being a glutton, it was science! Essentially, these contrasting flavors can taste so good it overrides our sense of feeling full. The principle is also called the “ice cream effect,” and it’s why there’s just always room for ice cream even after the biggest of dinners.
If you’ve never used Reese’s in a cocktail, you’re missing out
Sure, we’ve all had Reese’s on their own, and you’ve probably even baked with them, too. But have you had them in a cocktail? No? Why not! First, grab a bottle of vodka and a handful of Reese’s Pieces. Take out just enough vodka that you can pour in those little candy nuggets of deliciousness, replace the top, and let it sit. It might have to hang out on the top shelf for a few days, but it’s worth the wait. The vodka will be infused with all that Reese’s flavor and when it’s done, it’s cocktail time!
It’s the perfect thing to add to a dessert cocktail. Mix with milk, chocolate liqueur, and add a dash of chocolate syrup. Sounds pretty brilliant, right? Pretty much any drink that features those ingredients — or some cream, chocolate vodka, or Irish cream — is made better with the addition of some Reese’s-infused vodka. Better still? Use it to mix up a boozy milkshake, and it’ll be your new go-to treat.
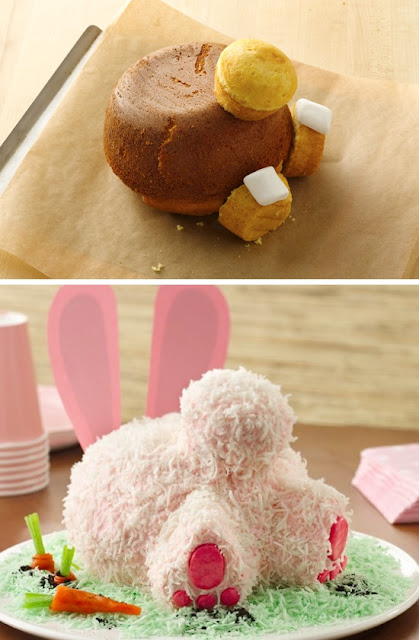
Today’s offering is a cute Easter cake that I’ve made with my granddaughter…a Bunny Butt Cake!
1 box yellow or white cake mix
Water, vegetable oil and eggs called for on cake mix box
Tray or cardboard covered with wrapping paper and plastic food wrap or foil
1 container vanilla frosting
Red food color
1 large marshmallow, cut in half
3 cups shredded coconut
Green food color
2 strawberry or cherry stretchy and tangy taffy candies (from 6-oz bag)
1 fruit roll up
3 green-colored sour candies, separated into strips
Construction paper
Heat oven to 325°F. Grease 1 1/2-quart ovenproof bowl (8 inches across top) with shortening; coat with flour (do not use cooking spray). Lightly grease 3 muffin cups in regular-size muffin pan.
Make cake batter as directed on box. Pour cake batter in 3 muffin cups, filling two-thirds full. Pour remaining batter into 1 1/2-quart bowl.
Bake cupcakes 17 to 21 minutes, bowl 47 to 53 minutes or until toothpick inserted in center comes out clean. Cool 10 minutes. Remove cakes from muffin cups and bowl; place rounded sides up on cooling racks. Cool completely, about 1 hour. If necessary, cut off rounded tops of cakes.
Spoon frosting into large bowl. Add red food color to make desired pink color. Place bowl cake on tray cut side down; spread 1/3 cup frosting over cake. Use frosting to adhere cupcakes to bowl cake for feet and bunny tail. Use toothpicks if necessary. Place marshmallow halves, cut sides down, on tops of 2 cupcakes to make heels of feet. Spread thin layer of frosting over side and top of cake to seal in crumbs. Freeze cake 30 to 45 minutes to set frosting.
Spread remaining frosting over cake. Sprinkle with 2 cups of the coconut; press gently to adhere. Shake 1 cup coconut and 3 drops green food color in tightly covered jar until evenly tinted. Surround bunny with tinted coconut. Use rolling pin to press strawberry candies into 2 large rectangles. Cut 2 large ovals and 6 small circles out of candy. Press onto bottoms of bunny feet, using frosting if needed.
Roll up fruit snack to make carrot shapes. Cut green sour candies in half crosswise; press into large end of each carrot to make greens on carrot. Cut ears from construction paper; wrap ends that will be inserted into cake with plastic food wrap. Insert into cake. Remove ears, plastic wrap and toothpicks before serving. Store loosely covered.
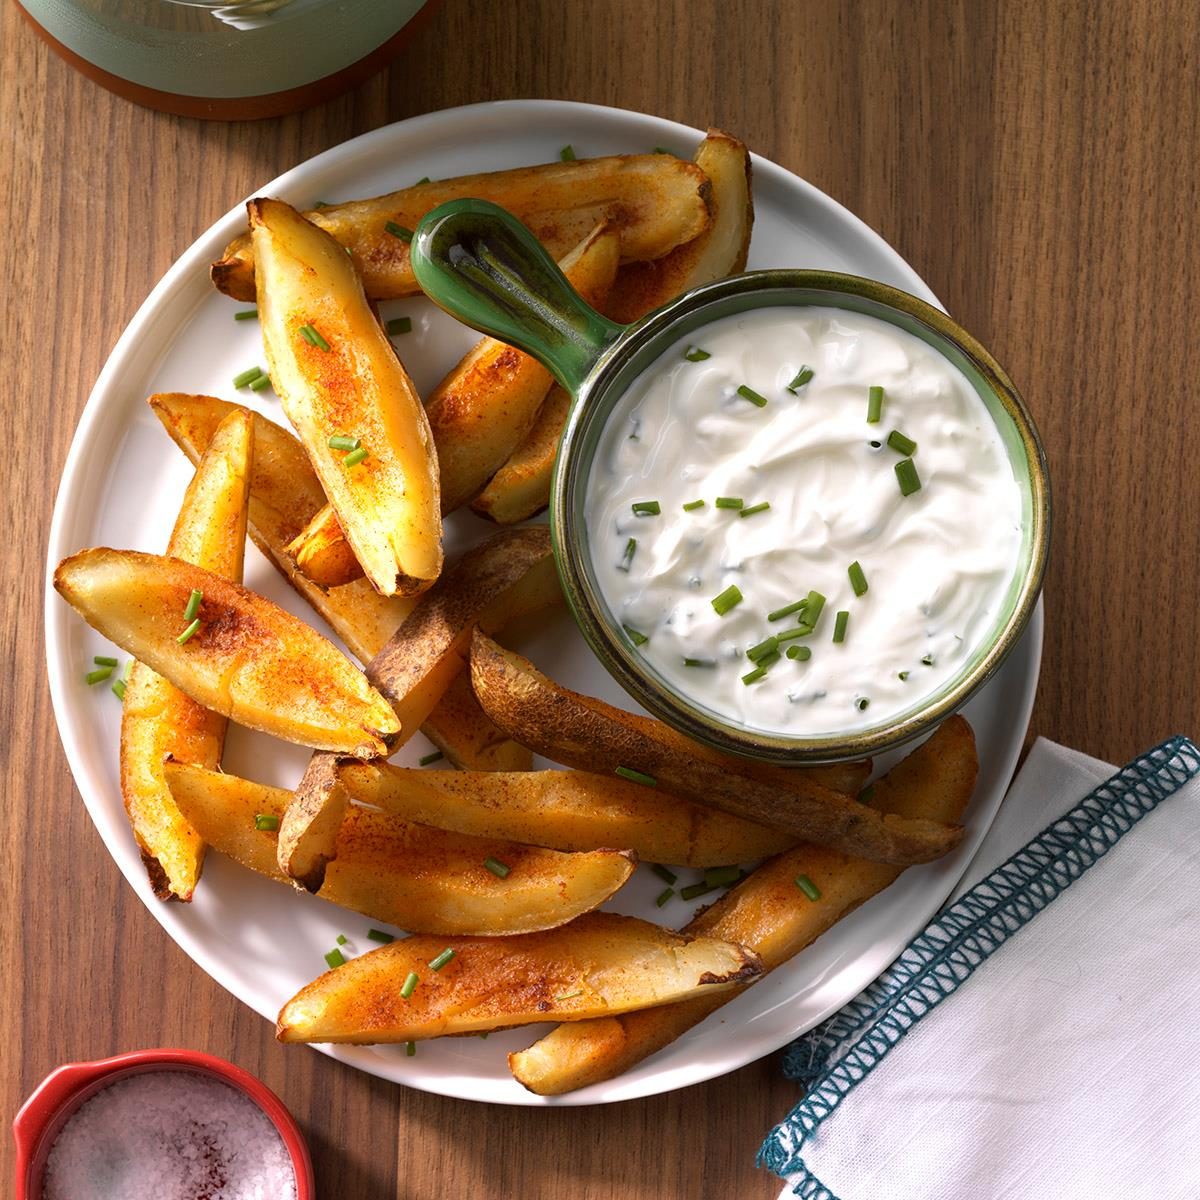
Preheat oven to 375°. Scrub potatoes; pierce several times with a fork. Place on a greased baking sheet; bake until tender, 1-1-1/4 hours. Cool slightly.
Cut each potato lengthwise in half. Scoop out pulp, leaving 1/4-in.-thick shells (save pulp for another use).
Cut each half shell lengthwise into quarters; return to baking sheet. Brush insides with butter. Mix seasonings; sprinkle over butter.
Broil 4-5 inches from heat until golden brown, 5-8 minutes. If desired, mix sour cream and chives and serve with potato skins.
I was so intrigued when I saw this picture, I just had to see the recipe! It seemed easy enough, although I have not attempted it myself yet. (I will update if I do by post time.)
Shamrock Pound Cake
Ingredients
2 packages (16 ounces each) pound cake mix
10 drops green food coloring
1/2 teaspoon peppermint extract
GLAZE:
1 cup confectioners’ sugar
1/8 teaspoon peppermint extract
3 to 5 teaspoons 2% milk
Directions
Preheat oven according to package directions. Grease a 9×5-inch loaf pan. Prepare one package cake mix according to package directions, adding food coloring and extract before mixing batter. Transfer to prepared pan. Bake and cool as package directs.
Cut cooled cake into 1-in.-thick slices. Cut slices with a 2-1/2-in. shamrock-shaped cookie cutter (save remaining cake for another use). Stand shamrock slices at an angle in a greased 9×5-in. loaf pan.
Prepare remaining cake mix according to package directions. Pour batter around and over shamrock slices. Bake and cool as package directs.
For glaze, in a small bowl, mix confectioners’ sugar, extract and enough milk to reach desired consistency. Pour glaze over cake, allowing some to flow over sides.
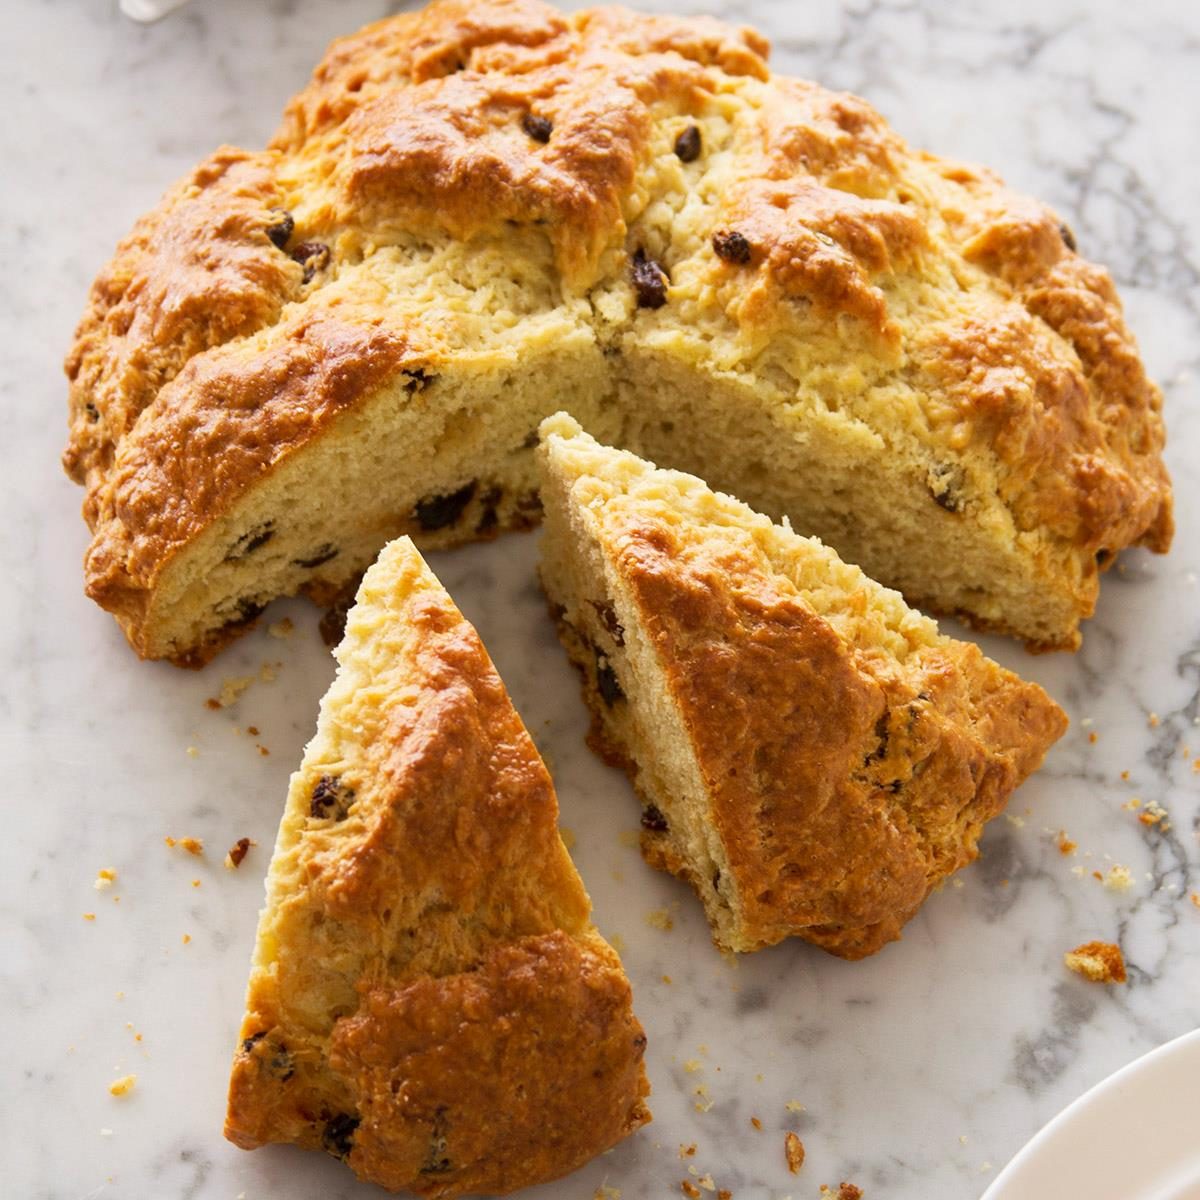
Since this is March, I thought I’d bring a recipe for classic Irish Soda Bread. I have not attempted this as of writing this open. If I do before it posts, I’ll update it to let you know the results.
Ingredients
2 cups flour
2 tablespoons brown sugar
1 teaspoon baking powder
1 teaspoon baking soda
1/2 teaspoon salt
3 tablespoons cold butter, cubed
2 large eggs, room temperature, divided use
3/4 cup buttermilk
1/3 cup raisins
Directions
Preheat oven to 375°. Whisk together first 5 ingredients. Cut in butter until mixture resembles coarse crumbs. In another bowl, whisk together 1 egg and buttermilk. Add to flour mixture; stir just until moistened. Stir in raisins.
Turn onto a lightly floured surface; knead gently 6-8 times. Shape into a 6-1/2-in. round loaf; place on a greased baking sheet. Using a sharp knife, make a shallow cross in top of loaf. Whisk remaining egg; brush over top.
Bake until golden brown, 30-35 minutes. Remove from pan to a wire rack. Serve warm.
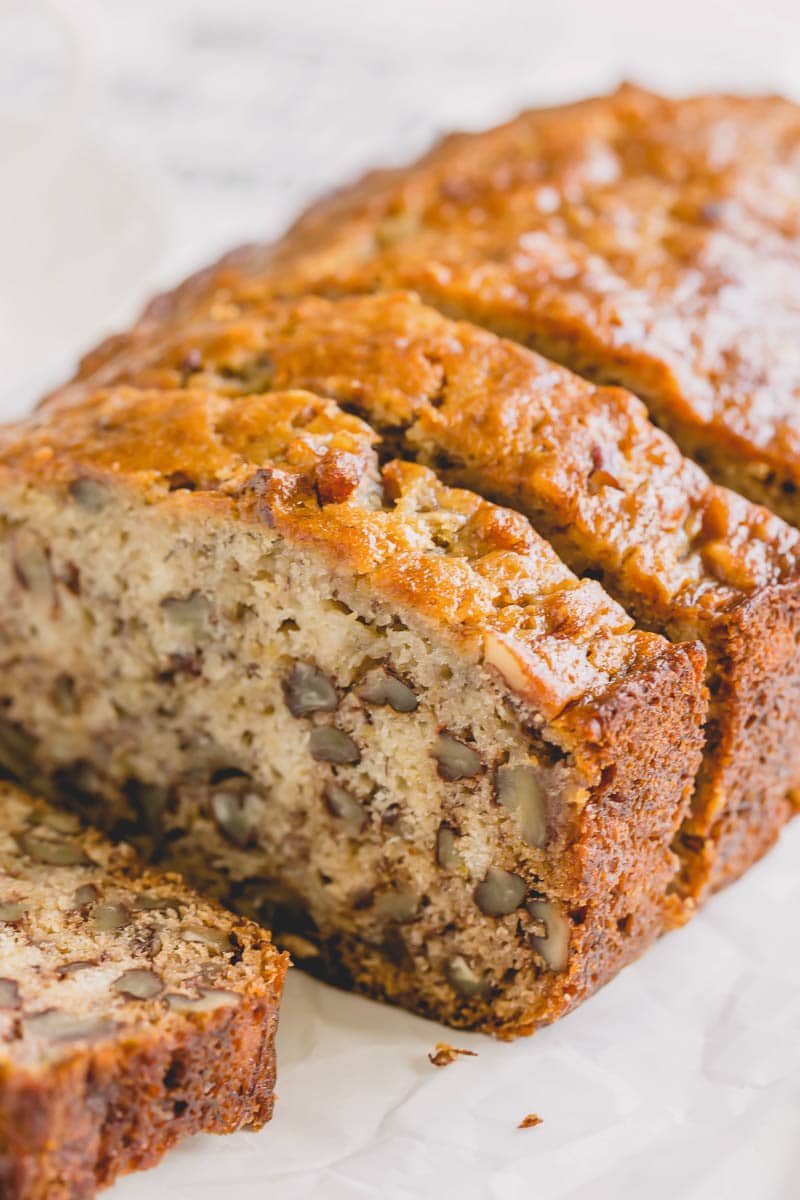
In our house, we hate to waste food, so when our bananas are past the good-to-eat stage, I freeze them to make banana bread at another time. The morning I want to bake some banana bread, I take them out to thaw and drain slightly before adding to the other ingredients. This recipe is super easy and so delicious!
Banana Bread
Ingredients
2-1/2 cups all-purpose flour
1 cup sugar
3 1/2 teaspoons baking powder
1 teaspoon salt
3 medium ripe mashed bananas
1 egg
3 tablespoons vegetable oil
¾ cup milk
1 cup chopped nuts
Preheat oven to 350*. Grease and flour 1 9 x 5 or 2 8 x4 loaf pans. Place all ingredients into a large mixing bowl and beat on medium speed for ½ a minute, scraping the bottom and sides constantly. Pour into pan(s). Bake 55-65 minutes. Cool slightly. Remove from pan and cool completely before slicing. Enjoy!
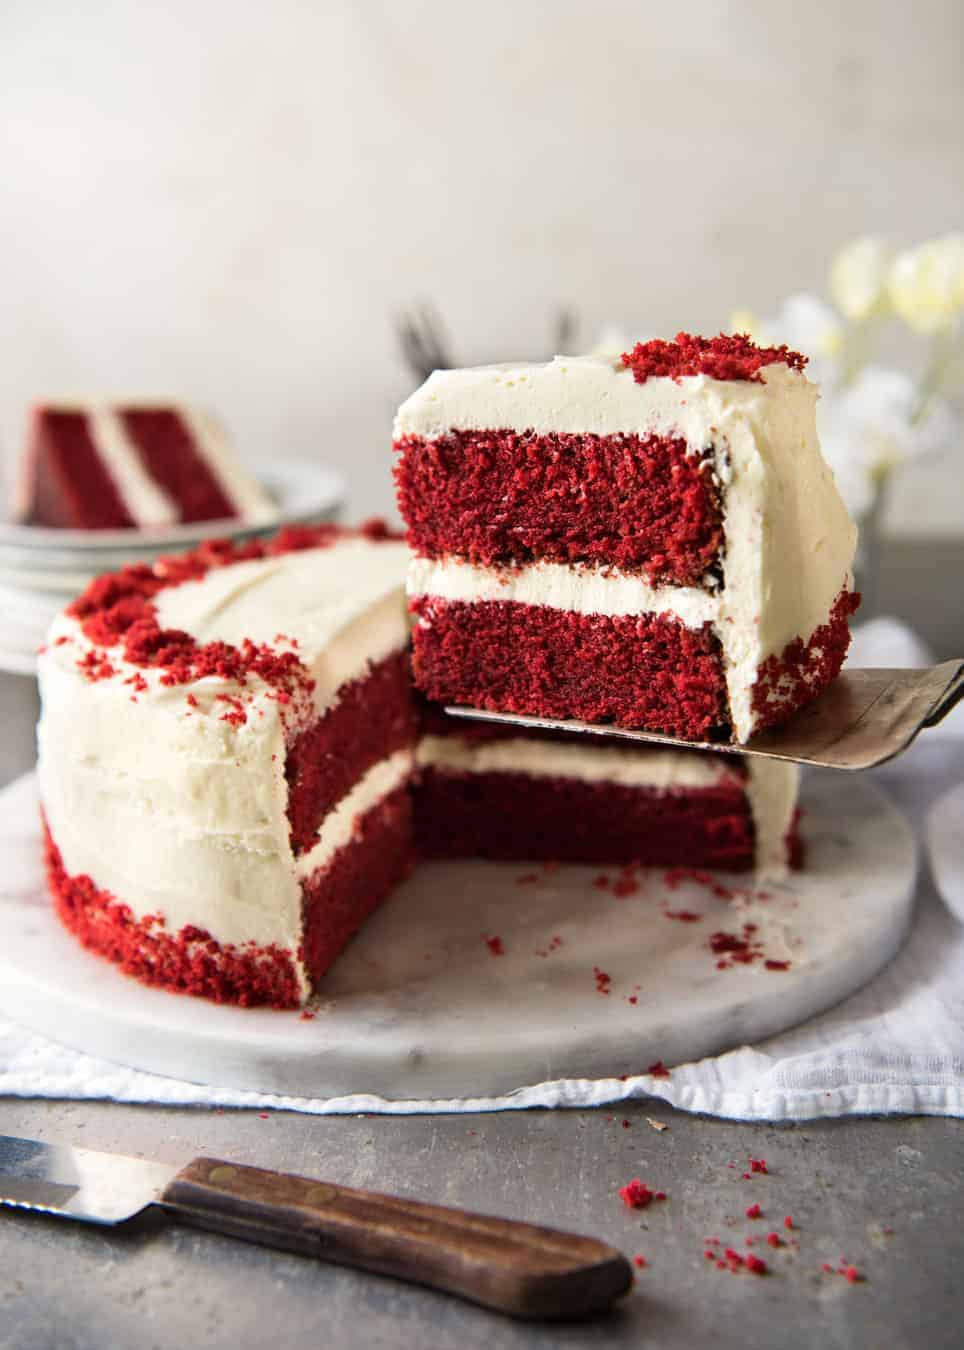
This being February, I thought we’d bake a Red Velvet Cake.
Cake:
1 ½ cups sugar
½ cup butter
2 eggs
2 ounces red food coloring
2 tablespoons cocoa
1 cup buttermilk
1 teaspoon salt
1 teaspoon vanilla extract
2 cups cake flour
1 tablespoon distilled white vinegar
1 ½ teaspoons baking soda
Preheat the oven to 350 degrees F. Grease two 9-inch round pans.
In a large bowl, beat the sugar and shortening together with an electric mixer until light and fluffy. Add eggs one at a time, beating well after each addition. Combine red food coloring and cocoa to make a paste; add to creamed mixture.
Mix buttermilk, salt, and 1 teaspoon vanilla together in a small bowl. To the creamed mixture, add flour, alternating with buttermilk mixture, mixing just until incorporated. Mix vinegar and baking soda together; gently fold into cake batter and pour into prepared pans.
Bake in the preheated oven until a toothpick inserted into the center comes out clean, about 30 minutes. Cool on a wire rack for 5 minutes. Run a table knife around the edges to loosen. Invert carefully onto a serving plate or cooling rack. Let cool, about 30 minutes.
Today is National Carrot Cake Day, so let’s make one of those. I have tried many recipes—some use jars of carrot baby food, some used pineapple and coconut, but this is my favorite. I’ve included the recipe for cream cheese frosting even though I personally despise it. (I just use my regular frosting for this cake.)
Cake
1 1/2 cups granulated sugar
1 cup vegetable oil
3 eggs
2 cups Gold Medal™ All-Purpose Flour
2 teaspoons ground cinnamon
1 teaspoon baking soda
1 teaspoon vanilla
1/2 teaspoon salt
3 cups shredded carrots (5 medium)
1 cup coarsely chopped walnuts
Cream Cheese Frosting
1 package (8 oz) cream cheese, softened
1/4 cup butter or margarine, softened
2 to 3 teaspoons milk
1 teaspoon vanilla
4 cups powdered sugar
Nutmeg, if desired
Steps
Heat oven to 350°F. Grease bottom and sides of one 13×9-inch pan or two 8-inch or 9-inch round pans with shortening; lightly flour. In large bowl, beat granulated sugar, oil and eggs with electric mixer on low speed about 30 seconds or until blended. Add flour, cinnamon, baking soda, 1 teaspoon vanilla and the salt; beat on low speed 1 minute. Stir in carrots and nuts. Pour into pan(s).
Bake 13×9-inch pan 40 to 45 minutes, round pans 30 to 35 minutes, or until toothpick inserted in center comes out clean. Cool rectangle in pan on cooling rack. Cool rounds 10 minutes; remove from pans to cooling rack. Cool completely, about 1 hour.
In medium bowl, beat cream cheese, butter, milk and vanilla with electric mixer on low speed until smooth. Gradually beat in powdered sugar, 1 cup at a time, on low speed until smooth and spreadable. Frost 13×9-inch cake or fill and frost round layers with frosting. Sprinkle nutmeg on frosted cake, if desired. Store in refrigerator.
Today’s entry, in honor of Chocolate Cake Day, is German Chocolate Cake. It’s a recipe I’ve won many awards for in high school.
German Chocolate Cake
For the Cake:
4 oz German sweet chocolate (I use Bakers) 1/2 cup boiling water 1 cup butter 2 cups sugar 4 egg yolks 4 egg whites; stiffly beaten 1 tsp vanilla 2 1/2 cups flour 1 tsp baking soda 1/2 tsp salt 1 cup buttermilk
Preheat oven to 350*. Line the bottom of 3-9inch round baking pans with waxed paper. Spray sides with Baker’s Joy.
Put chocolate in a bowl and pour boiling water over it to melt. Set aside to cool slightly. In another large bowl, cream butter and sugar until fluffy, add egg yolks one at a time. Mix in vanilla, and chocolate. Add dry ingredients alternately with buttermilk. Fold in egg whites. Pour into 3 pans. Bake at 350 for 30-35 minutes.
Frost tops with Coconut Pecan Frosting, leaving sides unfrosted.
Coconut Pecan Frosting
1 cup evaporated milk 1 cup sugar 3 egg yolks 1/2 cup butter 1 tsp vanilla 1 1/3 cups coconut 1 cup chopped pecans
Combine all except coconut and pecans in a saucepan. Cook over medium heat, stirring constantly, about 12 minutes. When mixture thickens, remove from heat. Stir in coconut and pecans. Cool until spreadable.
This is extremely delicious but can be a pain in the butt to make. I no longer use this recipe…I opt for a simpler choice:
(Pat’s TIP: Use 2 cans of frosting—it’s the BEST part!)