The Art of Chainsaw Carving

Chainsaw carving began in the U.S. in the 1950s. Ben Murphy and Ken Kaiser pioneered the craft and began distributing their pieces. Interest in chainsaw carving grew slowly until the 1980s. Then the craft jumped in popularity thanks to the publication of a handful of books about chainsaw carving and the creation of several chainsaw carving festivals and competitions. Men and women from all walks of life entered the contests, and the number of chainsaw carvers multiplied.

The development of the Internet also aided the growth of the craft. Chainsaw carvers posted “how-to” articles, recorded videos while they carved a piece, and sold their items in online stores.

As chainsaw carving gained popularity, it spread from America to Japan and Europe. Now, chainsaw artists participate in dozens of annual chainsaw carving festivals and competitions around the world. According to the United Chainsaw Carving Guild (UCCG), there are now chainsaw sculptors in more than 80 countries worldwide.

Like most chainsaw carvers, you will likely start with a single saw and add more as you learn the craft and increase the realism and detail of your projects. Standard chainsaw models from well-known tool manufacturers like Dewalt, Stihl, Husqvarna, Black+Decker, Worx, and Makita often make annual lists of “Best Chainsaws for Chainsaw Carvers”. Very popular models frequently feature guide bars (blades) with small noses that allow the artist to create realistic detail.

As you master the craft and increase the size, variety, and complexity of your pieces, you’ll probably add “specialty” saws with unusually long (or short) guide bars or custom noses that allow you to sculpt a piece exactly as you’d like it.

Safety gear

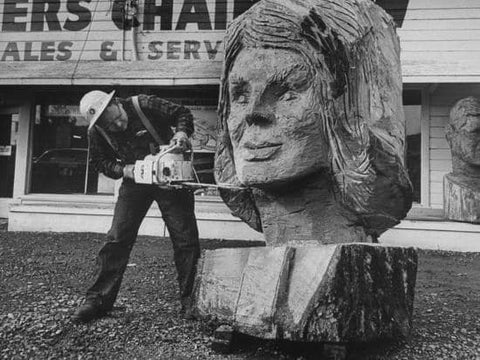
Obviously, chainsaw carving is dangerous. A careless mistake can result in serious injury or death. Therefore, the wise chainsaw carver “gears up” with at least goggles, ear protection, gloves, and steel-toed boots. Some carvers also wear a helmet with a face shield and Kevlar pants.

One of the benefits of chainsaw carving is that you can use wood that isn’t pristine enough for other woodcarvers to use. For example, irregular grain or knots that derail a chip carving or relief carving add character to a chainsaw carving. Some sculptors utilize fallen logs; others get scrap logs or end pieces from sawmills. (If you’re planning to use fallen logs, but don’t have any on your own property, be sure to get permission from the landowner beforehand.)

Commissioned pieces or extensive works can be the exception to this rule. In these cases, the carver may have to scour several sources before locating a log with the correct dimensions and character.

Another factor you’ll need to consider is the variety of wood you want to carve. Softwoods are easier to carve, offer less kick-back when you carve them, and are, therefore, less dangerous to carve. These reasons make softwoods much more popular for chainsaw carving than hardwoods are. Favorite woods for carving include:

  • Pine–It’s plentiful, inexpensive, and reliable to cut. White pine and ponderosa pine are particularly popular.
  • Red cedar–It’s not quite as easy to carve or as inexpensive as pine is, but the color is marvelous.
  • Basswood–which is a hardwood–is also popular because it’s relatively soft, fairly easy to use, and attractive. It’s also inexpensive and plentiful.

Impressive pieces

Salt of the Earth

Salt has so many other uses around the home, other than a flavor enhancer!  It can be used for cleaning, fighting inflammation, and even keeping pests away.  So make sure to keep some on hand!!

These tips were found on The Frugal Navy Wife’s Blog:

Keep soot from building up

If you have a wood-burning fireplace, you can keep soot from building up in your chimney by tossing some salt on the logs.

Helps to Get Rid of Watermarks 

Remove watermarks from your tables and furniture by using a mixture of warm water and salt. Just allow it to sit for a few minutes and wipe clean.

Add a Shine to Your Coin Collection  

Get your copper shining again with a paste of salt and vinegar. Just rub gently on the bottom of your copper pans to remove stuck-on soot and tarnish. Works great on brass, pewter, and bronze as well. Do not use on silver, however.

Quickly Removes Soap Suds

Pour salt onto overflowing suds in the sink or washing machine.

Abrasive Cleaner

Make a great abrasive cleaner by making a paste of salt, borax, and water. Don’t use on finished wood or painted surfaces, though, as this will get your troublesome areas clean. Works great on rust rings in the tub.

Helps to Brighten Your Clothing  

Speaking of washing machines, add salt to your washing machine’s rinse cycle to brighten colors and sharpen them.

Water Your Plants

Mix a couple of teaspoons with a gallon of warm water. Water your plants with this mixture once a month or so. They need salt, too, just like we do, and will grow much stronger and healthier.

Removes the Buildup on Your Clothes Iron  

Clean your iron with salt. Just sprinkle some on your ironing board and it will take the buildup right off. Alternatively, you can make a paste from vinegar, baking soda, and salt. Just rub on when your iron is cool and wipe off with a warm, wet cloth.

Reinvigorates Your Sponges 

Make your sponges come back to life by soaking in a solution of ¼ cup salt per quart of warm water. Soak overnight and your grungy mops and sponges are almost as good as new!

Keep Frost Off Your Car Windows  

This winter, keep your mirrors and windows frost-free by wiping them with a sponge dipped in saltwater and allowing them to dry. It’s convenient when you need to head out in the morning and don’t want to worry about dealing with frost on the car windows.

Deters Ants and Other Pests  

Keep pests at bay. Ants hate salt and will be discouraged from crossing the line if you put a line of salt in the doorway. If you’re spotting them in your home, you know what to do! Salt is a safer alternative to toxic pest control products that can harm your pets.

Neutralizes Odor

Garbage disposal smelling less than nice? Just sprinkle ½ cup salt down the drain and run some cold water. The salt will neutralize any odors and help get rid of anything that is stuck and causing them to smell. Salt also works to remove odors from sneakers. Sprinkle salt in the shoes, and wait 24 hours for the salt to absorb the odors and then shake the salt out.

Aleve a Toothache 

Rinse with it when you have a toothache. If your tooth is bothering you and you can’t get to the dentist right away, rinse your mouth with a cup full of warm water and a teaspoon of salt. It works to naturally relieve discomfort while treating inflammation.

Soak Your Sore Feet

Use it in a foot soak when dealing with ingrown toenails or inflammation. You can fill a basin with warm water, add your favorite essential oils, and then toss two tablespoons of salt into the water. Soak your feet for at least 15 minutes per day to get relief.

Clears Up Irritated Skin Including Eczema

Treat eczema with salt. You can add it to a bathtub full of warm water and then soak in it for at least 15 minutes. Its natural healing properties allow it to work wonders at clearing up the irritation and inflammation on your skin.

Help Clean Your Cutting Board

Use it to clean your cutting board. If you have a stained cutting board, sprinkling salt over it and then scrubbing away at it with dish soap will help you get it as clean as possible with less effort.

Brings Relief to a Sore Throat

Gargle with warm water and salt to soothe an aching sore throat. When you need relief, but nothing is helping, this old-fashioned approach can work wonders. It helps to clear up the infection, ultimately allowing you to get relief from the pain.

Brings Some Relief to Poison Ivy 

Get rid of poison ivy with salt. If you have poison ivy on your skin, soak some cotton balls in warm water mixed with salt and then place them on the irritated areas of your skin. It provides soothing relief and speeds up the healing process.

Helps You Remove Mold Easier 

Get rid of mold using a combo of lemon juice and salt. Add a ½ cup of lemon juice to a bowl with a tablespoon of salt, mix well, and then pour it over any mold spots. Place cotton balls on top and leave them there for 30-60 minutes before removing and wiping away the mold.

Freshen Your Toothbrush

Add it to your toothbrush to get rid of stains. After putting the toothpaste on your toothbrush, sprinkle a pinch of salt on top and gently brush your teeth. It helps remove those unwanted surface stains that often develop from coffee, soda, and other beverages and foods consumed.

How to Look Great During the Zombie Apocalypse

Let’s say it’s the zombie apocalypse, and you’re looking a little rough around the edges and need to fix up a bit.  (Or maybe it’s just the latest out of control inflationary affect on consumer goods that pushes you to find alternate ways to look good.)  Dining on a Dime, a frugal living cookbook and household tips book I was given as a Christmas gift years ago to the rescue!

This book goes beyond your normal stretch your food budget topics.  It includes a section called “Pretty for Pennies” that we’re going to explore today!

Let’s begin with essential oils, since a lot of the “recipes” call for them.  These recipes include: lip balms, aromatherapy lotions and creams, and many other personal care products. (For unscented products, simply leave out essential oil.)  The oils should be selected for the effect you wish to create. 

Relaxing: lavender, rose, sandalwood

Stimulating: peppermint, rosemary, eucalyptus, lemon

Uplifting: orange, jasmine, rosemary

Antiseptic: tea tree, eucalyptus, peppermint, lavender

Muscles Aches: eucalyptus, lavender, rosemary

Scented Bath Bubbles

2 cups unscented dish soap (Ivory works well)

10-15 drops of essential oil

Mix the ingredients and let stand for a week. Use ¼ cup per bath.

Herbal Foot Bath

Mix any of the following dried herbs and place in a small cheesecloth square and secure with a string.  Fill a dishpan with warm water and add herbs.  Essential oils can be added to the water instead if you wish.

Lavender

Rosemary

Sage

Leg Wax

1 cup sugar

2 Tbsp lemon juice

2 Tbsp water

Mix all ingredients in a small saucepan and boil 8-15 minutes (to approximately 250*).  Then pour into a container and let it cool down. After cooling, keep refrigerated.  When you’re ready to use, heat in the microwave till warm.  BE CAREFUL TO TEST WITH YOUR HAND! Lightly powder the area you want to wax.  Pull the skin taut and using a popsicle stick or tongue depressor spread the wax.  Cover with cotton strips. Pull off quickly against the grain.

*Cotton t shirts torn into strips work well here and can be reused by rinsing well.

After Shave

½ cup rubbing alcohol

½ cup water

1 tsp cologne

Mix and store in an airtight container.

Toothpaste

1 tsp baking soda

2 drops peppermint oil

Mix in a small bowl and add drops of water to create a paste. Dip toothbrush in toothpaste.

Antiseptic Hand Cleaner

4 Tbsp liquid soap (Ivory)

20 drops of tea tree oil

Water

In a spray bottle, mix the soap and the tea tree oil. Then fill the bottle with water.  Shake to mix.

Lip Balm

1 tsp beeswax beads

1 tsp sunflower oil

1 tsp coconut oil

1 capsule Vitamin E

2-5 drops flavoring (optional) peppermint, cherry, grape, vanilla, orange

Heat oils and beeswax just until melted.  Add the rest of the ingredients.  Mix well.  Use a dropper to place in small jars.

So, after dancing your zombie butt off all night, you might need a heating pad:

Heating Pad

Dry rice

Herbs or essential oils

Tube sock

Mix the herbs or the oils into the dry rice and let sit for a day or two before filling the sock—so plan ahead!  Fill the sock and either sew the top closed or knot it closed.

To use: Spray lightly with water.  (This prevents the pad from burning, so be sure to spray before microwaving.) Place in microwave for 30 seconds to one minute.  Use to soothe sore muscles.

Use Your Noodle!

Summer is the perfect time to hit the dollar stores and load up on pool noodles! They are not just for toddlers in pools any more! They have many uses outside the pool–so stock up and use them everywhere!

Crutches: Noodles can be used to soften the hand and arm pit guides. Simply cut to the proper length and then make a slit.

Kneeling Pad: Noodles can used to kneel on in the garden. Cut them in pieces to increase the usage from one noodle.

Fill a bucket with water: If your sink is too shallow for a proper bucket to fit in, use a noodle.

Create a floating drink bucket for a pool: You’ll need a plastic bin, a noodle and yarn. Cut 2 sections of the noodle in the length of the bin and 2 the width of the bin. Thread the yarn through the pieces and tie.

Hold your plants up!

Paintbrush holder: Cut pieces of the noodle to fit on one or more sides of a paint bucket.

Make a cake-pop stand.

Use a noodle to hang items in the garage. Cut one side flat and glue to the wall. Cut slits into the noodle to create the hanging openings.

Make a disposable squeegee. You’ll need something with a handle–like a rake.

Make your outdoor furniture more comfortable.

Make Halloween witch legs.

Create backyard fun! Bend the pool noodle into a racket shape, cover the noodle with a mesh bag (like fruit comes in) and duct tape the bottom. Use a water balloon to bat back and forth.

Create a camping bathroom. You’ll need a bucket, a noodle, and a plastic bag.

DIY: How to Make a Braided Rug

If you’re like me, you hate to waste anything…translation: I might be able to use THIS some day!  Well, today’s the day!  You can easily and fairly quickly make braided rugs for your home using fabric scraps, old clothing, sheets, even rope, jute or sisal. 

You can make either a continuous braided rug—generally round or oval shape

or you can make a square or rectangular one. 

Let’s start with the continuous braided rug first.  Begin by cutting your fabrics into 2-inch wide strips.  Depending on the pattern or look you want, sew the ends together to form long, long strips which you then roll into balls—like yarn. You’ll need 3 balls. 

To start the braid, sew the ends of the 3 balls together (this can all be done by hand—no sewing machine required) in a “T” shape.

Fold the ends over to begin braiding.  At this point, I use a binder clip (a clothespin will do) to attach the braid to a clip board or table if you like.  Continue braiding the 3 balls until you reach the end of the fabric balls.  At this point you can attach more fabric to each ball end or you can sew the three ends together and begin a new braid using different colors. 

When you think you have enough braid or braids to make your rug, you can begin forming it. For a round rug, form a circle with the end of the braid and stitch in place by hand.  (This can be sewed on a sewing machine, but I find that method more cumbersome when the rug gets a little larger.) Continue coiling the braid around the center and stitching in place.  When you come to the end of the braid, if your rug is the size you want, tuck the ends of the braid under the rug and stitch in place. If it’s not large enough yet, simply sew another braid to the end of the first one and continue coiling and sewing.

If you’d like an oval rug, you’ll start with a straight length of braid as the center and coil the remaining braid around that.

For a square or rectangular rug, make a bunch of braids which are similar in length. Lay the braids side-by-side, pin them together and sew them to keep them in place.  To make a tasseled look, leave a uniform length of each fabric free as you start the make the braids. Hand stitch those pieces together at that point and begin to make the braids.  Do not braid the entire length of fabrics–stop braiding leaving the exact same length as you did at the beginning.

Braided rugs are very versatile, and different looks can be achieved using different materials.  This rug utilizes fabric and rope, and uses glue instead of sewing the coils together.

If you find this is a craft you enjoy, you can also buy braiding helpers which fold the fabric as you braid to ensure there are no frayed edges or threads showing on your braids.

American Pride

The Fourth of July is coming up and there are relatively easy and cheap ways to display your American pride!

Tin Can Windsocks

Save some tin cans and spray paint them blue.  Punch 2 holes in the top of the cans and string twine through the holes.  Cut a star shape out of plastic lid (cool whip or butter dish) and use that to stencil the white stars.  Then add tissue paper or construction paper strips in red and white fastened to the inside of the can.

Paper Chain Railing

Cut some red and blue strips out of construction paper to make chains to fasten on a white fence or deck railing.

Doily Banner

For this banner you’ll need doilies from the Dollar Store, spray paint, modpodge and string or twine.  Keep a third of the doilies the original size.  Trim another third of the doilies to be the “middle” size and trim the remaining doilies to the smallest size.  Paint the largest doilies red, leave the middle size white and paint the smallest ones blue.  When they’re dry, cut them in half carefully and modpodge the 3 layers together.  When they’re dry, run the string or twine through the doily holes to string the banner up.  

Clothespin Wreath

Spray paint clothespins red, white and blue and when dry, clamp them onto a wire wreath.  Attach foam stars with glue.  Everything but the spray paint can be obtained from the Dollar Tree.

Painted Lawn Stars

Make a cardboard template and use construction marking paint to make stars on your lawn.  The idea comes from The Concrete Cottage and listed below are answers to frequently asked questions about this project:

Update: This is now my most viewed post and it’s garnered many questions. I’d like to go ahead and answer the three most asked questions here. 
First… This paint is specifically made for using on grass and it will NOT kill the grass. I can personally attest to that fact.
Second… The paint is construction marking paint, it’s intended to be sprayed upside down, and can be found at any home improvement store
Third… It dries very quickly and is permanent. It only comes off as the grass grows out and you mow it off.

Balloon Flag

Easy idea for a decoration and a game!  Pegboard makes this easy to do, but the balloons can be taped to any board or wall you have.  (You may not want to use the balloons for darts later on if you are using the side of your house or garage…lol)

The ideas are endless…so let your inner Patriot out and celebrate what’s GREAT about America!!!

Do it Yourself: Chia Pets

While these technically are not Chia Pets, you get the general look using simple grass seed! They are a little messy to make, so be sure to put down newspaper over your work space!

Let’s get started! You’ll need the following materials:

  • One pair knee-high nylons
  • Soil
  • Grass seed
  • Wide mouth drinking glass
  • Spoon
  • Googly eyes
  • Waterproof glue, such as Gorilla Glue
  • Small plastic or Styrofoam cups, such as Dixie cups
  • Paint pens
  • Felt or foam pieces in various colors
  • Small clay pots
  • Small bowl
Step 1

STEP 1:

Stretch one nylon stocking over the mouth of a wide drinking glass to make pouring the grass seed and soil into the nylon easier. Use a spoon to sprinkle a small handful of grass seed into the stocking.

Step 2

STEP 2:

Pour in one to two handfuls of soil on top of the grass seed, pushing the soil all the way down to the toe. Take the nylon off of the drinking glass, and knot the nylon close to the soil to keep the soil in place. This is your pet’s head.

Step 3

STEP 3:

With the length of leftover nylon hanging downward, glue googly eyes on to the face area and add other facial features if desired. Let the glue dry completely.

Step 4

STEP 4:

Fill the bowl with water and invert the pet’s head into it for several minutes. This wets the soil and grass seed and gets the seed growing.

Step 5

STEP 5:

Insert a small paper cup into a clay pot and fill the cup with water, Flip the pet’s head right side up and insert the loose end of the nylon into the cup. The nylon will act as a wick to pull water up and keep your grass seed watered.

DIY “chia” pets

Place the little guy where he will get sunlight, and within a week watch for the seed “hair” to sprout!

Source: Garden Therapy: Gardening With Kids