Happy National Iowa Day!

If you’re planning a trip to Iowa, Trip Advisor says these places are among the MUST SEE places in Iowa!

Maquoketa Caves State Park

Unfortunately, all modern facilities in the park, including the shower building have closed for the season they will reopen MAY 2026. Frost free hydrants remain on in the campground. Pit toilet is available at the youth group parking lot.

Field of Dreams Movie Site

Is this Heaven? No, it’s Iowa. A place of fertile soil, traditional values and simple pleasure. And, in Dyersville, Iowa, at the century-old Lansing family farm with its quaint, and oh-so-recognizable house, baseball still ranks as a favorite pastime for all ages. What better place to carve a baseball diamond from a corn field and to make a movie about pursuing one’s dream, no matter how much effort it takes? From tours of the inside of the iconic Field of Dreams Farm House, to our retail store, to our concessions stand, there certainly is plenty to do at the place dreams come true!

National Mississippi River Museum & Aquarium

Part aquarium, part museum, part science center, the National Mississippi River Museum & Aquarium inspires stewardship by creating educational experiences where history and rivers come alive! Our 14-acre campus on the banks of the Mississippi River features two separate two-story buildings and an expansive outdoor plaza. The Museum & Aquarium is home to over 200 species of animals and thousands of historic artifacts.

Fenelon Place Elevator Co.

Historic cable car. Also known as the Fourth Street Elevator, this funicular railway has been called “the world’s steepest, shortest scenic railway.” Great view of downtown Dubuque, the Mississippi River and 3 states. Buses should go to the bottom of the bluff. Please use 4th and Bluff Streets for GPS. Narrow streets with parking on both sides at the top of the bluff.

Pappajohn Sculpture Park

Open to visitors since September 2009, the John and Mary Pappajohn Sculpture Park features artwork by 22 of the world’s most celebrated artists. The 4.4 Acre park, located within a major crossroads of the urban grid, creates a pedestrian friendly entranceway to downtown Des Moines. This accessible setting, coupled with the skilled landscape design and caliber of the art, makes it unlike any other sculpture park in the United States. The Pappajohns’ contribution of 28 works for the park is the most significant donation of artwork ever made to the Des Moines Art Center.

SOURCE: TRIPADVISOR.COM

What Shall We Bake Today?

In keeping with our Valentine themed offerings this month, I present Red Velvet Brownies!

Ingredients

Brownies:

Cooking spray

1 (4-oz.) bittersweet chocolate baking bar, chopped

3/4 cup (6 oz.) salted butter

1 1/2 cups granulated sugar

4 large eggs

1 1/4 cups all-purpose flour

1 tsp. baking powder

1/4 tsp. table salt

1 (1-oz.) bottle red liquid food coloring

2 tsp. vanilla extract

Cream Cheese Frosting:

1 (8-oz.) pkg. cream cheese, softened

1/2 cup (4 oz.) salted butter, softened

6 cups powdered sugar

2 tsp. vanilla extract

Directions

Prepare the oven and baking pan:

Preheat oven to 350°F.  Lightly grease bottom and sides of a 9-inch square baking pan with cooking spray; line bottom and sides with parchment paper, allowing 2 to 3 inches to extend over sides; lightly grease (with cooking spray) parchment.

Melt chocolate:

Microwave chocolate and butter in a large microwavable bowl on HIGH until melted and smooth, 1 1/2 to 2 minutes, stirring at 30-second intervals. Whisk in sugar; add eggs, 1 at a time, whisking just until blended after each addition.

Make batter:

Whisk together flour, baking powder, and salt in a medium bowl. Gently stir flour mixture, food coloring, and vanilla into chocolate mixture, stirring just until well incorporated.

Bake Brownies:

Pour batter into prepared pan. Bake in preheated oven until a wooden pick inserted in center comes out with a few moist crumbs, 25 to 30 minutes. Transfer to a wire rack, and let cool completely, about 2 hours.

While Brownies cool, prepare the Cream Cheese Frosting:

Beat cream cheese and softened butter in bowl of a heavy-duty stand mixer fitted with paddle attachment on medium speed until creamy. Reduce speed to low, and gradually beat in powdered sugar until blended. Beat in vanilla. Increase speed to medium-high, and beat until light and fluffy, about 1 to 2 minutes.

Frost brownies:

Using a piping bag fitted with a large star tip, pipe frosting on top of brownies or spread frosting over brownies. Cut brownies into squares.

ENJOY!

Arizona State Motto

Arizona uses ‘Ditat Deus’ as its official motto. A state motto is a phrase chosen to represent important values or ideas. Arizona’s motto has remained the same since territorial days in 1863. The motto appears on Arizona’s state seal. You see it on government documents, official letterhead, and state buildings. The seal shows mountains, a reservoir, irrigated fields, and a miner with the motto above. Arizona law recognizes this as the official state motto. The phrase survived all the changes to the seal design over the years. It stayed constant while other elements of the seal were added or removed.

The English translation is God Enriches. The Latin word ‘ditat’ means ‘enriches’ or ‘makes rich.’ The word ‘Deus’ means ‘God.’ Put them together and you get a simple two-word phrase. Some scholars think the phrase comes from Genesis 14:23 in the Vulgate Bible. Abraham refuses help from the king of Sodom and relies on God’s blessings instead. The exact Latin words don’t appear in scripture, but the concept matches. The broader meaning points to Arizona’s natural wealth. Copper mines, agriculture in the desert, and natural resources like the Grand Canyon all fit the idea. Many residents see the motto as recognition of blessings that made Arizona prosperous despite harsh conditions.

Richard Cunningham McCormick created ‘Ditat Deus’ in 1863 for the Arizona territorial seal. President Abraham Lincoln had appointed McCormick as Secretary of Arizona Territory that same year. McCormick was a writer and journalist who brought a printing press with him when he moved west.

The motto appeared on the territorial seal from the very beginning. The seal showed miners, mountains, and mining tools along with the Latin phrase. Critics made fun of the first design and said it looked like a baking soda label. The seal changed many times over the years, with elements added and removed, but the motto stayed the same.

Arizona became the 48th state on February 14, 1912. The territorial motto became the official state motto that year. The phrase had already been in use for 49 years by the time Arizona gained statehood.

Birds That Mate for Life: Part 1

Just Birding lists these 8 birds as top picks for Birds That Mate for Life.

Bald Eagle

Bald eagle pairs are the power couples of the avian world. Found in North America, these birds of prey have a large fan base. People get excited when they see them in the wild and love photographing them. They are the national bird of the USA, and their noble appearance suggests that they are quite aware of their dignified status symbol. Male and females are clothing coordinated with matching brown plumage, stunning white heads, and yellow beaks.

They play and work hard together to achieve the mutual goals of living life to the fullest and raising successful offspring. When it comes to romance, bald eagle pairs really fall for each other by putting on stellar courtship performances that involve flying up to a high altitude and locking talons before tumbling in a series of cartwheels in mid-air. Bald eagles often live solitary lives throughout the year but always return to the same mate every breeding season. They remain faithful to their partners except in rare instances of impotency. They often return to the same nest every year, adding to the existing structure each time. Their nests are the largest of any North American bird and one of the largest in the world. Together, pairs raise one to three chicks per nest.

 Mute Swan (pictured above)

While all swans mate for life, mute swans are the picture of classic romance. You’ve probably seen them in photographs, movies or your neighborhood pond. Courting pairs are famous for curving their long necks toward each other and creating aheart shape, as if communicating, “I love you.” They also lift their wings and gracefully bow to one another. Native to North Africa, Europe, and Asia but widely introduced to North America, southern Africa, and Australia, mute swans are beautiful birds with white plumage and orange beaks that are marked with a black knob.

It’s been said that a mute swan will grieve if its mate dies. Some experts suggest that birds don’t have emotions as we humans do. However, there is a report from a Russian zoo in 2015 of a mute swan whodied of a broken heart shortly after his mate was killed. They are called mute swans because they are not as vocal as other swan breeds, but when it comes to courting and defending their loved ones, they know how to be heard with hissing, grunting and honking. Pairs usually return to the same nest every year and share in the care of five to seven eggs.

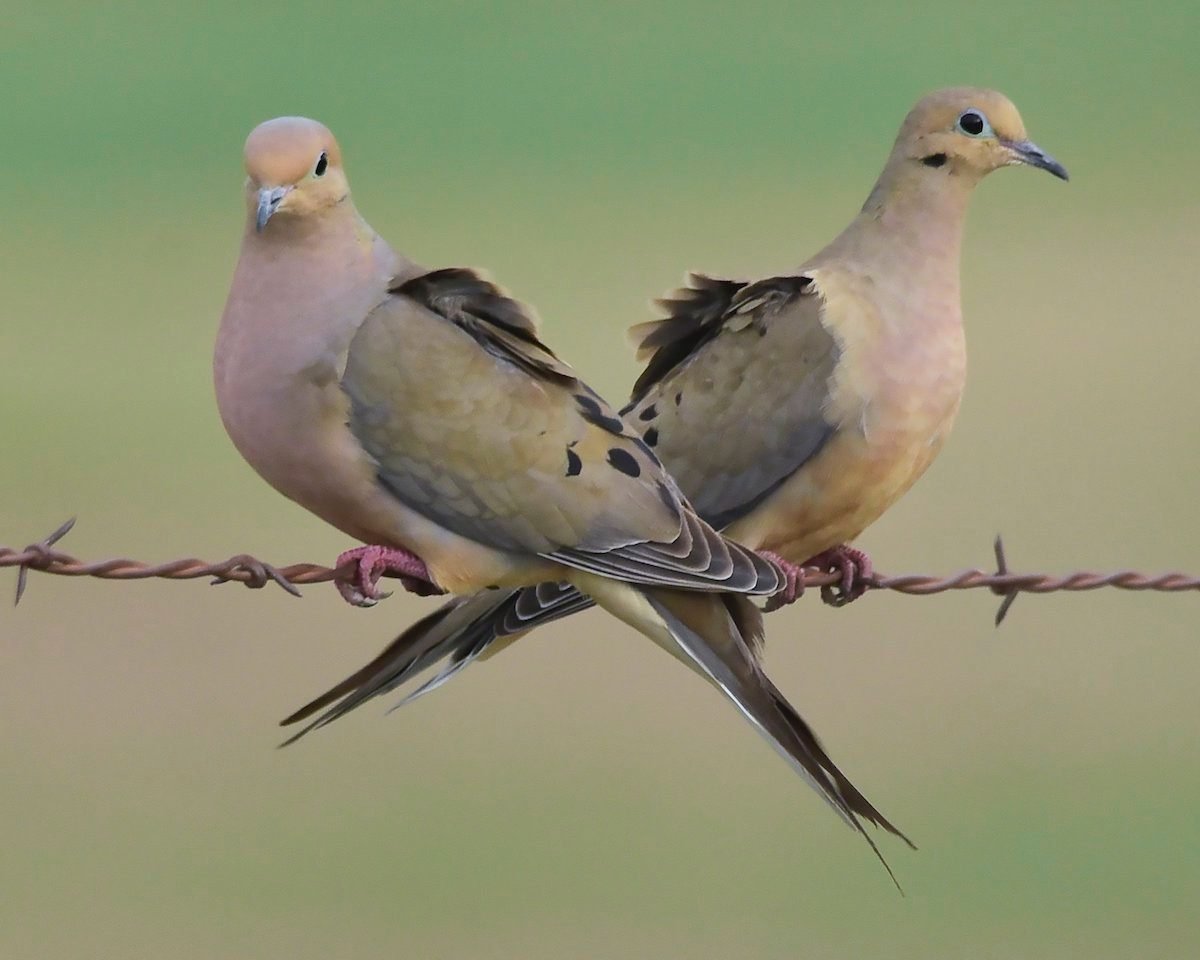
Mourning Dove a.k.a Turtle Dove

You’ve seen those couples who are inseparable. Where you see one, you’ll see the other. The mourning doves are those “lovey-dovey” (pun totally intended) couples of the bird world. Along with other doves, they are often seen as symbols of both love and peace, two of the most important traits you need for a successful relationship. These sweet birds are light tan and gray with long, pointed tails and wings that are marked with black spots. The appearance of their plump bodies, short legs, and small beak make them easily recognized. If alarmed, they fly off quickly with their wings making a whistling sound.

Mourning doves get their name from their “mournful” cooing call. Most of the time, this is the male making the call to woo the female. He will also fluff up his feathers and bob his head when trying to win her over. Once the female accepts the male’s advances, the male will then bring her twigs to build a nest. After the female lays two eggs, both she and her partner will take turns incubating and feeding them.

Scarlet Macaw

Found in family groups in the rainforests of South America, scarlet macaws are known for being strikingly colorful birds. They sport red, blue and yellow feathers. They are noisy, funny and intelligent, and they are devoted lovers and parents. Not only do they mate for life, but scarlet macaws are attentive to one another. They share food, lick each other’s faces, and enjoy mutual preening. Other birds that mate for life sometimes are known to live separately until the breeding season, but these macaws value family life and can always be seen hanging out with one another.

When the kids come along, they usually raise two to four chicks at a time in a nest that they build in a tree hollow. Both Mom and Dad take care of their young, from incubating the eggs to feeding the nestlings. Scarlet macaws take parenting seriously and will not mate again until their current juveniles are able to live independently, which could be up to two years.

SOURCE: JUSTBIRDING.COM  DREW HAINES

DIY: Romantic Valentine’s Gift

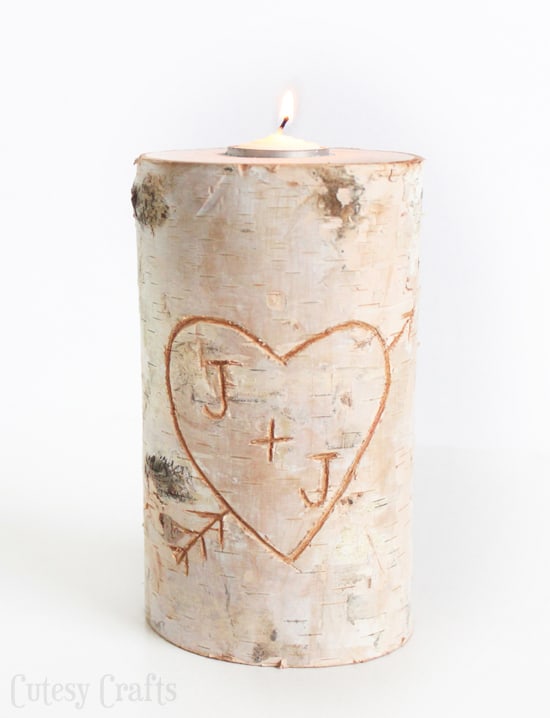
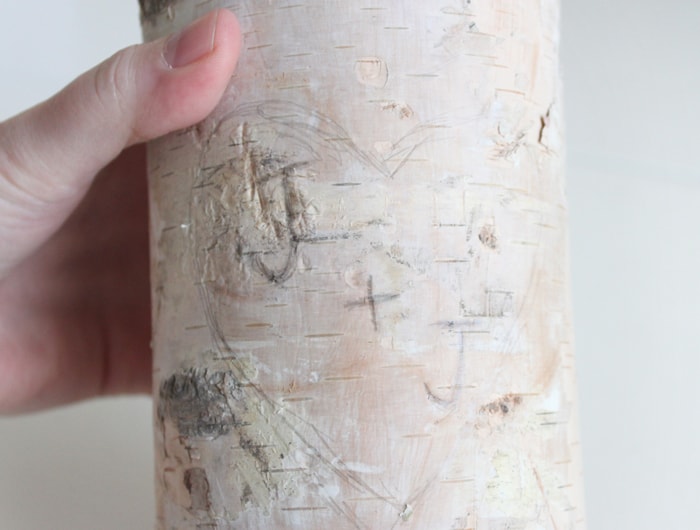
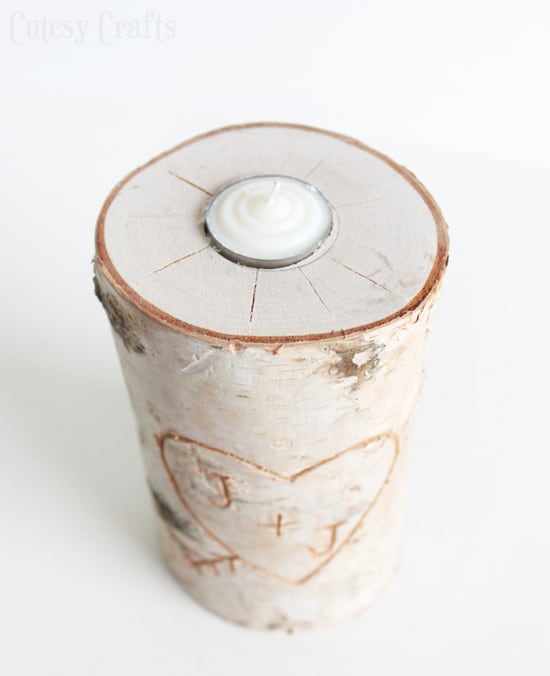
I saw this DIY tutorial for a birch log candle holder and I fell in love!  It does take a little bit of skill with a drill (my husband will handle that part), but it really is a clever, romantic Valentine’s gift.

Items you‘ll need:

Birch pillar from the craft store OR a piece of birch log you cut yourself

Tealight candle

Colored pencil – light brown

Pencil

Knife

Drill

Drill bit – 1 3/8″ spade bit or slightly larger

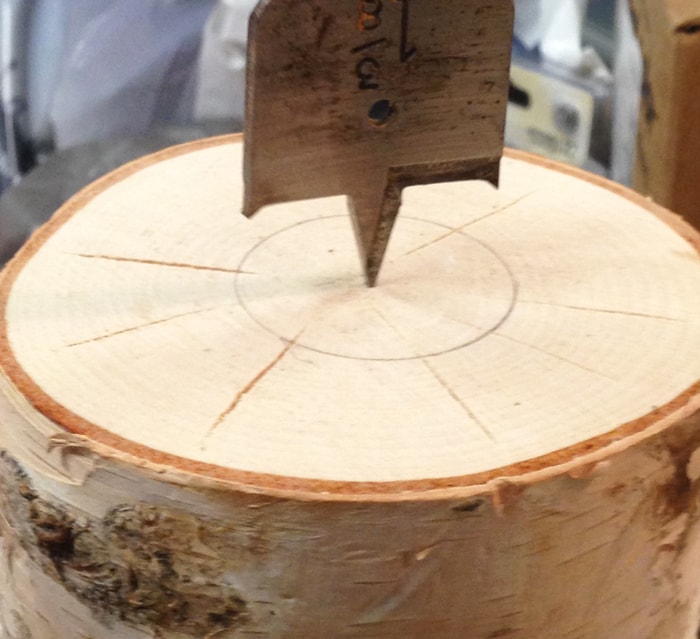
Start by marking out the size of your candle and drilling a hole in the top of your birch pillar. Trace the bottom of the tealight in the center of the birch log, then place the bit down in the middle of it.

With this kind of bit, you might need to rock the drill back and forth a little while drilling to get a good hole.

Sketch the design you want on the front of your birch pillar.  It doesn’t need to be perfect. You want it to look like it was carved spontaneously into the side of a tree.

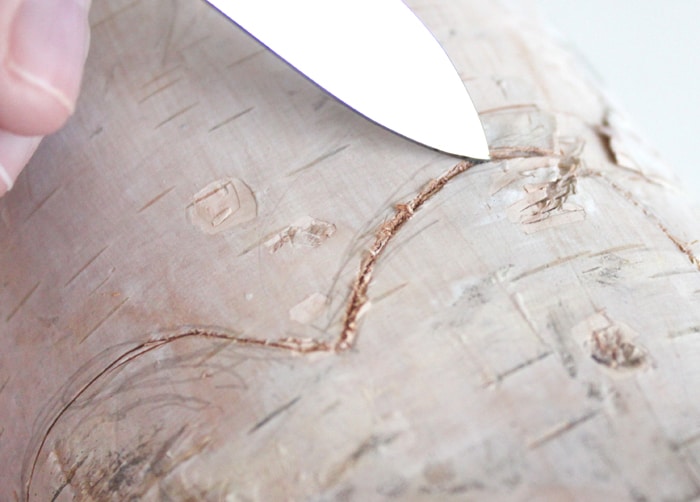
Carve your design with an old, dirty pocket knife. You know, to make it as authentic as possible. But really, if you have some kind of special carving knife, that would probably be even better.

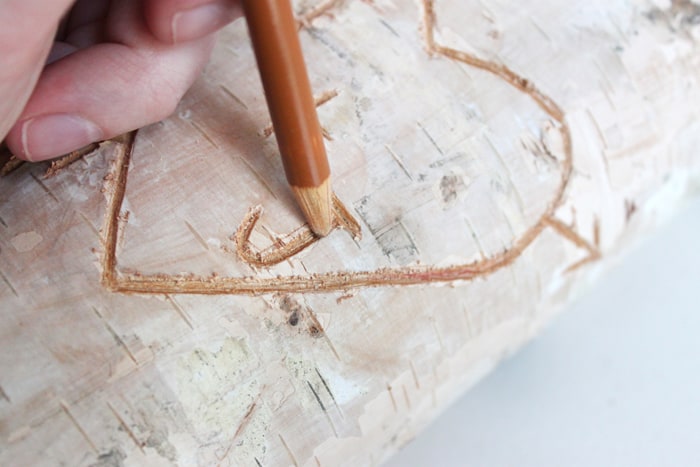
I wanted the design to “pop” a little bit more from far away, so I shaded it in with a light brown (hazel) colored pencil. Not 100% necessary, but I think it made it look better.

Put a tealight candle in the top of your birch candle holder and you’re done!

SOURCE: DIYCANDY.COM

A Tisket, a Tasket…

I found an article on raisingteenstoday.com that shows quite a few do-it-yourself Valentine’s gift baskets! 

Love You More Than Chocolate

How sweet and simple is this idea? Simply fill a red or pink basket or bucket with all their favorite sweet treats, add festive ribbon or string and a crazy cute gift tag like this one and you’ll have an inexpensive, yet adorable gift that says “I love you.” 

I Love You from the “Bottom” of My Heart

if you really want to get creative, roll underwear in a gift basket or bucket to look like a bouquet of flowers and pop in a few chocolate roses and heart-shaped decorations for a Valentine’s Day gift that’s sure to put a smile on their face. 

I’m NUTS About You

Such a cute and creative way to show ’em how much you care. Fill a simple bucket or basket with their favorite nutty candy bars and peanutty snacks and add a cute printable tag like this one for a sweet (and slightly nutty) gift they’ll always remember.

Valentine’s Day Spa Basket

Pamper your favorite Valentine with this “Valentine’s Day Spa Basket!” Head over to the grocery store, Dollar Store, craft store or the Target dollar section and buy her favorite lotions, soap, candle, bath salt and loofah sponge. Any bestie, sweetie, tween, teen or mom would love this basket. (This basket can easily be modified for guys, too!)

I Won the Lottery When I Met You

Looking for a fun, creative idea that’s out of the norm? Who could resist this “I Won the Lottery When I Met You” Valentine’s basket? Decorate any box or fill a basket with lottery tickets and a few Valentine’s Day decor items for a basket that looks like a million bucks!

SOURCE: RAISINGTEENSTODAY.COM

What Shall We Bake Today?

Our first baked item for the month is a Heart-Shaped Cake!

Ingredients

Cake:

1/2 cup bittersweet chocolate chips (3 oz.)

1/3 cup boiling water

3/4 cup (6 oz.) salted butter, softened, plus more for greasing pans

1 1/2 cups granulated sugar

3 large eggs, separated

1 tsp. vanilla extract

1 1/2 cups (about 6 3/8 oz.) all-purpose flour, plus more for pans

3 Tbsp. unsweetened cocoa

3/4 tsp. baking soda

3/4 tsp. table salt

3/4 cup whole buttermilk

Frosting:

3/4 cup (6 oz.) salted butter, softened

4 1/2 cups (about 18 oz.) powdered sugar

1 tsp. vanilla extract

1/4 tsp. table salt

1/3 cup finely chopped fresh strawberries (from about 3 large strawberries)

1 to 2 drops soft pink food coloring gel

Garnishes:

Pink sanding sugar (optional)

Sliced strawberries

Directions

Prepare the Cake

Prepare oven and cake pans:

Preheat oven to 350°F. Grease (with butter) and flour 1 (8-inch) round cake pan. Line bottom of pan with parchment paper; lightly grease parchment paper with butter. Grease (with butter) and flour 1 (8-inch) square cake pan; line bottom of pan with parchment paper; lightly grease parchment paper with butter. Set aside.

Melt chocolate:

Place chocolate chips in a small heatproof bowl; pour boiling water over chocolate. Whisk until chocolate is melted and smooth. Let stand until cooled to room temperature, about 15 minutes.

Make Cake batter:

Beat butter with a stand mixer fitted with a paddle attachment on medium speed until creamy, about 1 minute. Gradually add granulated sugar, beating until light and fluffy, 3 to 4 minutes. Add egg yolks, 1 at a time, beating just until blended after each addition. Add vanilla and cooled melted chocolate, beating until blended. Whisk together flour, cocoa, baking soda, and salt in a separate bowl. Add flour mixture to butter mixture alternately with buttermilk, beginning and ending with flour mixture, beating on low speed until just blended after each addition.

Add egg whites to batter:

Beat egg whites in a separate bowl with an electric mixer on medium speed until soft peaks form, about 1 1/2 minutes.  Gently fold egg whites into batter. Pour batter evenly into prepared pans.

Bake Cake:

Bake in preheated oven until a wooden pick inserted in centers of cake layers comes out clean, about 25 minutes.

Cool in pans on wire racks 10 minutes. Remove cake layers from pans; remove parchment paper, and let cool completely on wire racks, about 1 hour.

Prepare the Frosting

Beat butter with a stand mixer fitted with a paddle attachment on medium speed until creamy, about 1 minute. Gradually add powdered sugar, vanilla, salt, and strawberries, beating on medium speed until mixture is fluffy, about 2 minutes. Beat in desired amount of soft pink food coloring gel until desired color is reached.

Assemble the Cake

Shape heart from Cake layers:

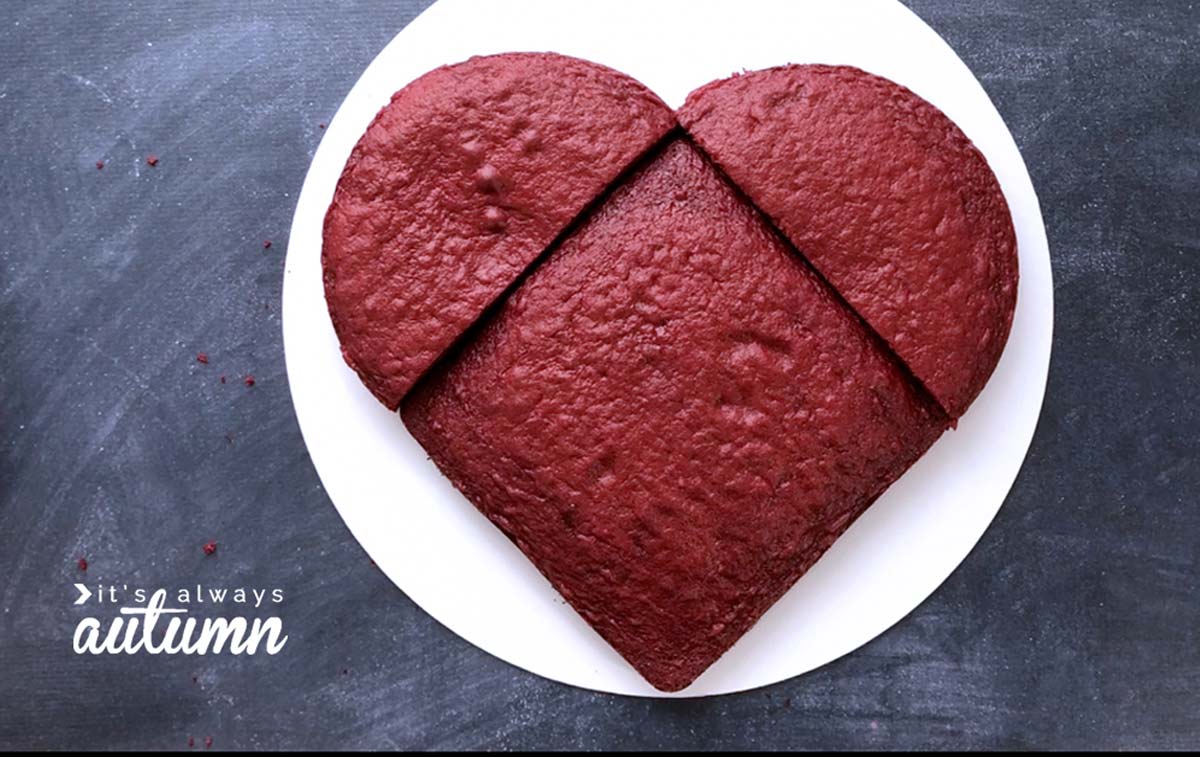
Place the square layer on a serving platter in a diamond position. Cut round cake in half crosswise, creating 2 perfect half-moon shapes. Position halves against the 2 top angles of the square, forming a heart shape.

Decorate Cake:

    Spread Frosting over top and sides of cake, and sprinkle with sanding sugar, if desired.

    Arrange strawberry slices around top edge of cake.

    ENJOY!

    Happy National Texas Day!

    If you’re planning on visiting Texas, Tripadvisor recommends these “don’t miss” attractions!

    San Antonio River Walk

    Also known as Paseo del Rio, this 15-mile-long river walk is a must-do in San Antonio. Opt for a self-guided walking or bike tour of the riverside paths, lined with beautiful cypress trees, shops, museums, hotels and of course, Tex-Mex restaurants. But one of the best ways to experience the River Walk is on a hop-on, hop-off cruise, which glides past iconic spots like the Arneson River Theatre, Marriage Island, and the San Antonio Museum of Art. Visit during festivals and holidays like St Patrick’s Day and Christmas for exciting river parades and spectacular light illuminations.

    Space Center Houston

    Located in the heart of NASA’s spaceflight program, Space Center Houston is a must-visit for fans of space exploration. With more than 400 space-related artefacts and numerous interactive exhibitions, you can easily spend a whole day learning about NASA’s history and current work. Be sure to hop on the tram tour too, which takes you around the real site of the Johnson Space Center, including the original Mission Control room and a behind-the-scenes look at the astronaut training facilities. You might want to join VIP tours by NASA experts to gain a deeper understanding and inside knowledge of the center.

    The Alamo

    Established in 1718 as Mission San Antonio de Valero, for over 300 years the former mission now known as the Alamo has been a crossroads of history. Having existed under six flags of independent nations and served as a garrison for five different armies, the Alamo has a rich history and a heritage to inspire Texans and people around the world. Although the Alamo is best known as the site of the 1836 Battle of the Alamo, all 300 years of Alamo history are vital to our story.

    Natural Bridge Caverns

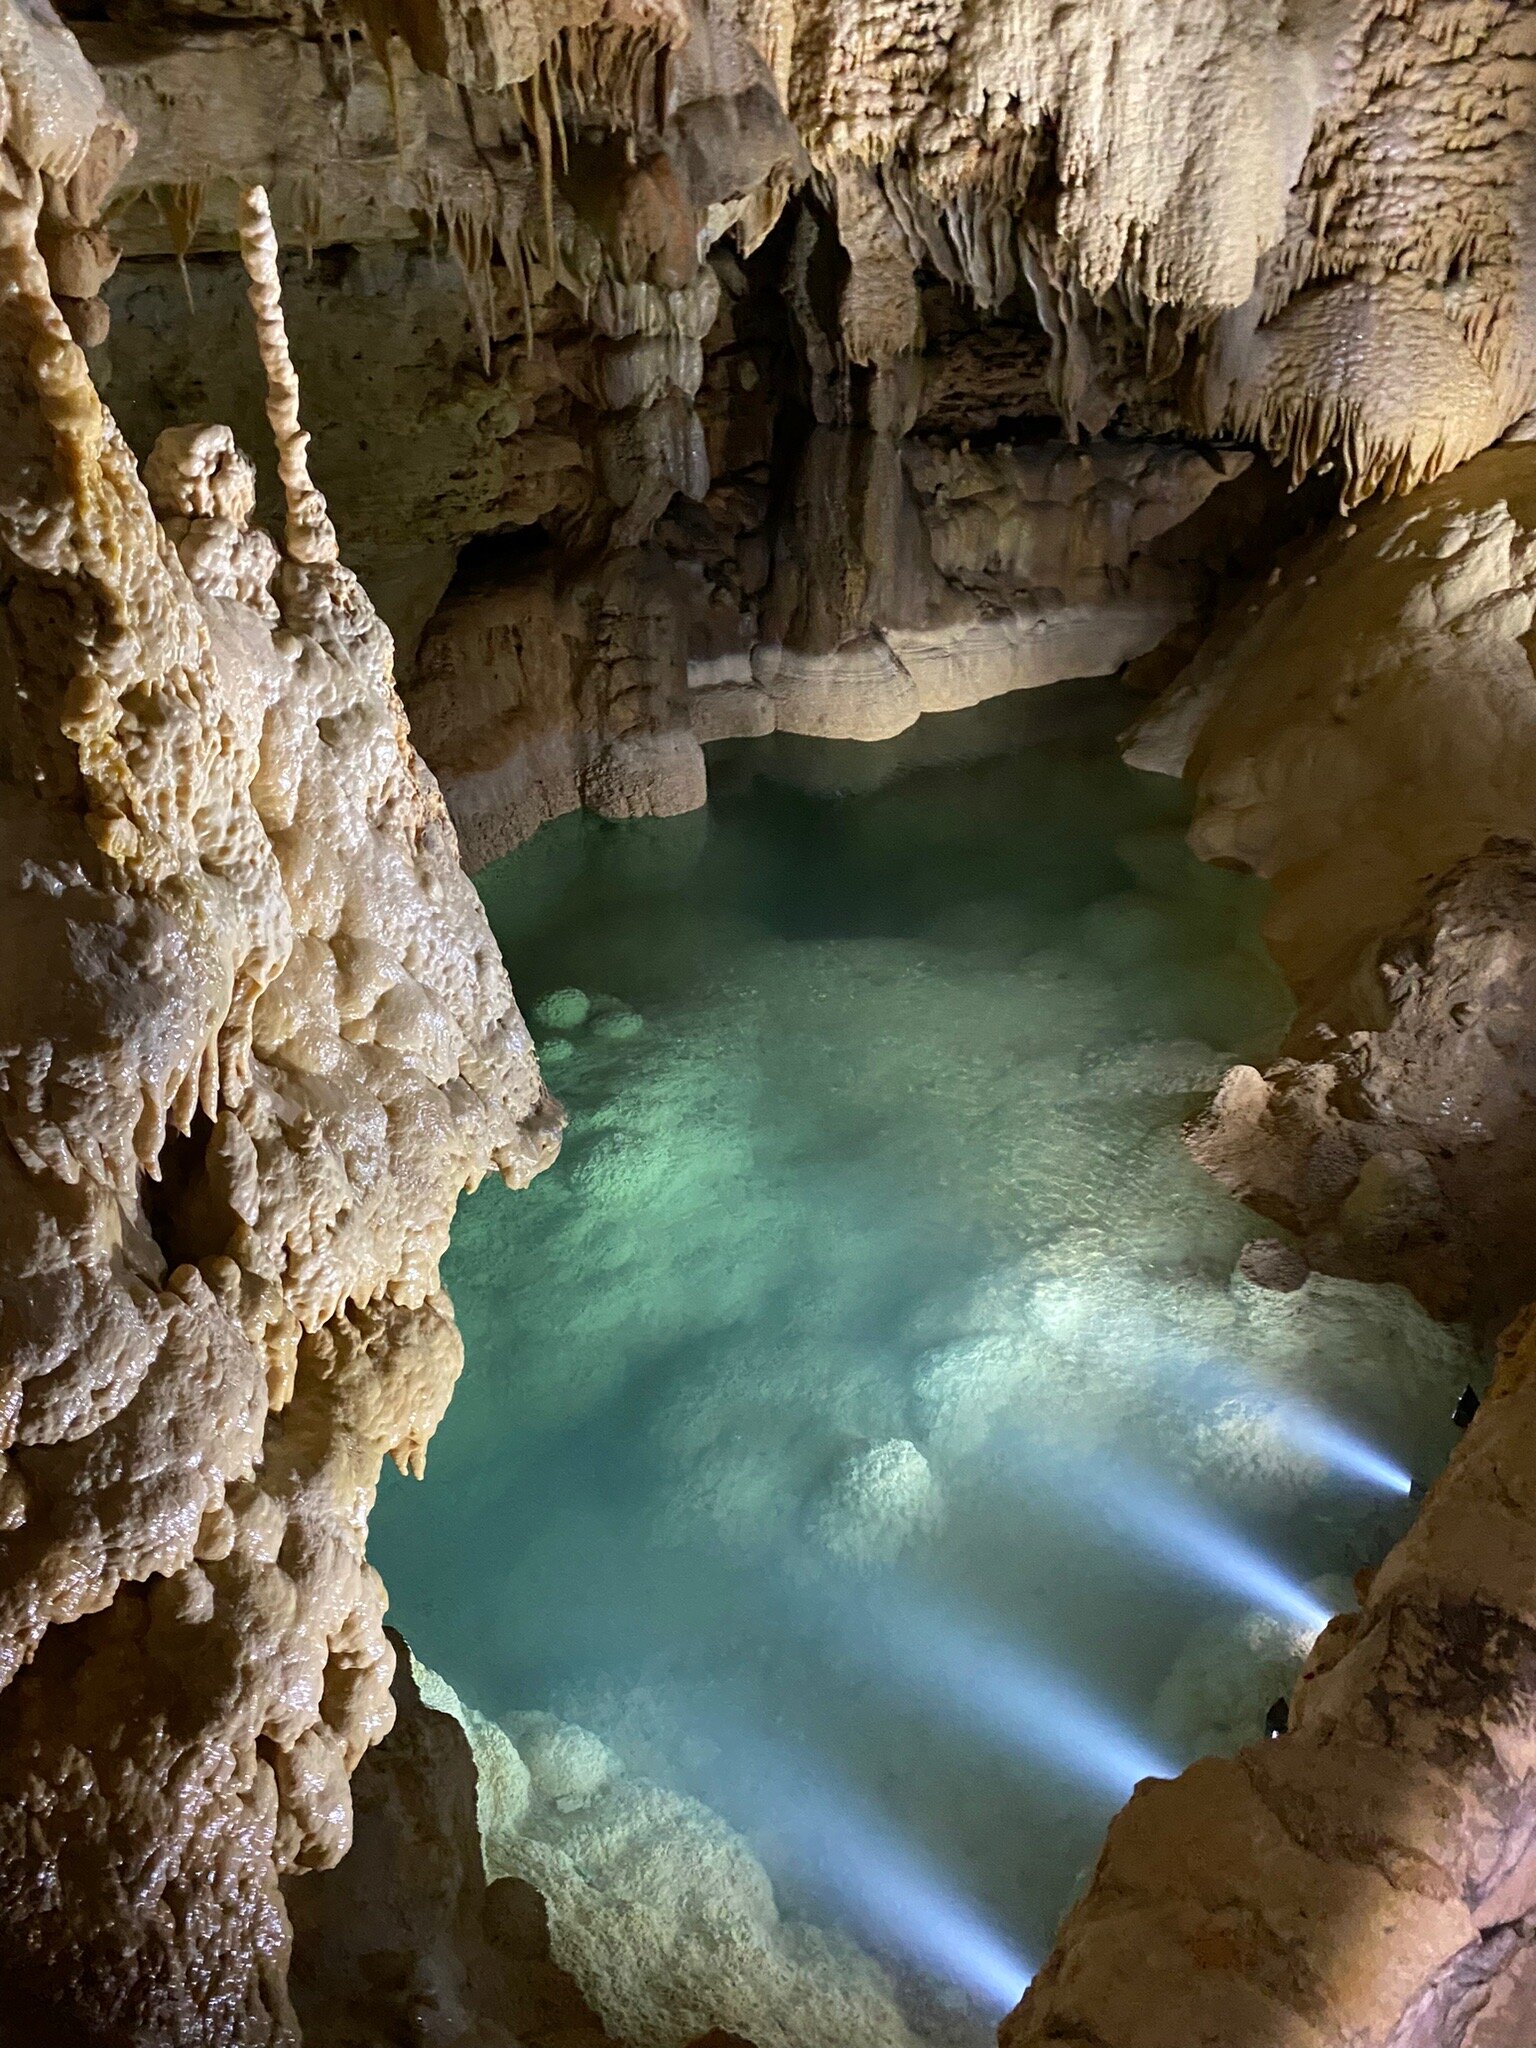
    Natural Bridge Caverns is one of Texas’ largest underground attractions that is best explored on a guided tour. The Discovery Tour takes you through the most spectacular part of the caverns 180 feet underground, whilst the Hidden Passages tour shows you a system of huge underground chambers—or experience both on a combo tour. Otherwise, navigate the outdoor Twisted Trails rope course, find your way out of the AMAZEn’ Ranch Roundup maze, and pan for fossils at the Mining Company.

    The Dallas World Aquarium

    The adventure at The Dallas World Aquarium begins at the top of the rainforest exhibit, where exotic birds, such as Cocks-of-the-rock and many species of toucans, can be seen. Lounging around are Two-toed and Three-toed sloths. Endangered animals, such as Orinoco crocodiles, Giant river otters, Antillean manatees and several species of monkeys are part of the many conservation projects. The aquarium portion displays interesting marine life, including Japanese crabs, jellyfish, Leafy, Weedy and Ribbon seadragons. Black-footed and Blue penguins can be seen swimming as guests enjoy the outdoor South Africa exhibit.

    The Texas State Capital

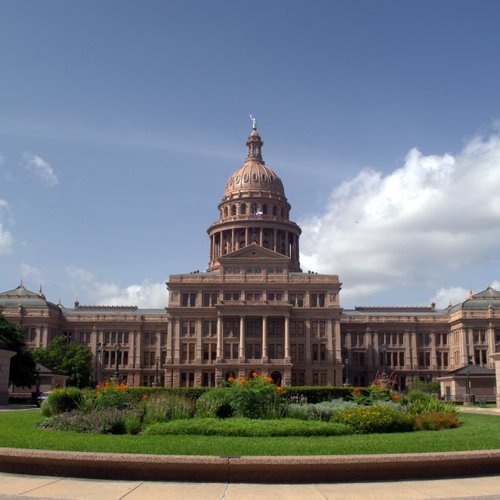
    If it’s in Texas, it must be bigger and better. That is the motto that architects followed with the Capitol Building in Austin. At one time, it was the tallest capitol building in the nation. Others might be taller now, but this is still a beautiful building that shows off many of the natural resources which are so prevalent in Texas, such as limestone and the landscapes.

    SOURCE: TRIPADVISOR.COM

    The Invention of Scotch Tape

    A Brief History

    On January 31, 1930, the 3M Company (then going by the name of Minnesota Mining and Manufacturing) revealed Scotch Tape.  This product, consisting of clear cellophane tape with a pressure-sensitive adhesive on one side, would become a household and office necessity.

    Digging Deeper

    3M has since ridden the success of Scotch Tape to produce many products bearing the Scotch brand that have nothing to do with the original product, one example being the stain repellent Scotchguard.  3M first began advertising with the familiar tartan plaid (Wallace type) in 1945.  Today, many manufacturers produce adhesive tape, but most folks generically call these products “Scotch Tape” as well.  (Same as the Kleenex phenomenon.) 

    Pressure-sensitive or adhesive tape was invented by a surgeon in 1845, presumably for medical applications.  Since then, all sorts of material have been used as tape, with just as many types of adhesive.  These include: medical adhesive tape which comes in both cloth and plastic varieties; package-sealing tape; metal tape, iron-on hem tape; electrical tape; friction tape; sports grip tape; and, of course, the greatest friend of men everywhere, duct tape, which men use to fix EVERYTHING!

    Some types of tape have to be moistened for the adhesive to work, while other types have to be heated.  Some types come with a layer over the sticky side that must be peeled off before use.  There are even double-sided sticky tapes for a variety of uses.

    A simple roll of electrical tape, or insulating tape, in your glove compartment, tool box, tackle box, kitchen drawer or pocket can save a life as a temporary wound binder, can temporarily fix a leaky pipe or hose, can be used to make emergency repairs on clothing (especially raincoats), can get you at least double the life out of a wornout baseball and can be used for a million other vital things, including its primary use as an insulator for electrical wiring.  Same thing goes for duct tape which is probably the greatest auto body repair product ever made!  (On a budget, anyway…)

    Not only is Scotch Tape handy for taping pieces of paper together, it makes a dandy light-duty lamination material for preserving clippings or small photos; and it can be used for posting toddler art on the fridge, labeling things, removing pet hair and lint from clothing and for all sorts of arts and crafts.  Available in numerous varieties, one of the most popular ones is the “invisible” type that seems to disappear when pressed firmly onto paper or an object.

    It is hard to imagine what modern life would be like without all these types of tape, especially Scotch Tape, the king of them all.

    SOURCE: HISTORYANDHEADLINES.COM

    What Shall We Bake Today?

    The last recipe this month is Apple Cinnamon Rolls!

    Ingredients:

    2 cups all-purpose flour

    1/4 cup granulated sugar

    2 tsp instant yeast

    1/2 tsp salt

    1/2 cup warm milk

    1/4 cup unsalted butter, melted

    1 large egg

    2 medium apples, peeled, cored, and diced

    1 tsp ground cinnamon

    1/4 cup brown sugar, packed

    1/2 cup powdered sugar (for glaze)

    1-2 tbsp milk (for glaze)

    Instructions:

    In a large bowl, combine the flour, sugar, yeast, and salt.

    In a separate bowl, whisk together the warm milk, melted butter, and egg. Add the wet ingredients to the dry ingredients and stir until a dough forms.

    Knead the dough on a floured surface for about 5 minutes, or until smooth and elastic. Place it in a lightly greased bowl, cover, and let it rise for 1 hour, or until doubled in size.

    While the dough rises, prepare the filling. In a medium bowl, toss the diced apples with cinnamon and brown sugar.

    Once the dough has risen, punch it down and roll it out on a floured surface into a rectangle about 1/4 inch thick.

    Spread the apple mixture evenly over the dough, then roll it up tightly from one edge.

    Cut the dough into 8 even slices and place them in a greased baking pan.

    Cover and let the rolls rise for another 30 minutes, or until puffy.

    Preheat the oven to 375°F. Bake the rolls for 20-25 minutes, or until golden brown.

    While the rolls bake, prepare the glaze by whisking together the powdered sugar and milk until smooth.

    Drizzle the glaze over the warm rolls and serve.

    ENJOY!