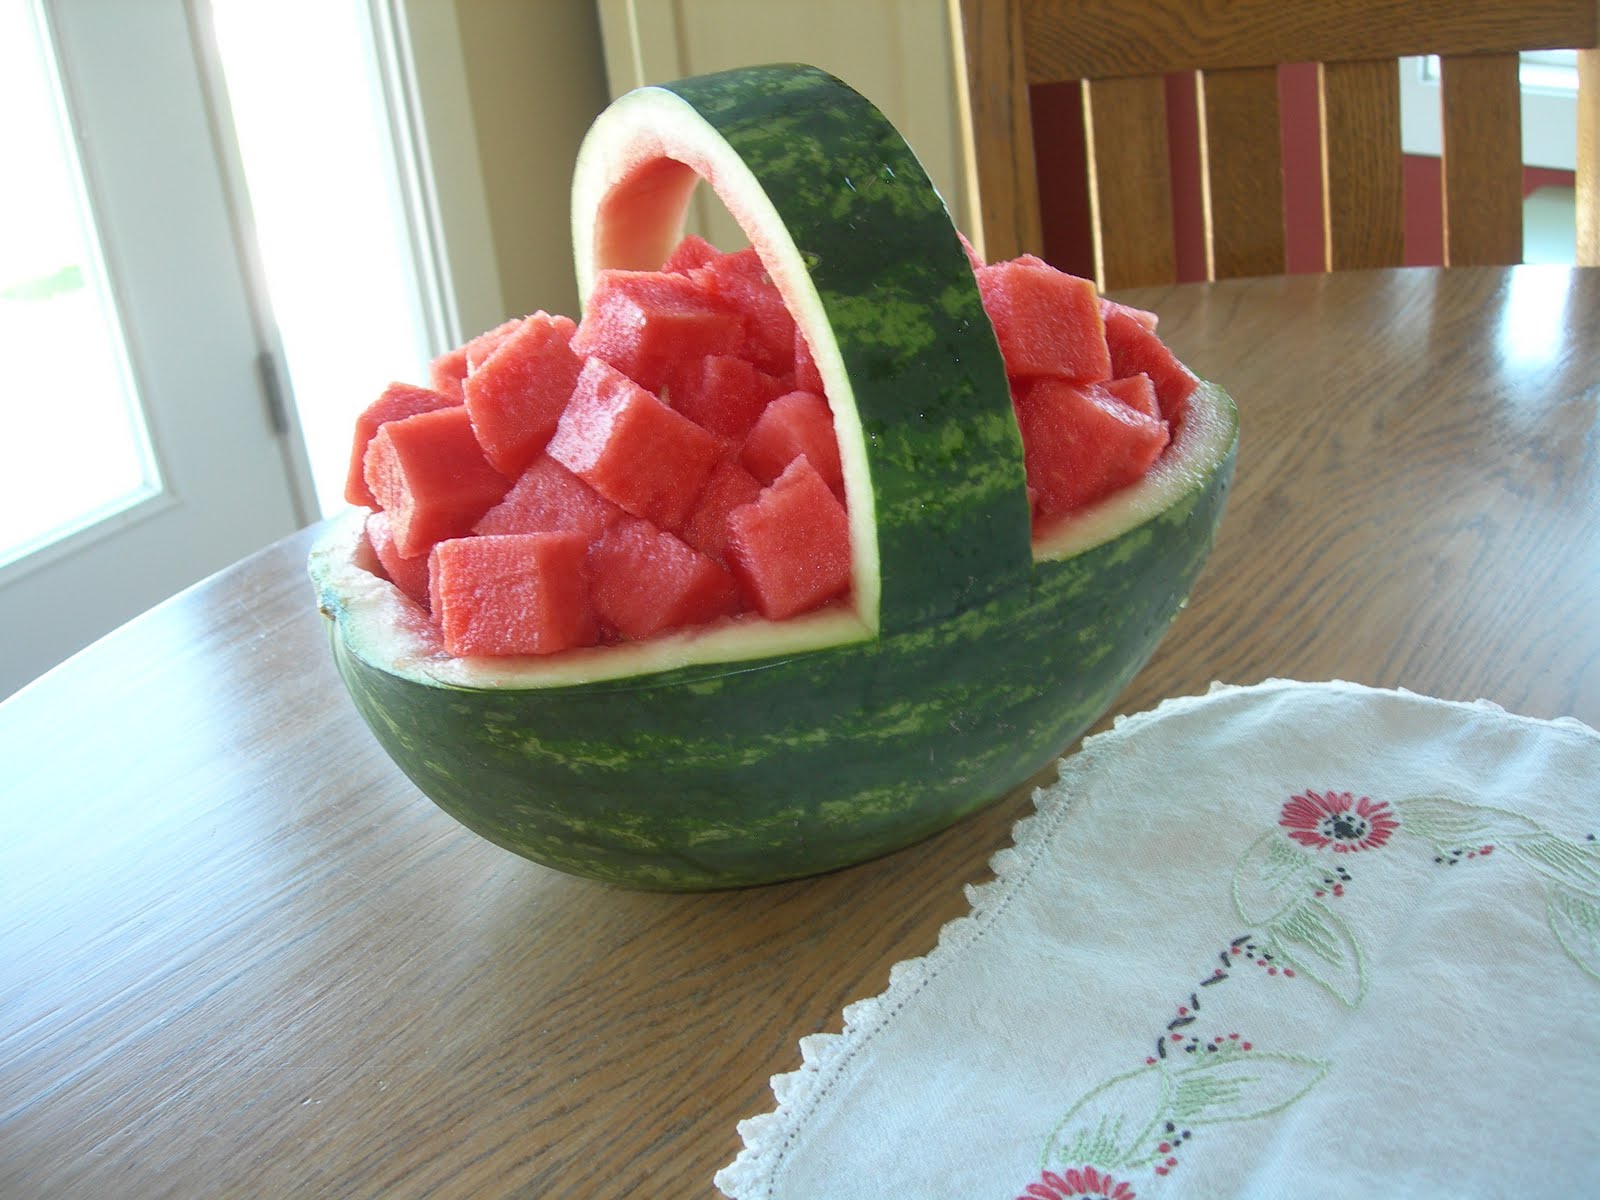
Watermelons baskets are a simple but gorgeous addition to any summer festivity!
I found this brief tutorial on Living My New Simple Life.com.
Are you going to a cookout, picnic, or family get together this Memorial Day weekend?
I thought I would share something fun and easy to do that always wows everyone!
A watermelon basket filled with beautiful, colorful, fruit.
Here are the 4 steps that are easy to follow.
Step1 – Place watermelon width-wise on a flat surface. Roll melon until it settles into a position where it remains stable or cut a thin slice from the bottom to provide stability. As shown, use strips of masking tape to mark lines of handle and rim of basket.
Step 2 – With a sharp knife, cut outline of handle, using outside edges of masking tape as a guide. To make a scallop template, cut out a paper circle with scissors. (The size of the melon determines the size of the circle. The watermelon shown is small so the circle used is relatively small.) Fold circle in half and cut along fold. Starting on either side of handle, place the straight edge of one paper semicircle on top edge of masking tape that forms rim. With a sharp pencil, trace a row of scallops along rim, stopping just before reaching ends of melon. At each end, draw remaining scallop freehand, connecting the gap.
Step 3 – Using a sharp knife, cut into the watermelon along the scalloped pencil lines. Next, cut a large wedge from the area on both sides of the handle, leaving about an inch above the scalloped rim. Remove wedge, inserting knife behind the scallops, cut straight down into the melon close to the rind, cutting deep enough to release top part of rim. Lift and discard.
Step 4 – Remove masking tape. Scoop out watermelon from rind. For a fruit basket, add a mixture of fresh fruit combined with watermelon cut into one-inch cubes or melon balls. I have never been able to make the watermelon balls so I always cut into cubes.
The finished look is really awesome.
SOURCE: LOVINGMYNEWSIMPLELIFE.COM
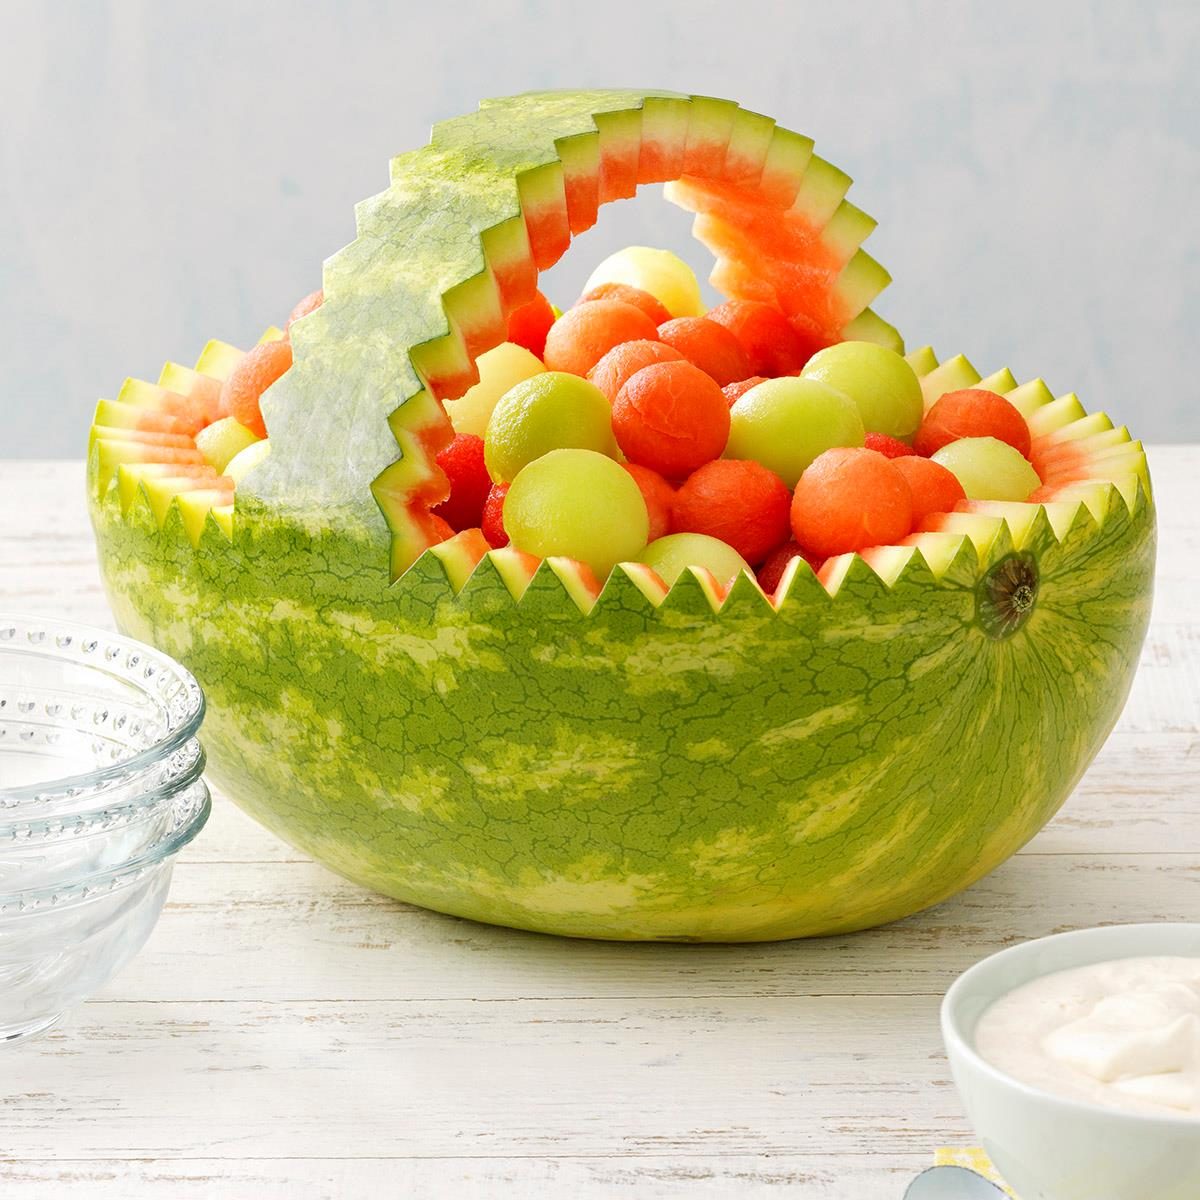
Once you master the basics, you can try further embellishing your basket.
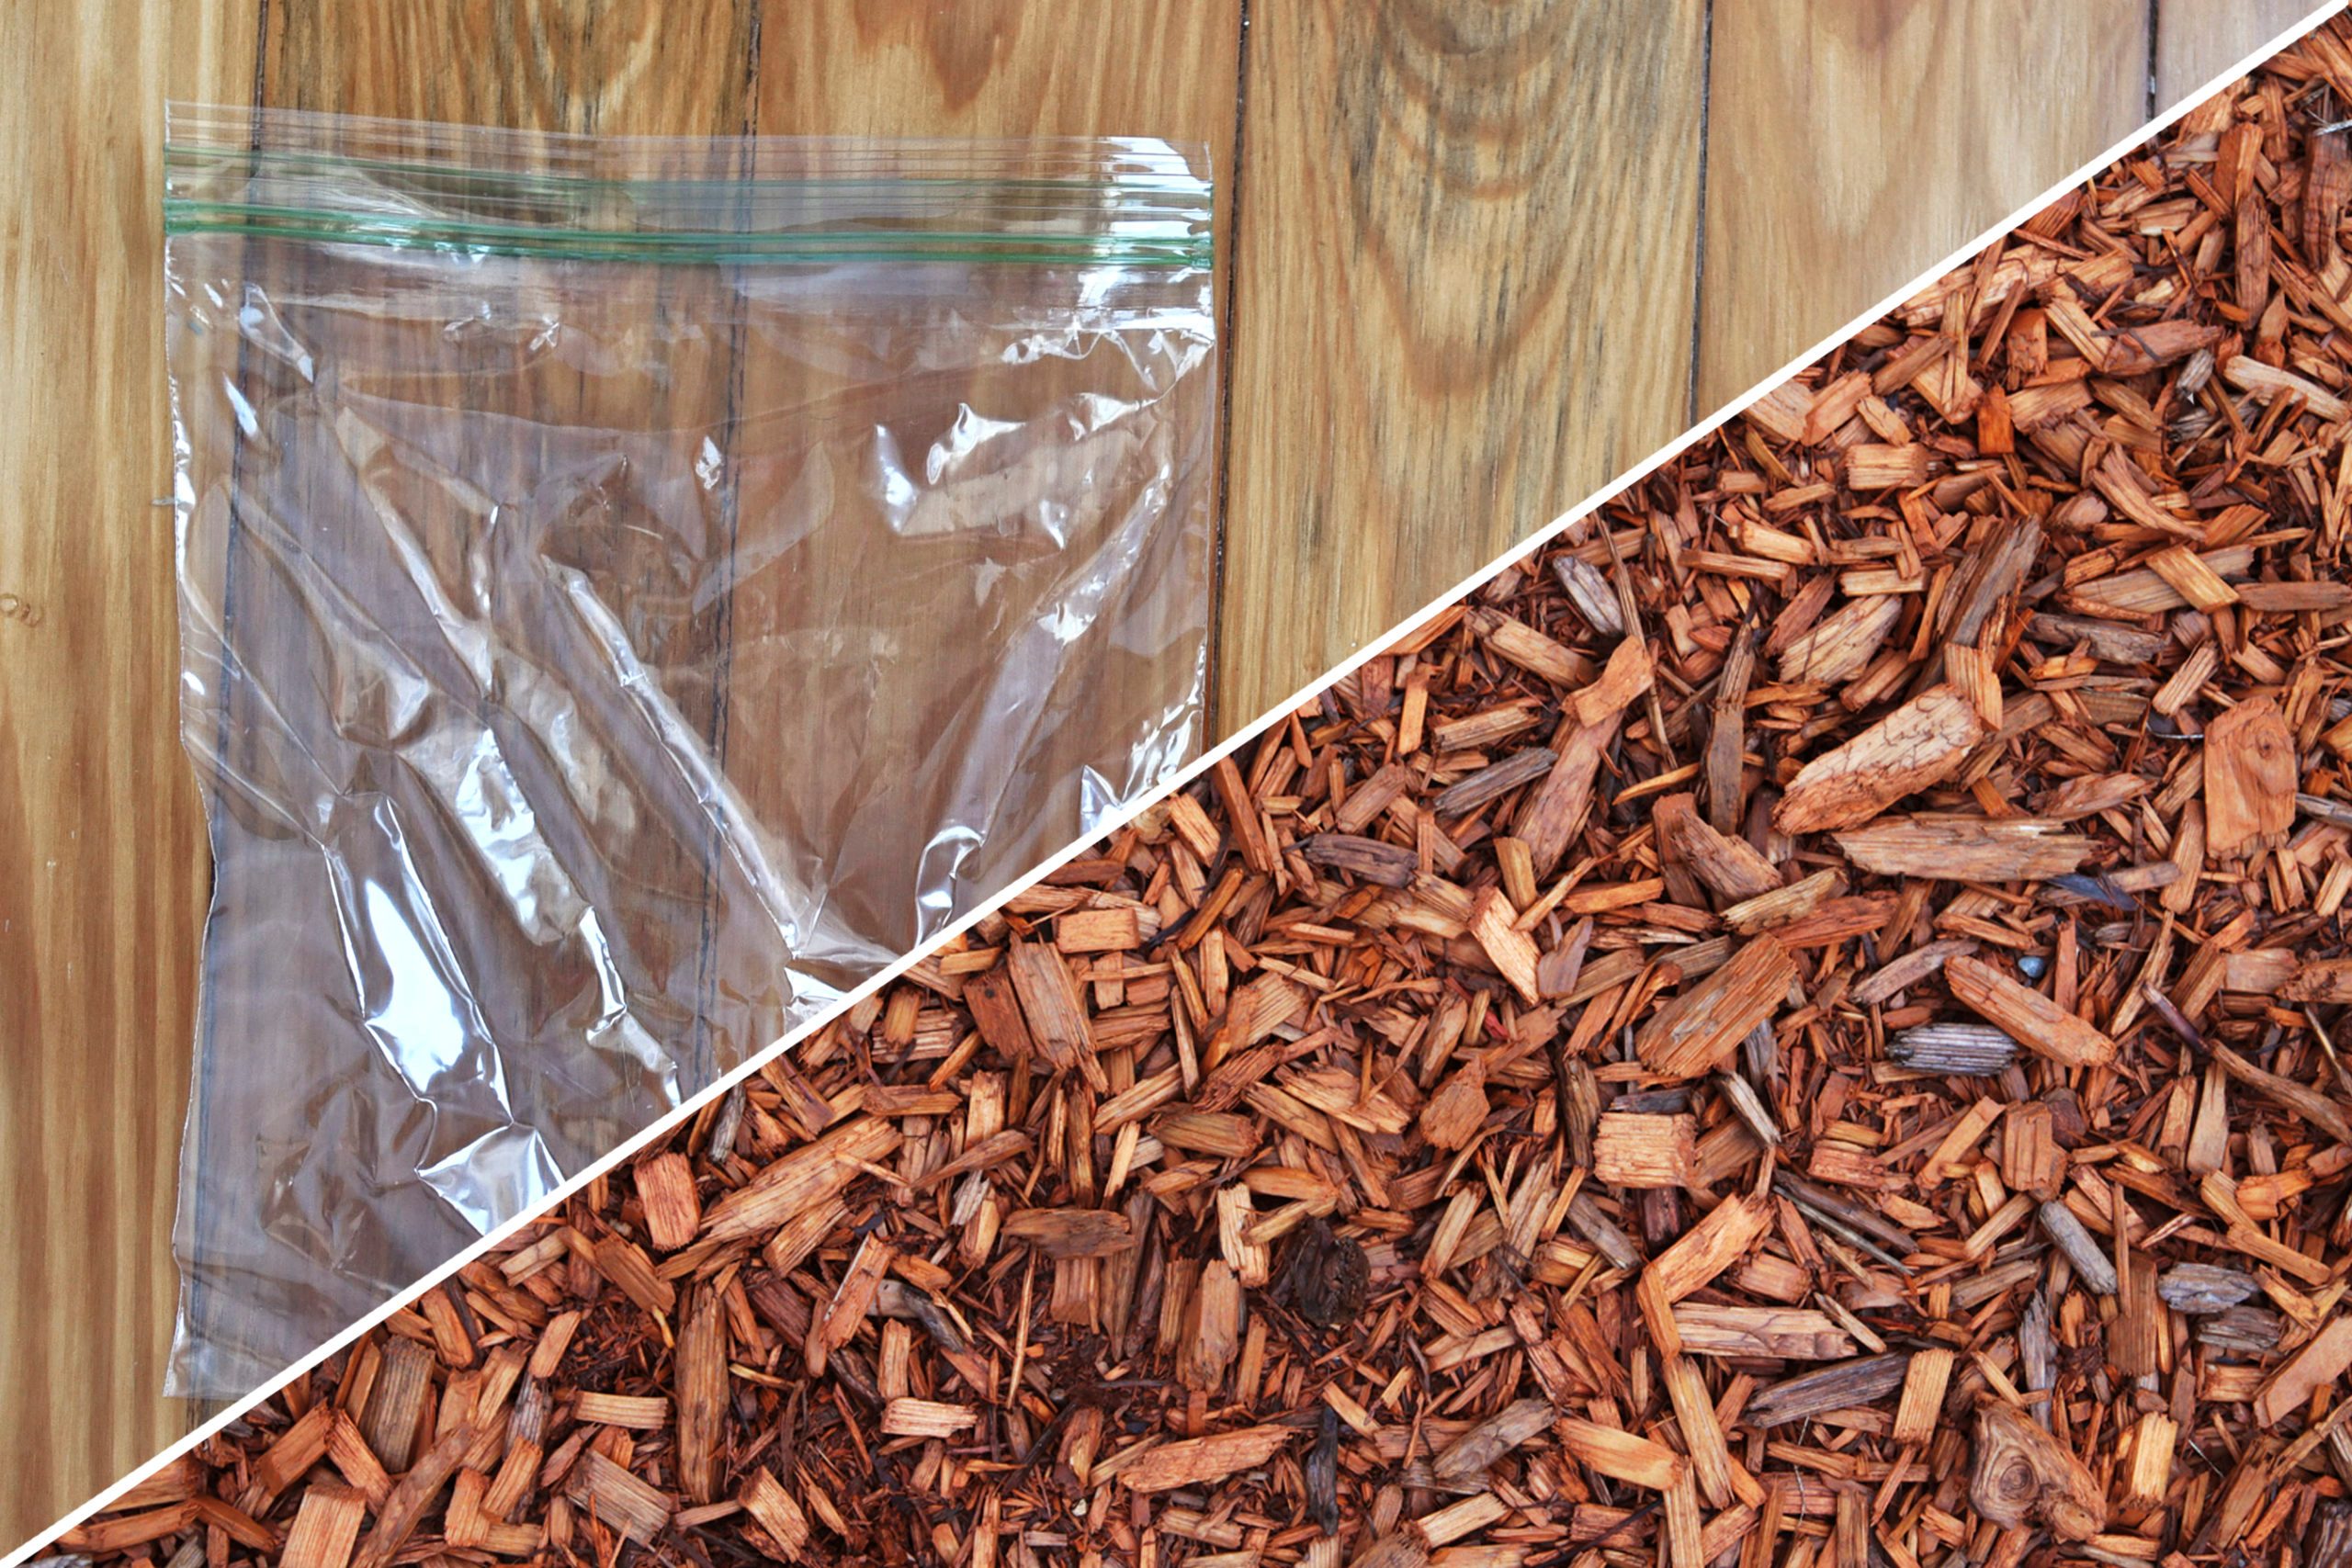
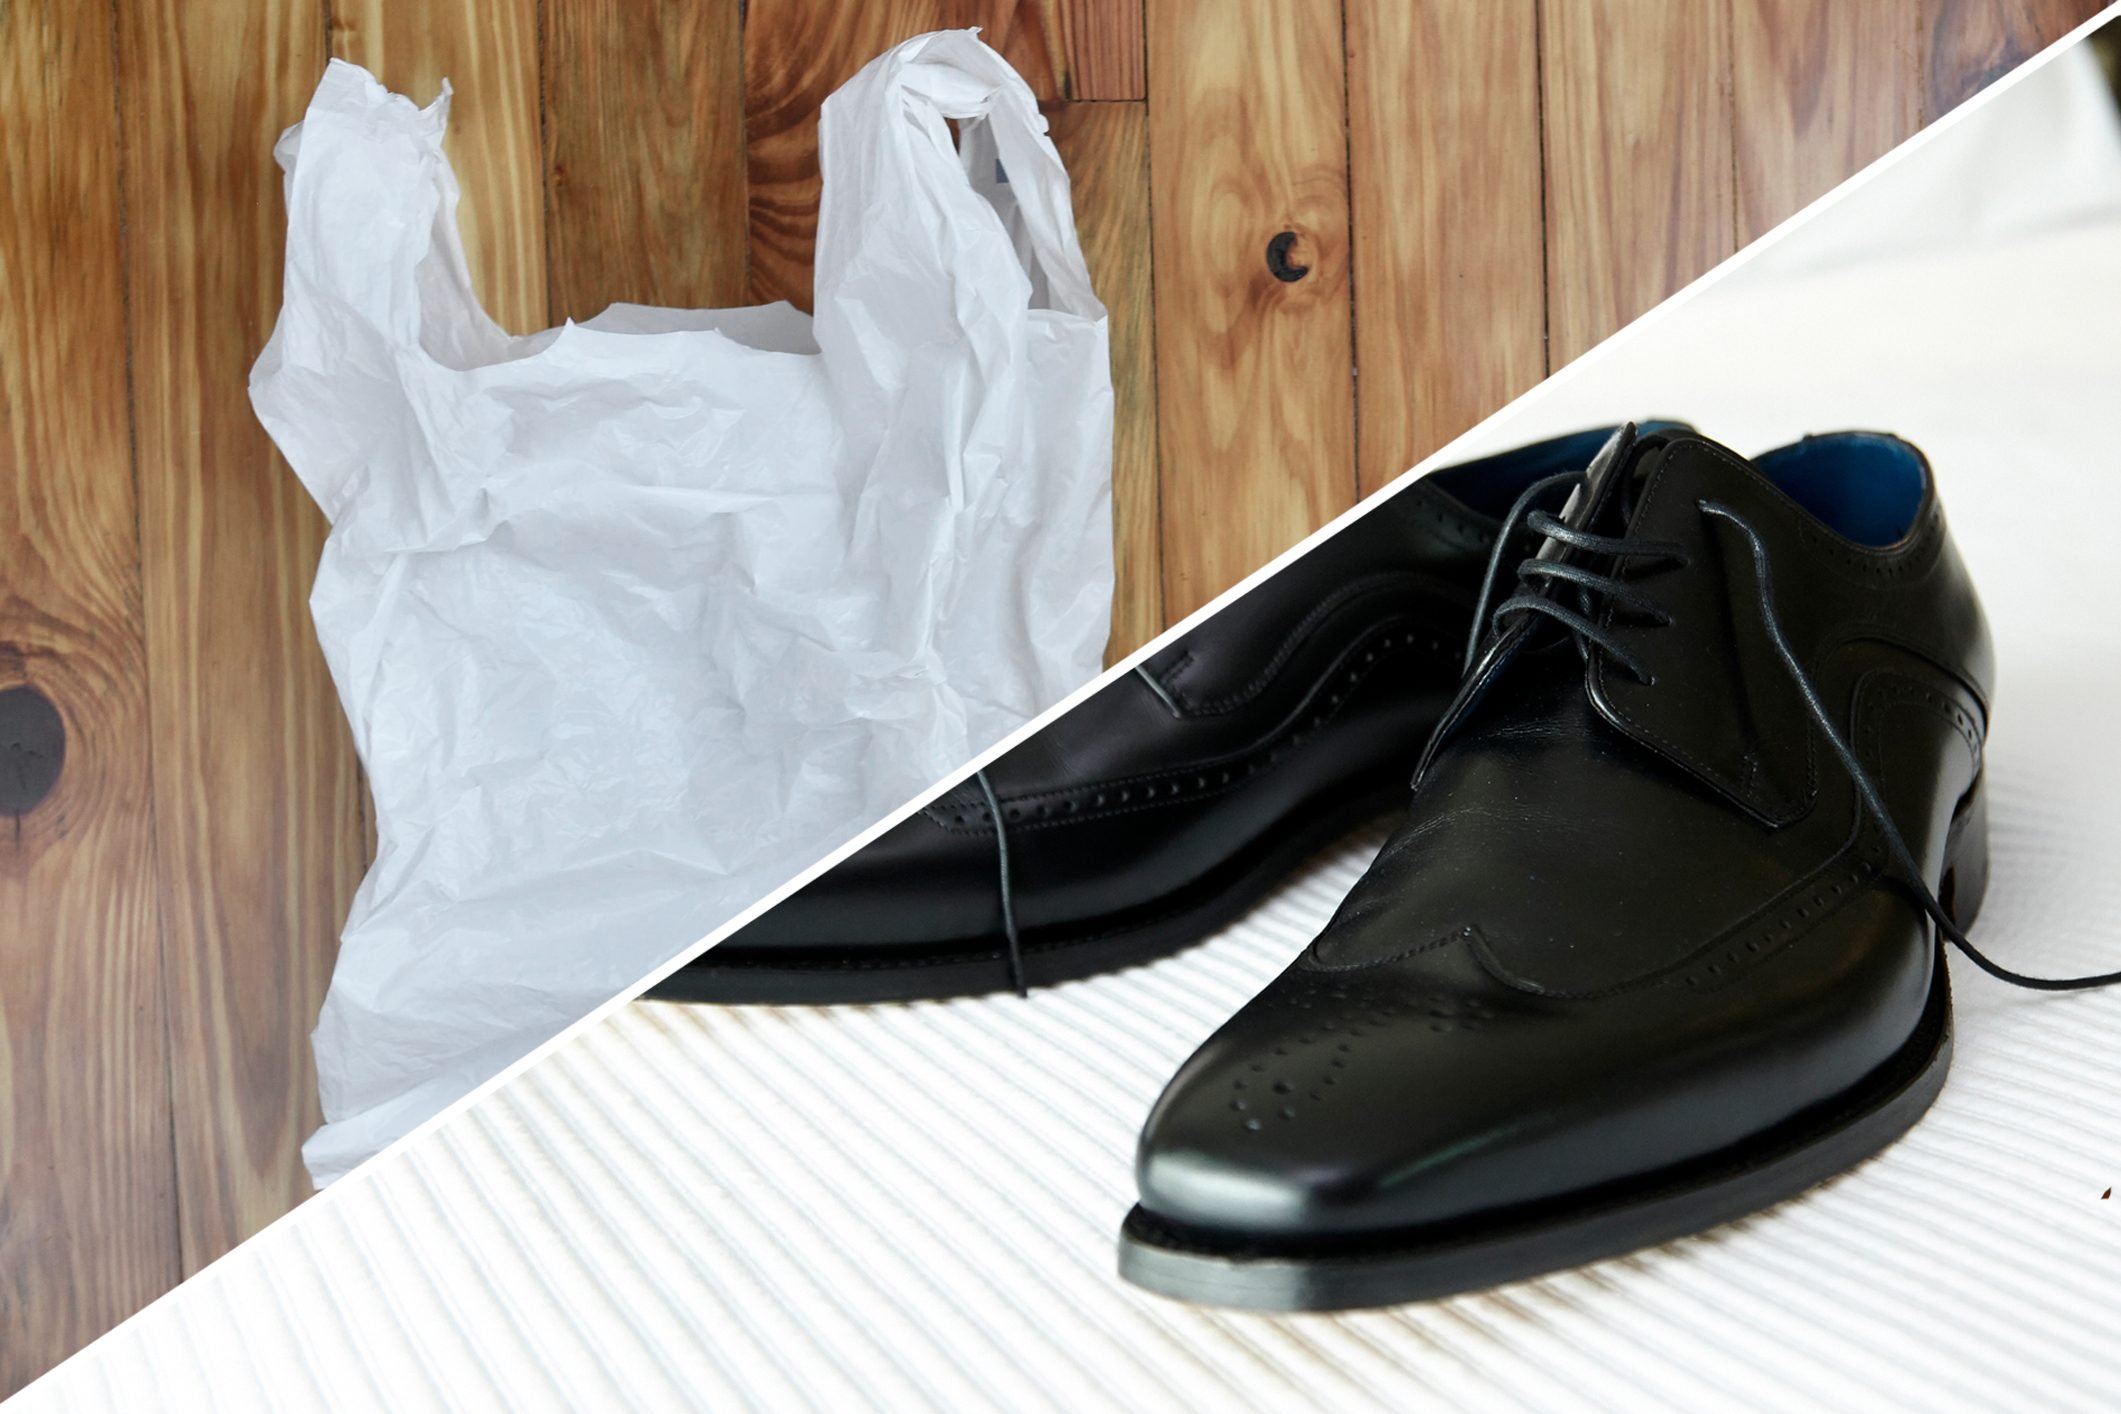
I can never throw away plastic bags. There, I said it. I find numerous ways to reuse them—from crafts to organization. This article from Reader’s Digest suggests many, many more uses.
Lauren Gelman
Updated: Jan. 13, 2023
From the book 10,001 Timesaving ideas
Cedar closets smell great, and, more important, they repel moths. If you aren’t lucky enough to have a cedar closet, you can easily create the next best thing. Fill a sealable bag with cedar chips—the kind you buy at a pet store for the hamster cage. Zip it closed, then punch several small holes in it. Hang the bag in your closet (a pants hanger is handy for this) and let the cedar smell do its work. You can also create a sachet to freshen up musty drawers. Fill the bag with potpourri—flower petals, a few crushed fragrant leaves, and a couple of drops of aromatic oil. Punch a bunch of small holes in the bag, then place it in the drawer.
Road trip trash bin
Plastic bags can fold up and store in your glove box, barely taking up any space at all. When you’re out on the road and make any trash or come across litter, having a designated trash bag on hand is incredibly useful and means you don’t have to stop to find a trash bin, and you won’t have crumbs, refuse, or any other trash bits floating around in your car.
Easy donation
One man’s trash is another man’s treasure! While those annoying plastic grocery bags may just be trash to you, thrift stores and flea markets would be thrilled to have your old bags to use rather than having to buy their own. It may seem like an odd thing to donate but many small businesses would be thrilled to have them.
Make a DIY shoe form
Even if you don’t have your own shoe forms, you don’t have to worry about your shoes losing their shape when you aren’t wearing them. Crumple up some plastic bags to stuff the toes of your off-season shoes with and they’ll be just like you left them when you pick them back up.
Travel laundry bag
Next time you pack your suitcase, slip a few plastic bags inside. They’re useful for storing still-wet-from-the-beach swimsuits, or any dirty clothes you might have, in order to keep them separate from any clean things in your luggage.
Cool off (and clean up) outside
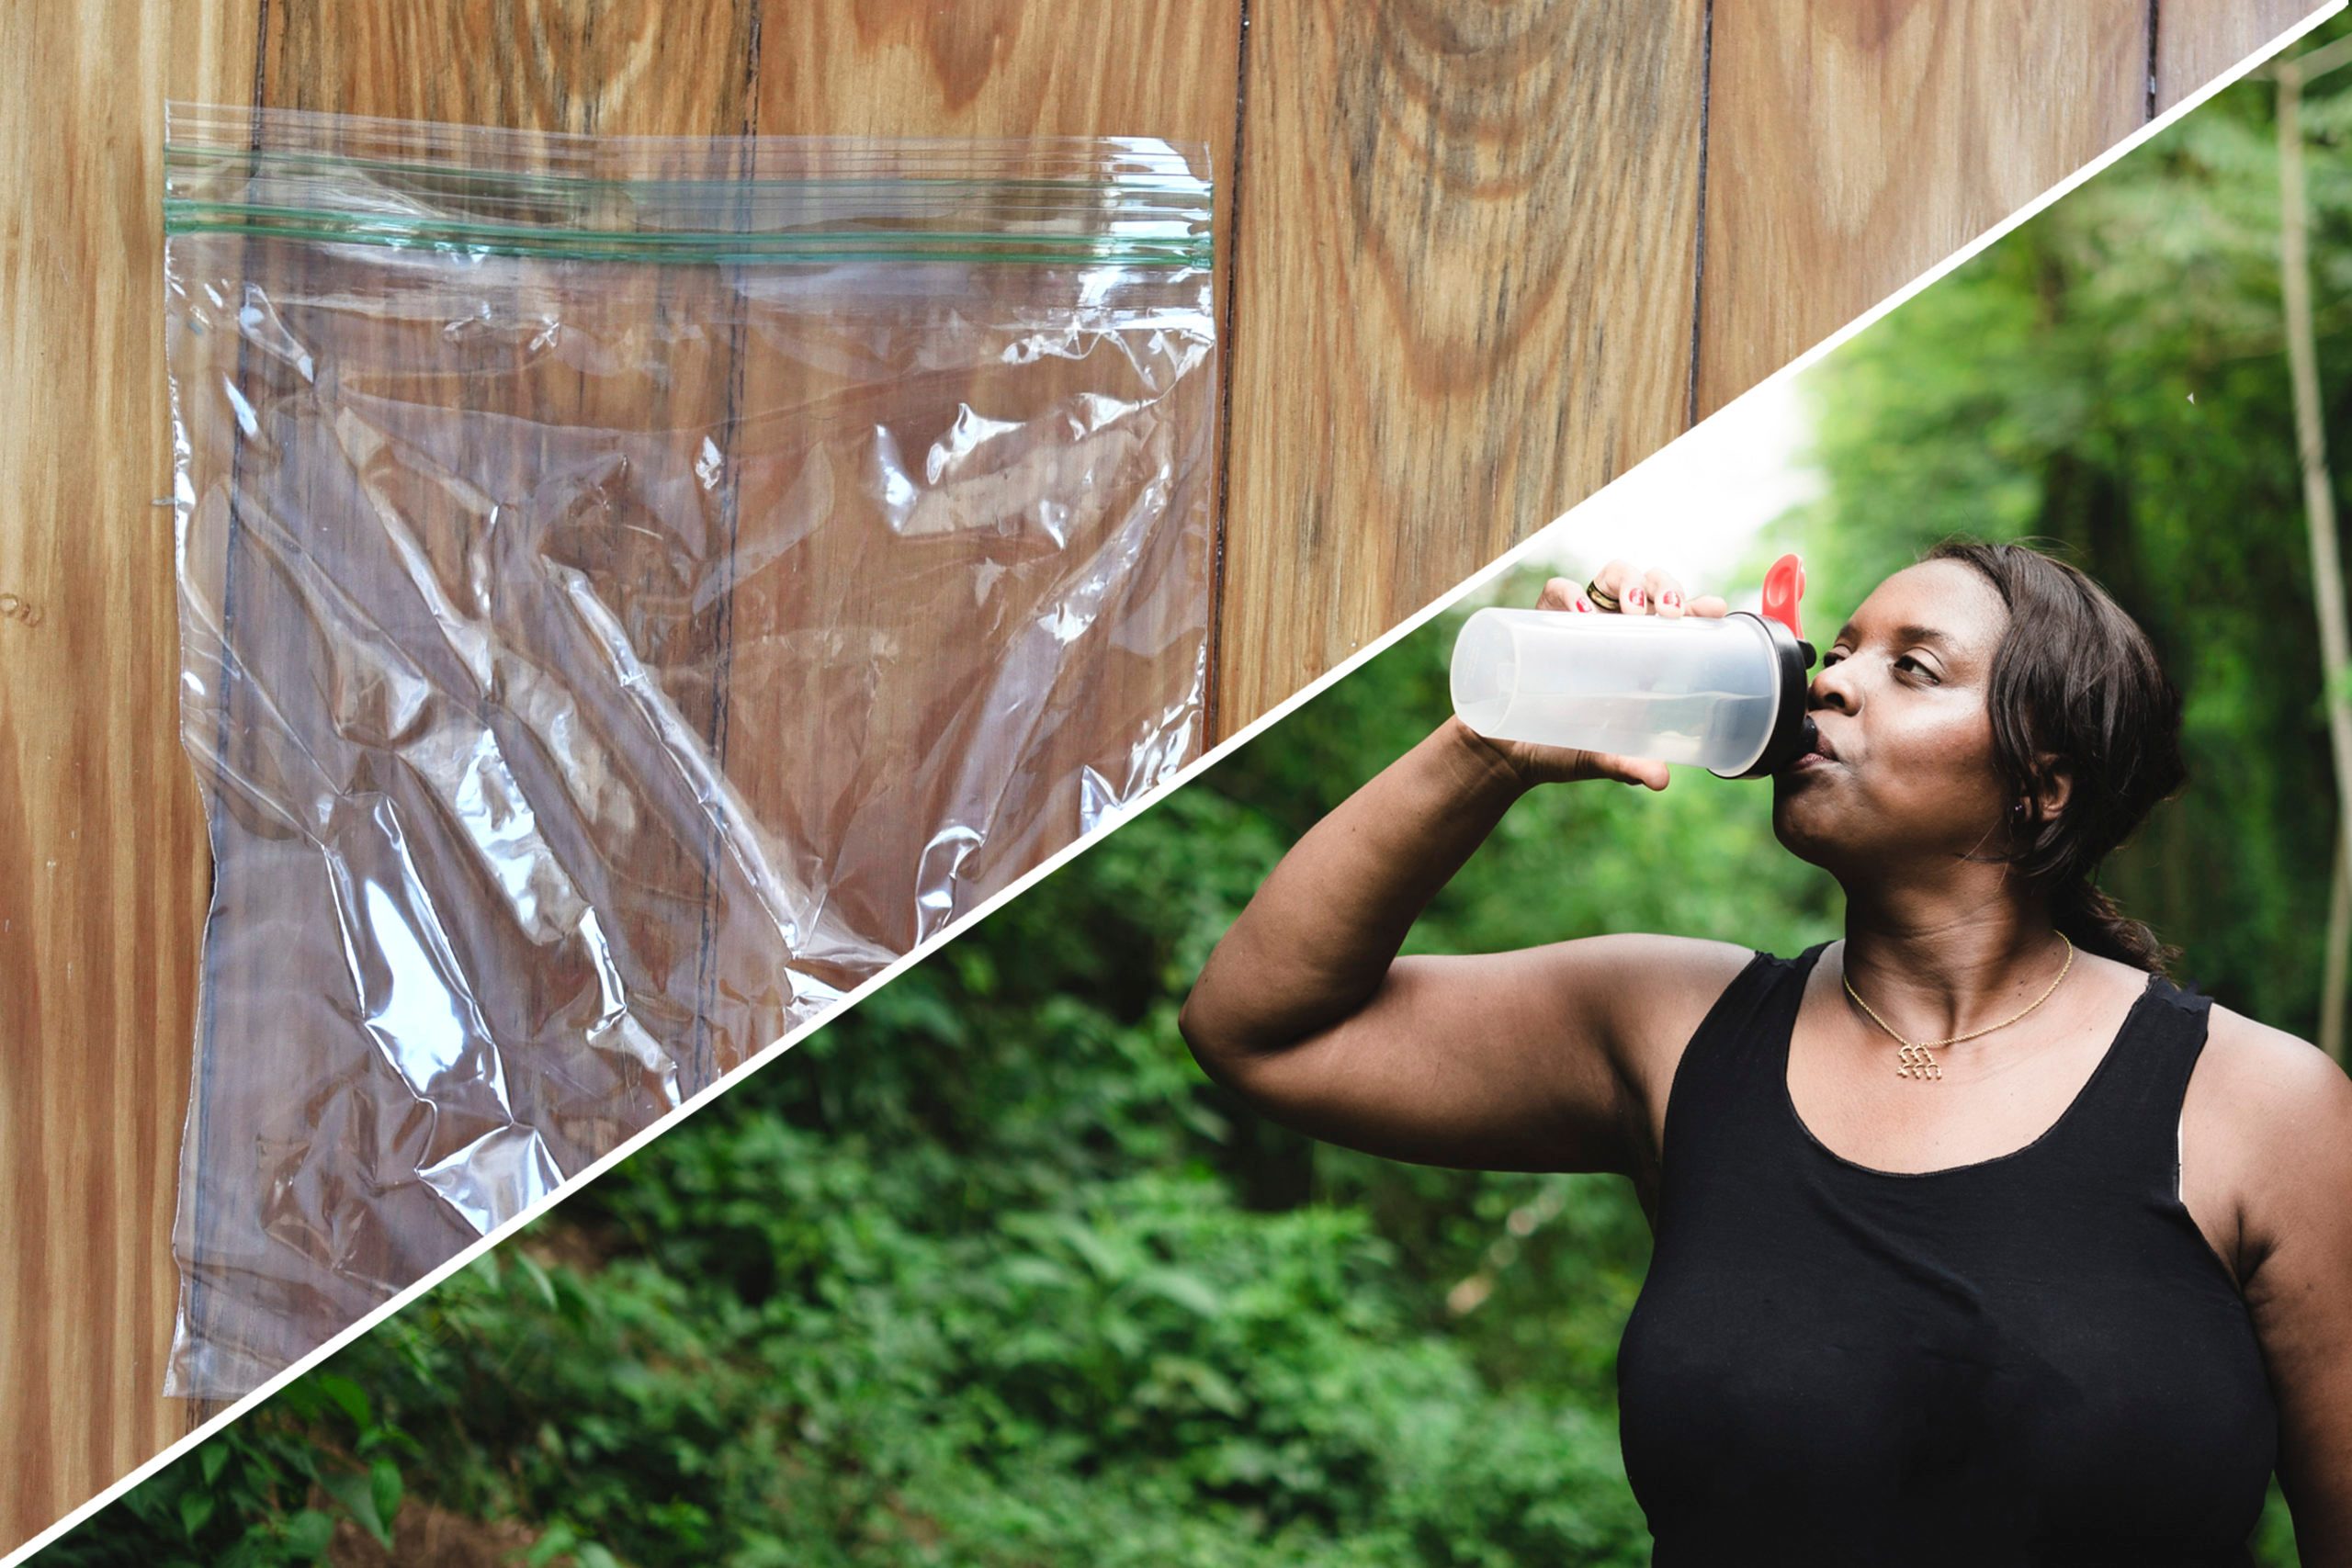
Going for a long trip on a hot and sticky day? Use a sealable bag to take along a wet washcloth that has been soaked in water and lemon juice—it makes a great refreshing wipe-off. This is a good trick for fast on-the-road face and hand cleanups. Another great option is to freeze a few washcloths in a sealable bag; they provide fast relief for anything from bumps and scrapes to burns and tooth pain.
Create single-use detergent packs
If you’re planning a trip and think you’ll be doing a few loads of laundry while you’re there, pre-measure some detergent into a bag. It beats lugging a big box of detergent down to the shore or on an airplane or buying expensive travel-size bottles.
(Pat’s opinion: the little bottles can be bought at dollar stores and are reusable. If something punctures this bag, you have detergent all over everything in the bag.)
Make a funnel
That handiest of kitchen and garage tools, the funnel, can be replicated easily with a small sandwich bag. Fill the bag with the contents you need to be funneled. Snip off the end and transfer into the needed container. Then just toss the bag when the funneling is done.
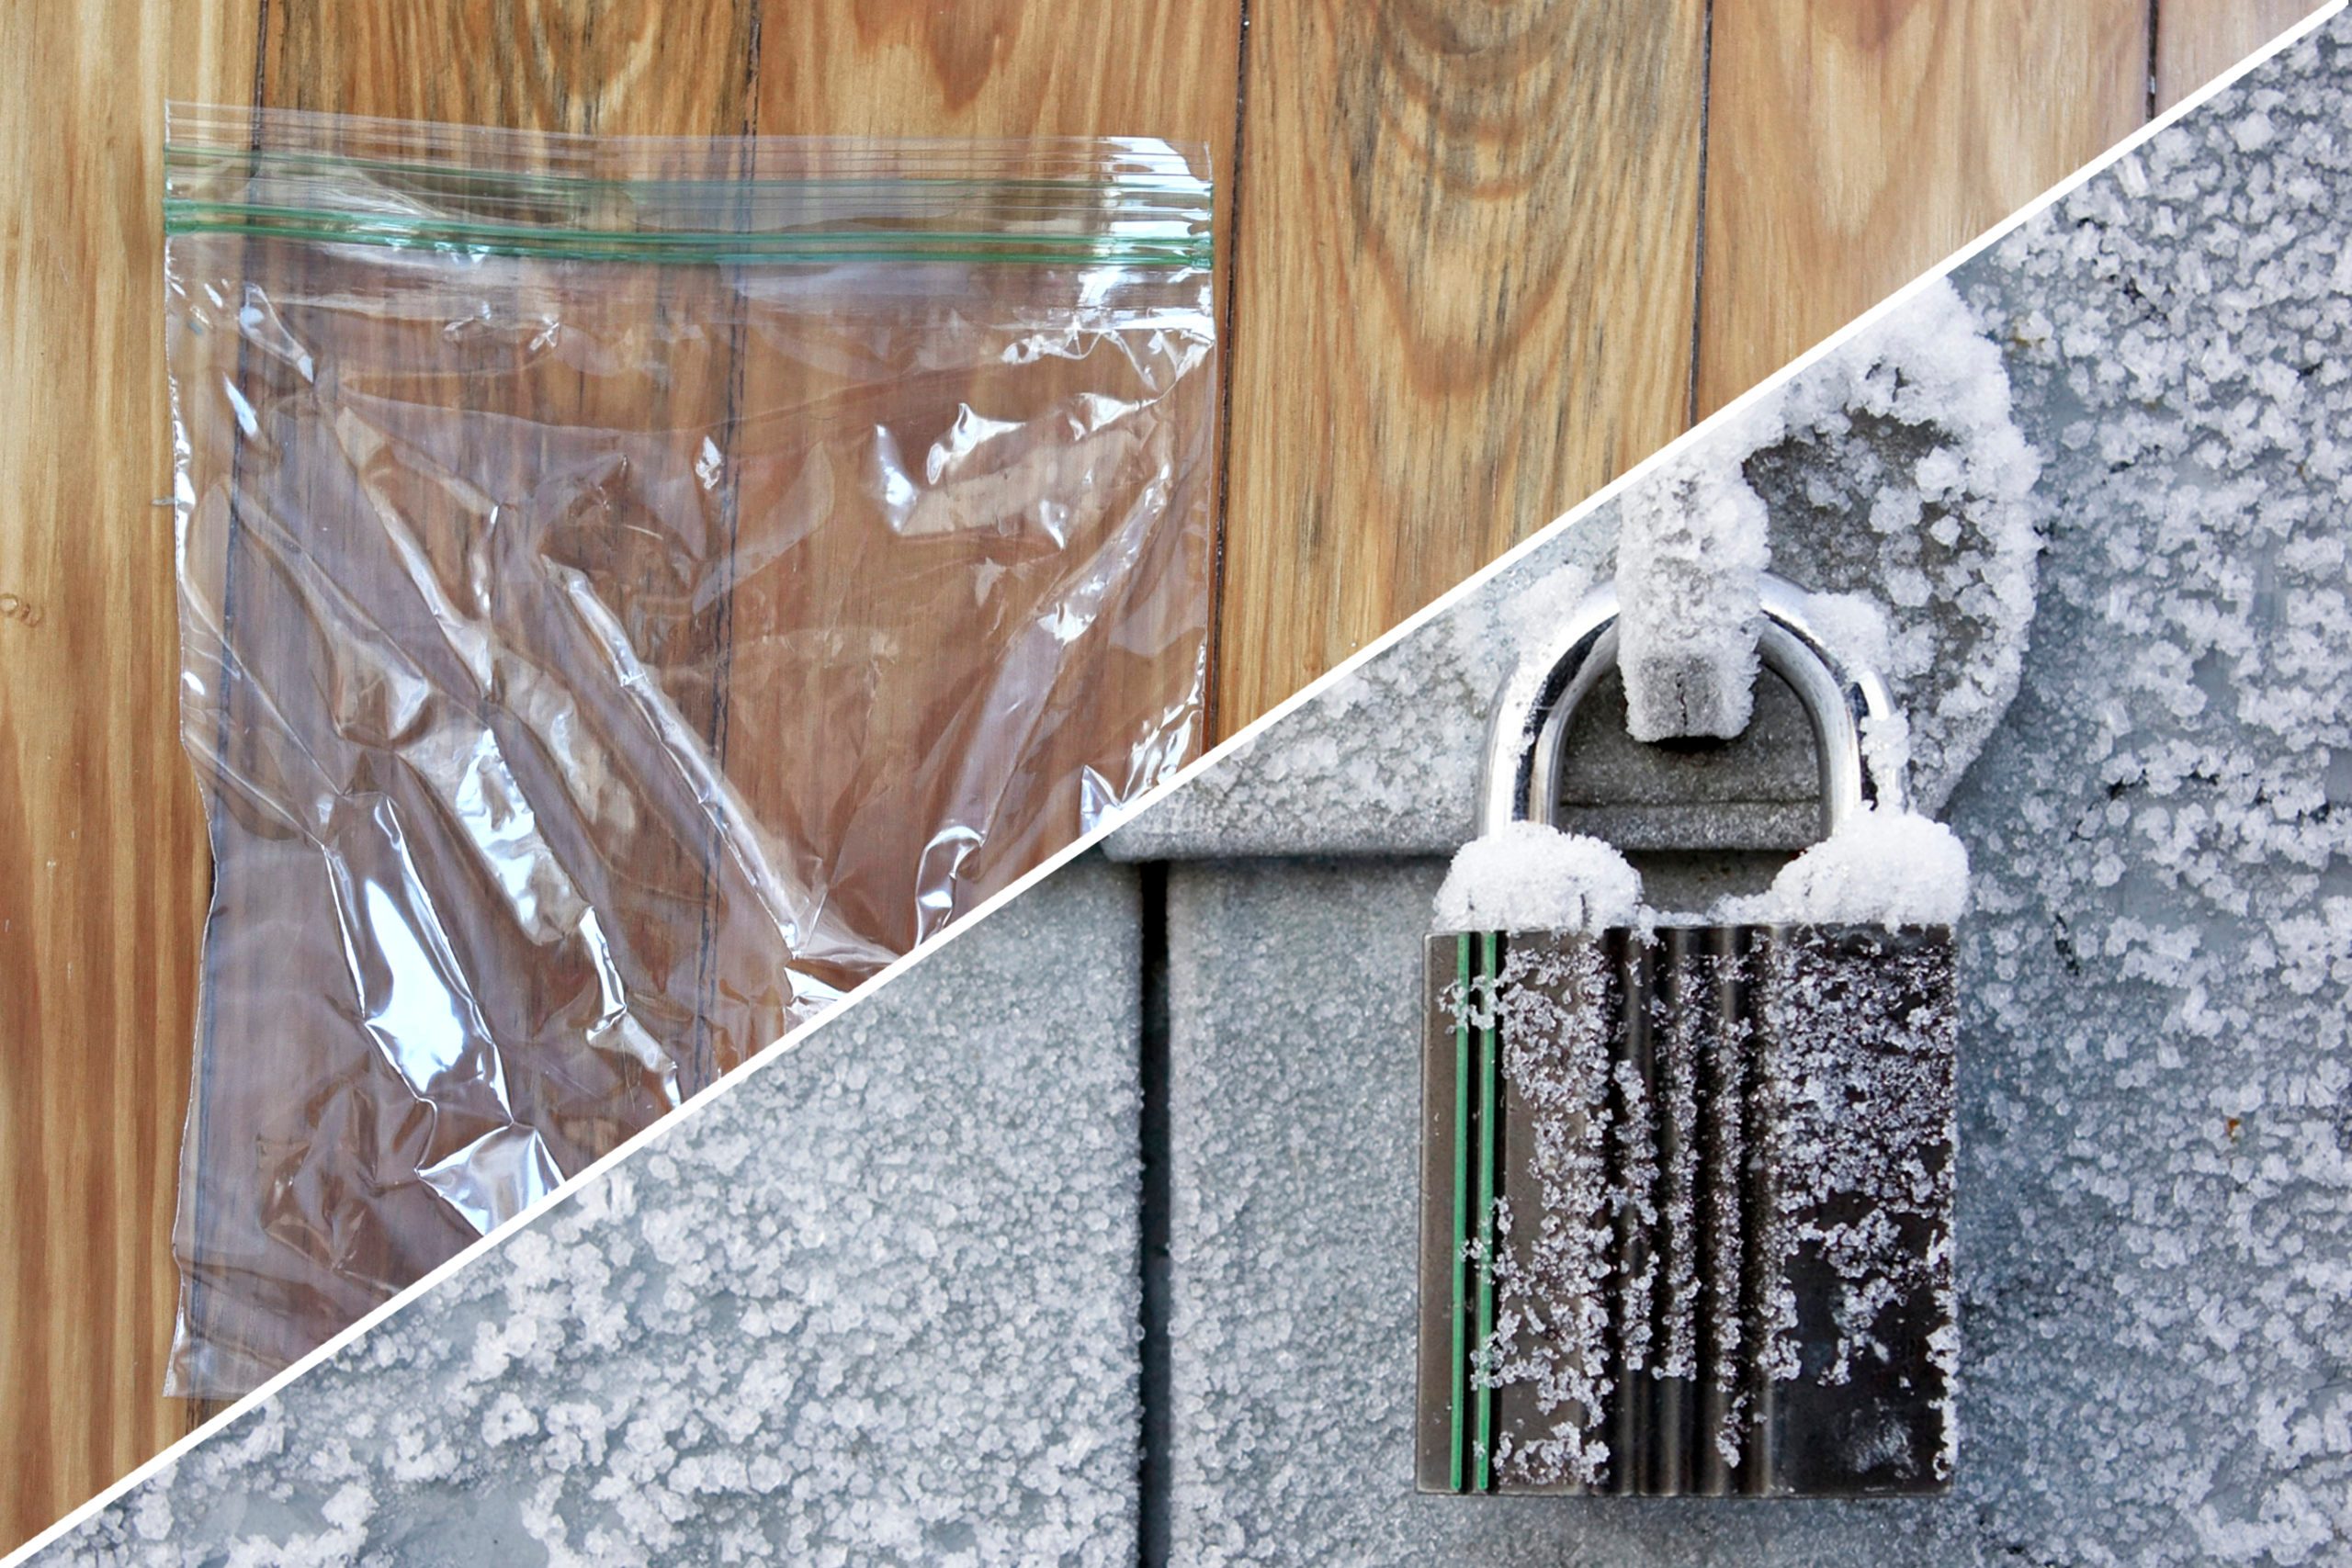
Protect your padlocks from freezing
When the weather is cold enough to freeze your padlocks on the outdoor shed or garage, remember that a sandwich bag can help. Slip one over the lock and you’ll avoid frozen tumblers.
Color cookie dough without stained hands
Experienced bakers know what a mess your hands can be after coloring cookie dough. Here’s a clean idea: Place your prepared dough in a bag, add the drops of food coloring, and squish around until the color is uniform. You can use the dough now or stick it in the freezer ready to roll out when you need it.
Soften hard marshmallows
You’re about to pull out that bag of marshmallows from your kitchen cabinet when you notice that the once-fluffy puffs have turned hard as rocks. Warm some water in a pan. Place the marshmallows in a sealable plastic bag, seal, and place in the pan. The warmth will soften them up in no time.
Decorate a cake
Pastry bags can be cumbersome, expensive, and hard to clean. Place your frosting (or deviled egg mix) into a sealable bag. Squish out the air and close the top. Snip off a corner of the bag to the size you want—start conservatively—and you are ready to begin squeezing.
Feed the birds
Be kind to the birds in your yard during the lean winter months! First, put some birdseed with peanut butter in a sealable plastic bag. Close, then knead the outside of the bag until well mixed. Then place the glob in a small net bag, or spread on a pinecone. Attach to a tree and await the grateful flock.
Melt chocolate without a mess
Melting chocolate in a microwave or double boiler leaves you with a messy bowl or pot to wash. Here’s a better method: Warm some water in a pan (do not boil). Place the chocolate you want to melt in a sealable freezer bag. Seal and place the bag in the pan. In a few moments, you have melted chocolate, ready to bake or decorate with. You can even leave the bag sealed and snip off a bottom corner of the bag to pipe the chocolate onto a cake. When you are done, just toss the bag.
Kid’s kitchen gloves
There’s nothing more welcome than helping hands in the kitchen. But when they’re little hands that tend to get dirty and leave prints all over the place, then something must be done. Before they start “helping” you make those chocolate chip cookies, place small sandwich bags over their hands. These instant gloves are disposable for easy cleanup.
Grease your pans mess-free
If you’re never quite sure how to handle shortening and butter when greasing a cake pan or cookie sheet, here’s a tip: Place a sandwich bag over your hand, scoop up a small amount of shortening or butter from the tub, and start greasing.
Create a beach hand cleaner
You’re sitting on the beach and it’s time for lunch. But before you reach into your cooler, you want to get the grit off your hands. Baby powder in a sealable plastic bag is the key. Place your hands in the bag, then remove them and rub them together. The sand is gone.
Cure car sickness
The last thing you need in your car is a child (or adult) throwing up. Place a few cotton balls in a sealable plastic bag, then squirt in two drops of lavender oil. If motion sickness strikes, open the bag and take a few whiffs to feel better.
Keep valuables dry (and afloat)
Going out on the water? Put your valuables, like car keys and cell phone, in a sealable bag. The big trick: Blow air into it before you seal the bag so it will float. A sealable bag is perfect for keeping valuables dry at the water park or beach too.
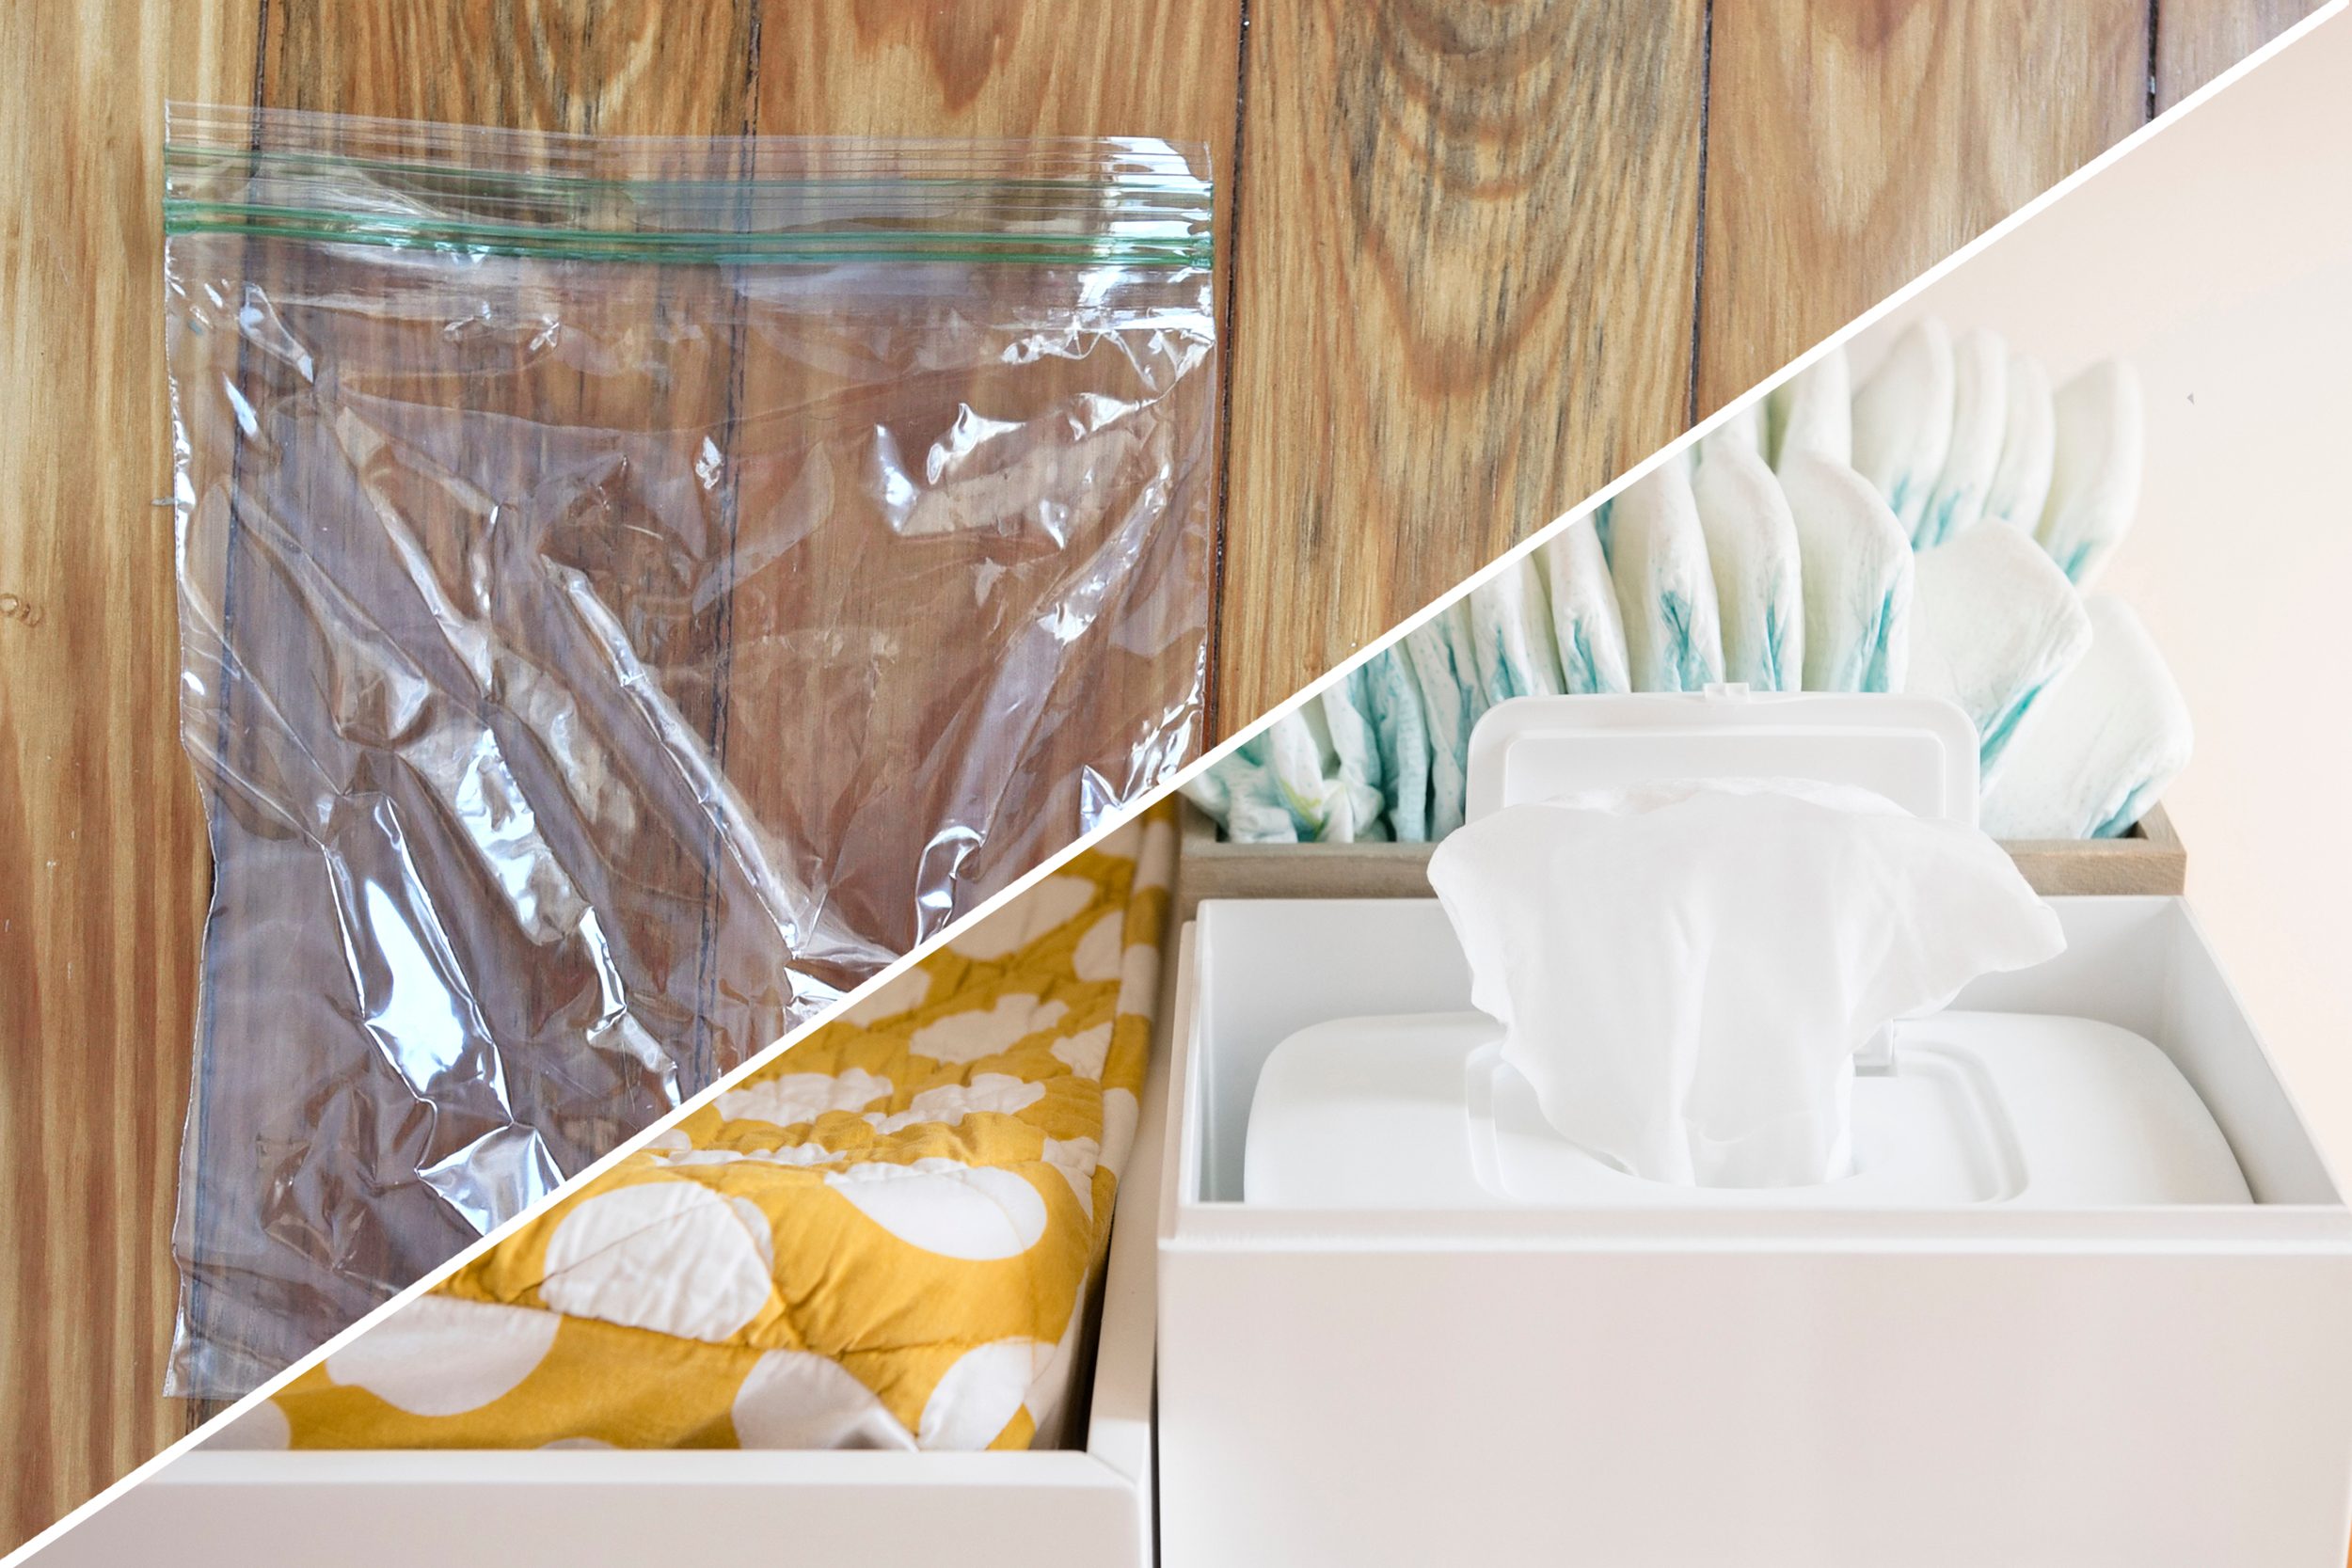
Make low-cost baby wipes
Borrow the thrifty parents’ method to make your own baby wipes: Place soft paper towels in a sealable bag with a mixture of 1 tablespoon gentle antibacterial soap, 1 teaspoon baby oil, and 1/3 cup water. Use enough of the mixture just to get the wipes damp, not drenched.
Use as a portable water dish
Your furry best friend has happily hiked alongside you during your trek in the great outdoors. Even if you don’t have your own portable water bowl, you can make your own with a plastic bag. Bring along a sealable plastic bag full of water from your pack and hold it open while Buddy laps his fill.
Protect your breakables
There’s a precious small family heirloom or trinket that needs some extra padding when storing. Place it gently in a self-closing bag, close the bag most of the way, blow it up with air, then seal it. The air forms a protective cushion around the memento.
Store grated cheese
Pasta or pizza is always better with a dash of freshly grated Parmesan cheese. But who wants to bother with getting the grater out every time you want that taste? Instead, take a wedge of Parmesan cheese, grate the whole thing at once, and then double bag it in two self-closing bags to protect the freshness.
Dispose of cooking oil
Unless you want the plumber for a best friend, don’t clog your kitchen drain with used cooking oil. Instead, wait for it to cool, then dump it in a sealable plastic bag. Toss the bag into the trash.
Any others you have that are not listed? Please share!!
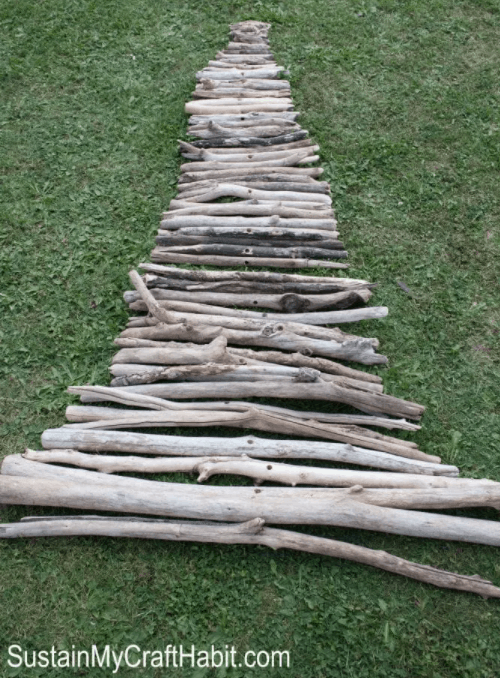
While you’re out at the beach this summer, why not collect pieces of driftwood to make your own Christmas Tree! I will be attempting this (on a smaller scale) with tree branches since the woods are full of them!
Materials
thick pieces of driftwood in various lengths for example 4″ to 4′
a central support rod like rebar, shower curtain
a strong base to hold up the central support rod like a small branch stump
a drill with a bit that’s a little larger than the diameter of the central support rod
How to Make a Driftwood Christmas Tree:
The concept for this type of tree is pretty simple:
Arrange your driftwood from longest to shortest having enough pieces to reach your desired height.
Drill holes in the mid-point of each piece of driftwood, making sure the holes are large enough for your center rod to go through.
Prepare the central support rod by drilling an appropriately sized hole in the small branch stump and then inserting the rod inside.
Starting with your longest, spear each piece of driftwood until you are done. And voila, you have a tree! You can even add a starfish to the top and some twinkle lights!
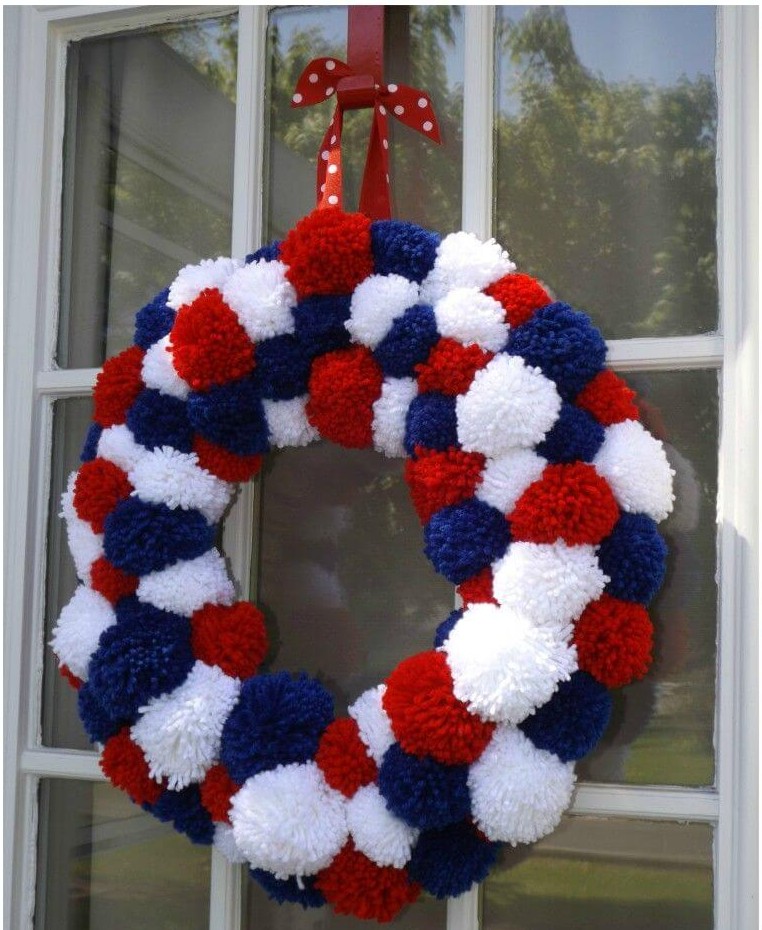
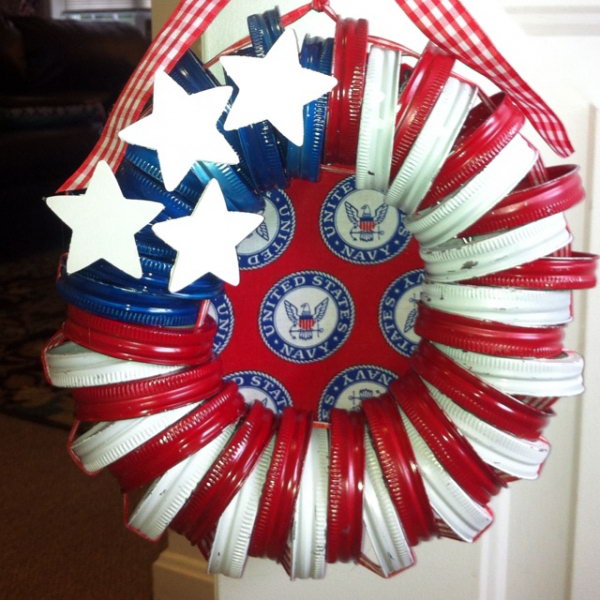
This 4th of July, display your patriotic pride! With these super simple wreath ideas, you can show the world what country has your heart!
Bandana Wreath
If you can tie a knot, you can make this wreath! And you don’t even need a formal wreath form as a base. You can use cardboard!
Pompom Wreath
This wreath uses pompoms glued to a wreath form (found in any dollar store).
Clothespin Wreath
After you paint the clothespins, you attach them to a wire wreath form. (You might have to get one of those at a craft store.) Add some purchased wooden or foam stars.
Card Stock Paper Wreath
To make this wreath, make funnels out of card stock paper (thicker and stiffer than regular colored paper). Then attach the funnels to a cardboard circle in a flower design. Add a pleated circle for the center and finish off with a star!
Canning Lids Wreath
After painting the lids, use heavy ribbon to tie the lids into a tight circle. (This will be the smaller inner circle.) Then use additional ribbon to weave in and out of the lids on the outer edge as shown. Add foam stars and a bow!
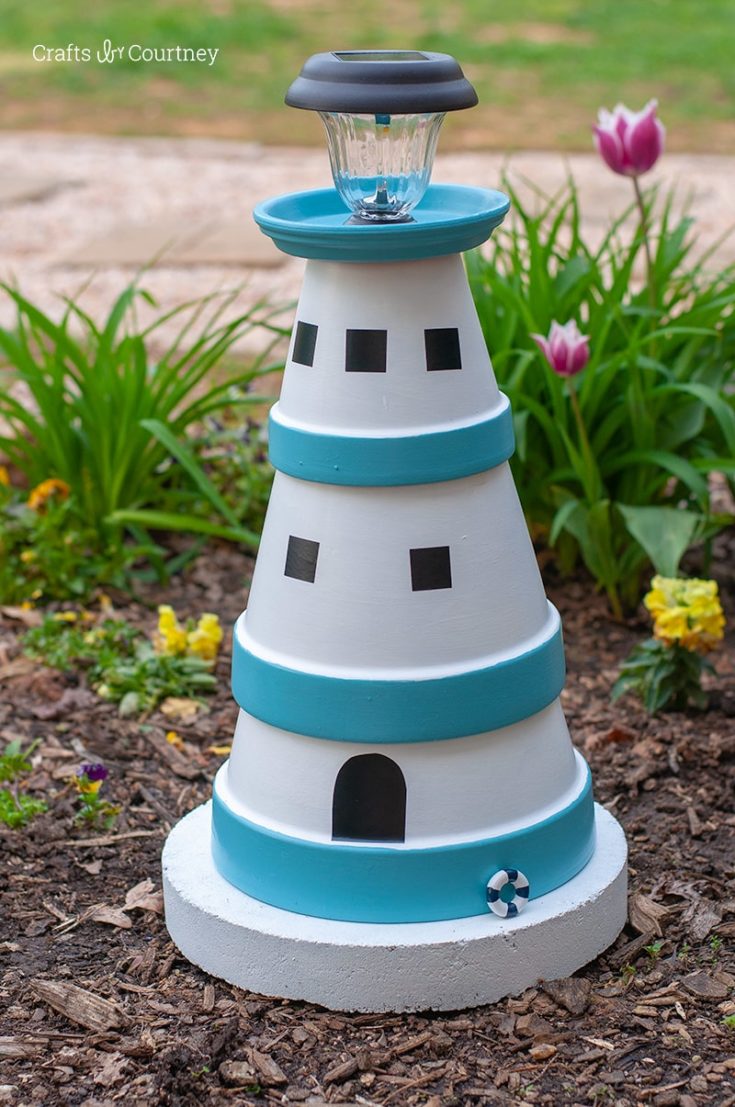
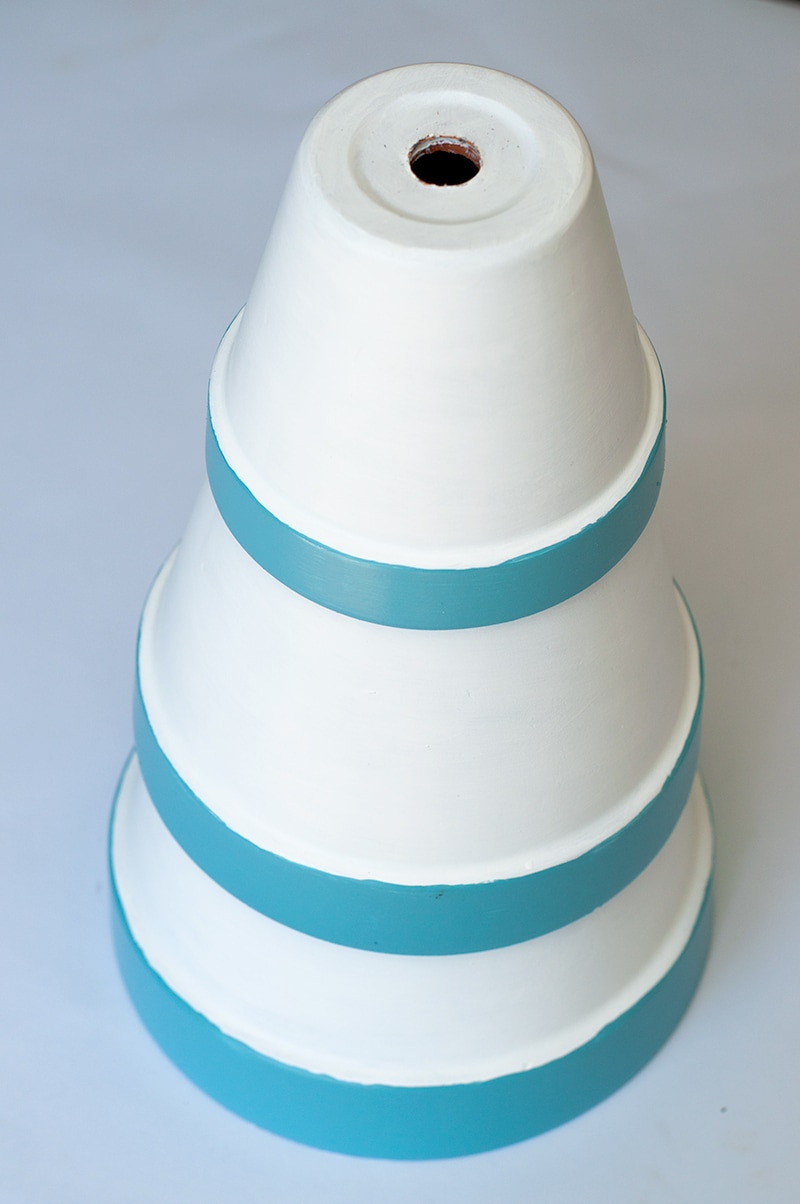
I fell in love with this lighthouse and it’s so simple to make!
This is from the Crafts by Courtney website.
Supplies Needed for Your DIY Lighthouse Project:
Clay Pots in various sizes
Solar Light
E6000 Glue
Paint Brush
Americana Decor Outdoor Living 2oz – Picket Fence
Americana Decor Outdoor Living 2oz – Poolside
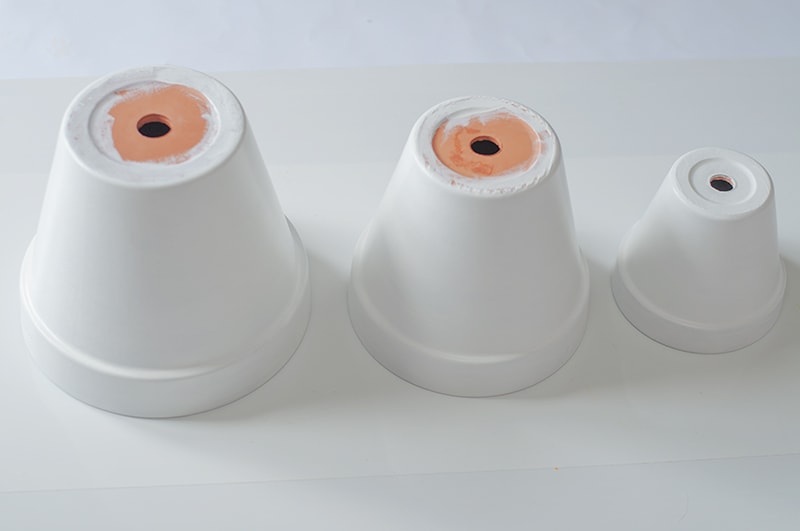
Step 1 – Paint Pots White
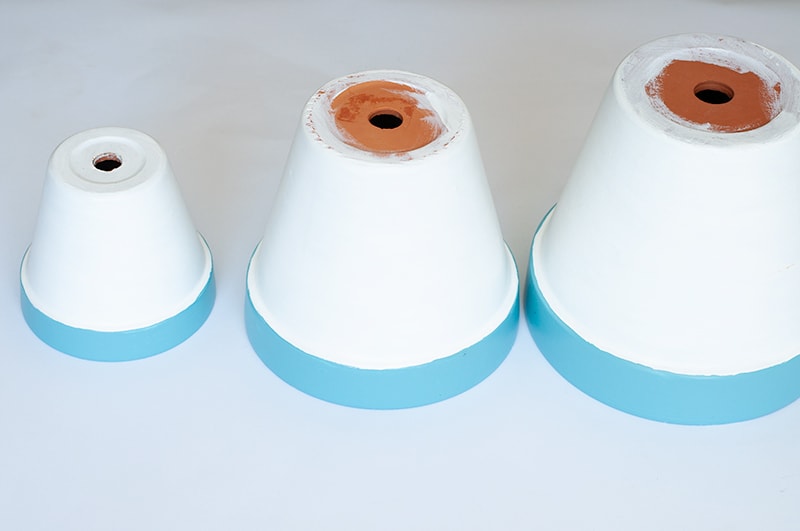
Step 2 – Add Your Blue Accent Color
Step 3 – Glue Pots together
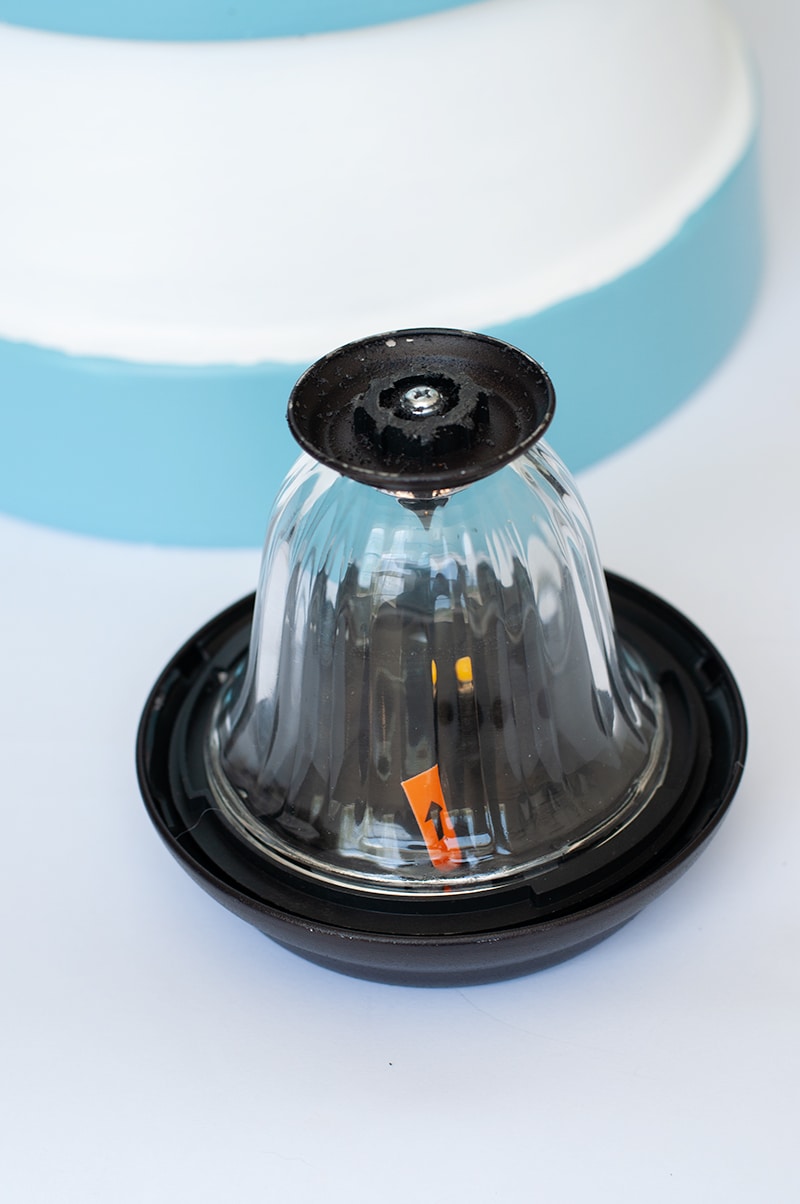
Step 4 – Add your Light
I found a solar light at Wal-Mart to place at the top of the Lighthouse. I used a small hack saw to cut the bottom of the solar light off, so that it would sit flush on the top of the lighthouse. I added a little E6000 glue to this part as well, and let sit overnight.
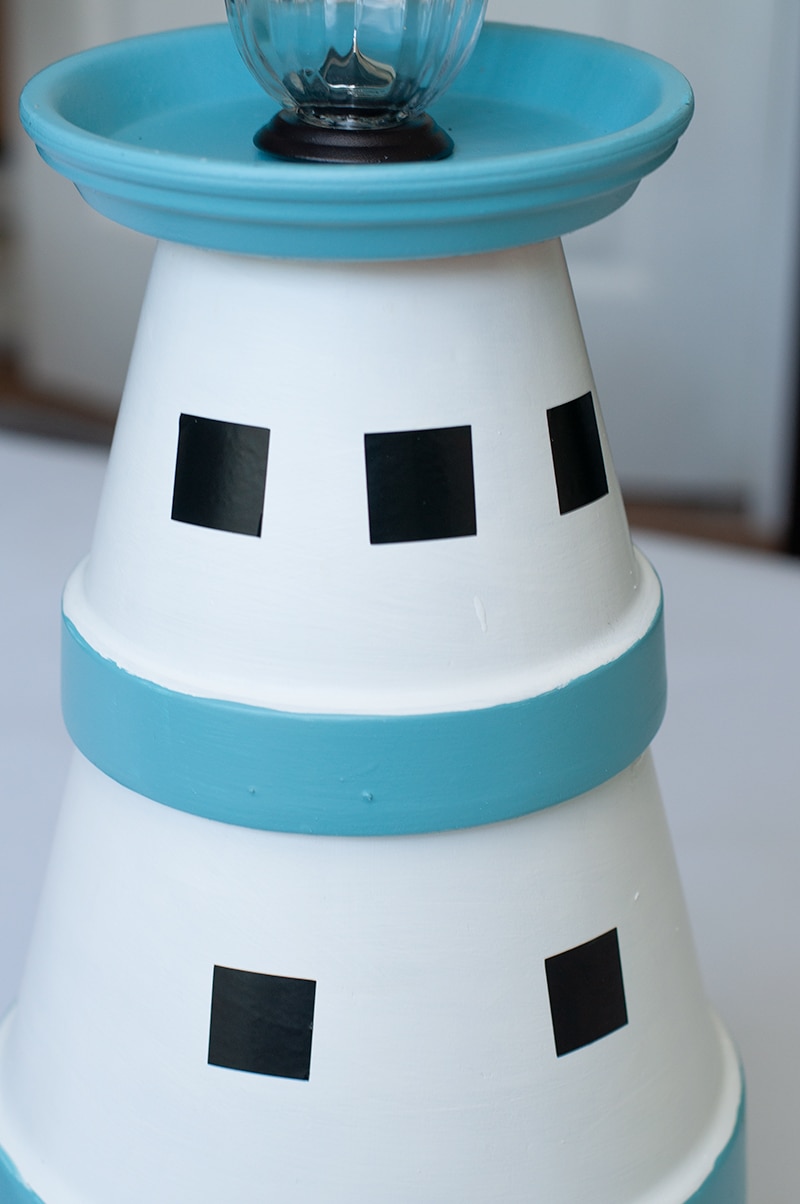
Step 5 – Add WindowsFor the window I decided to change this step last minute. I was originally going to use the black Iron gate paint. But I cut out my window shape in black vinyl to use as a stencil. Then I decided to just stick with the black vinyl as my window. That vinyl won’t go anywhere.But you can always paint in your window as well. Both options will work.
Finishing Touches
Now let’s take is baby outside and display it!
I’m very excited with how this DIY Lighthouse turned out, I really wanted to keep it simple with the details. But you can get pretty detailed with a project like this as well. I pinned some great ideas on my Pinterest page.
A few people have asked me where I got the base for the lighthouse. The base at the bottom of the lighthouse is a round paver I found at Wal-Mart. I used the outdoor paint to paint that as well.
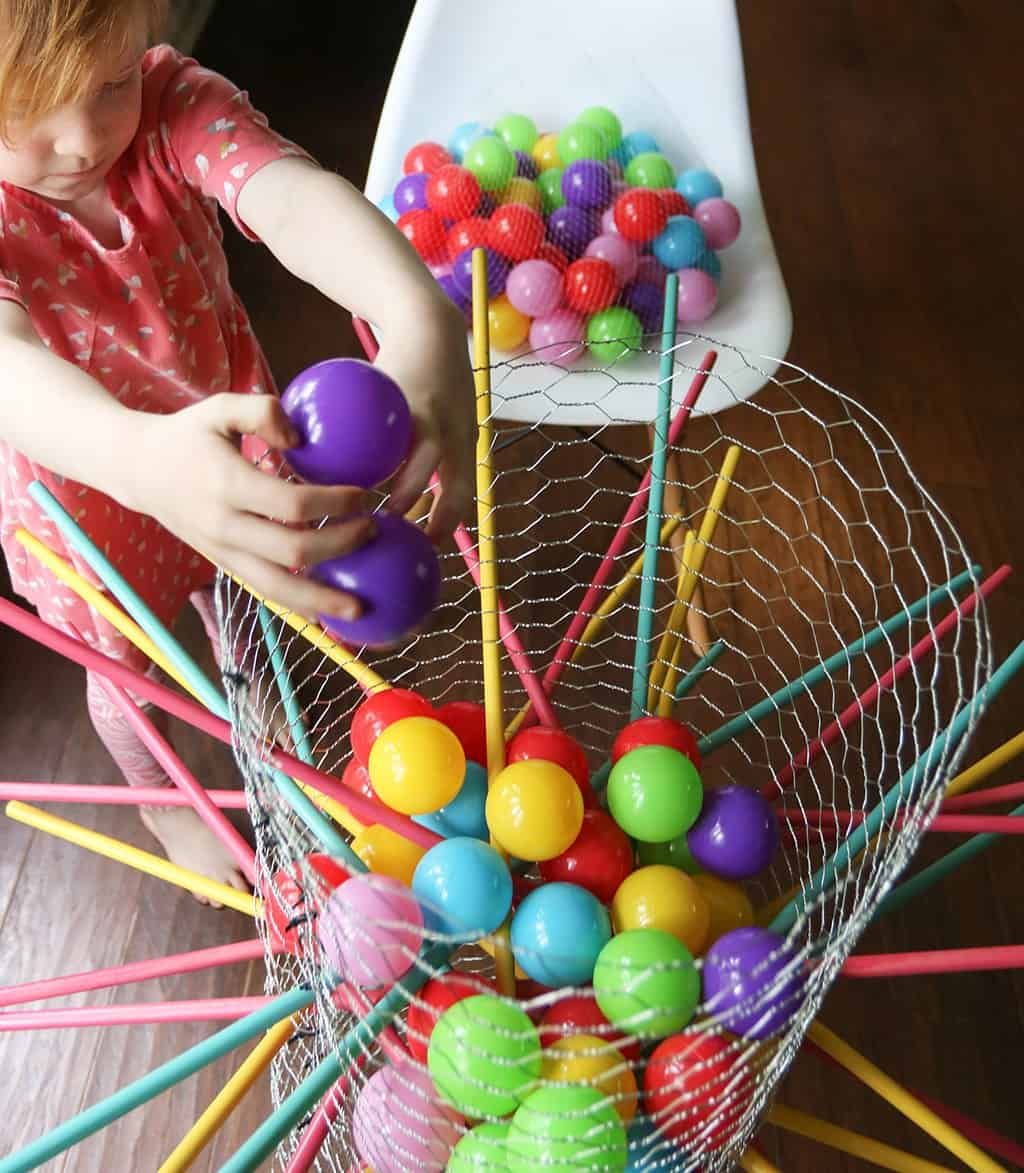
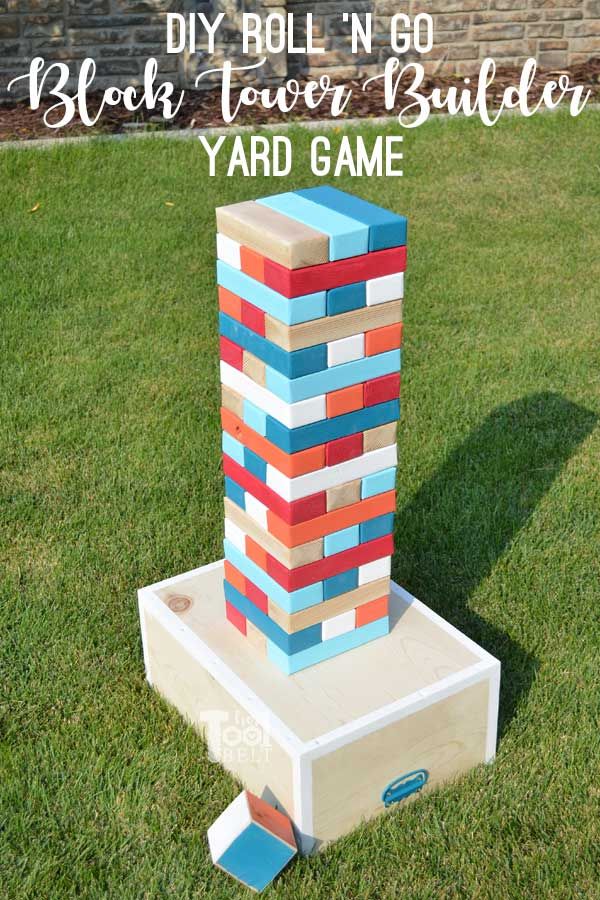
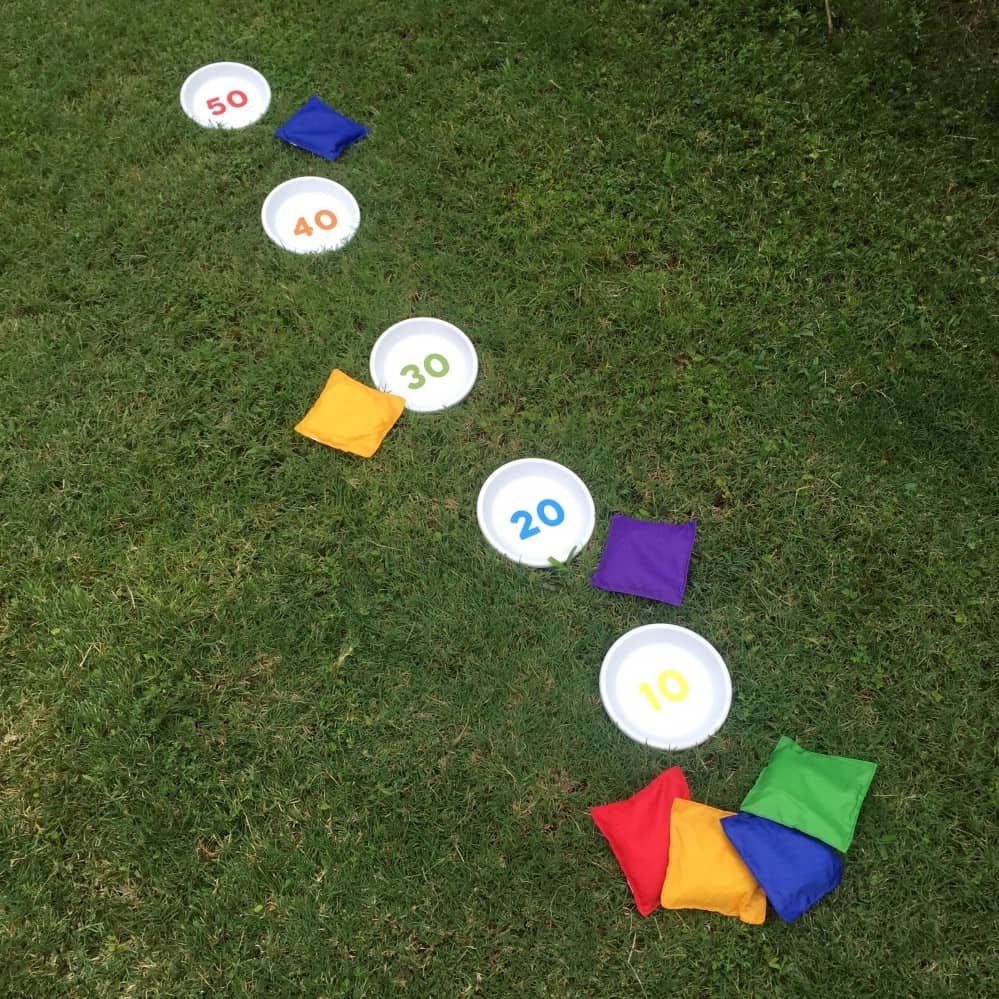
The weather is turning warmer and sunnier (hopefully) and is the PERFECT time for picnics! I found a wonderful article on the Pioneer Woman’s website listing some great outside games for picnics. (She includes instructions at her site—which I’ve listed at the end.)
Kerplunk
This game uses some chicken wire, painted dowels and balls!
Hook and Ring Game
She says this is popular at bars and restaurants in Florida. It looks like fun.
Giant Jenga
This game requires 2 x 3 blocks of wood and paint…seems easy enough. Hubby and I will make this one for sure!
Bean Bag Toss
Bean Bag Toss is another simple to make outside game. It requires clay pot saucers, some paint and bean bags!
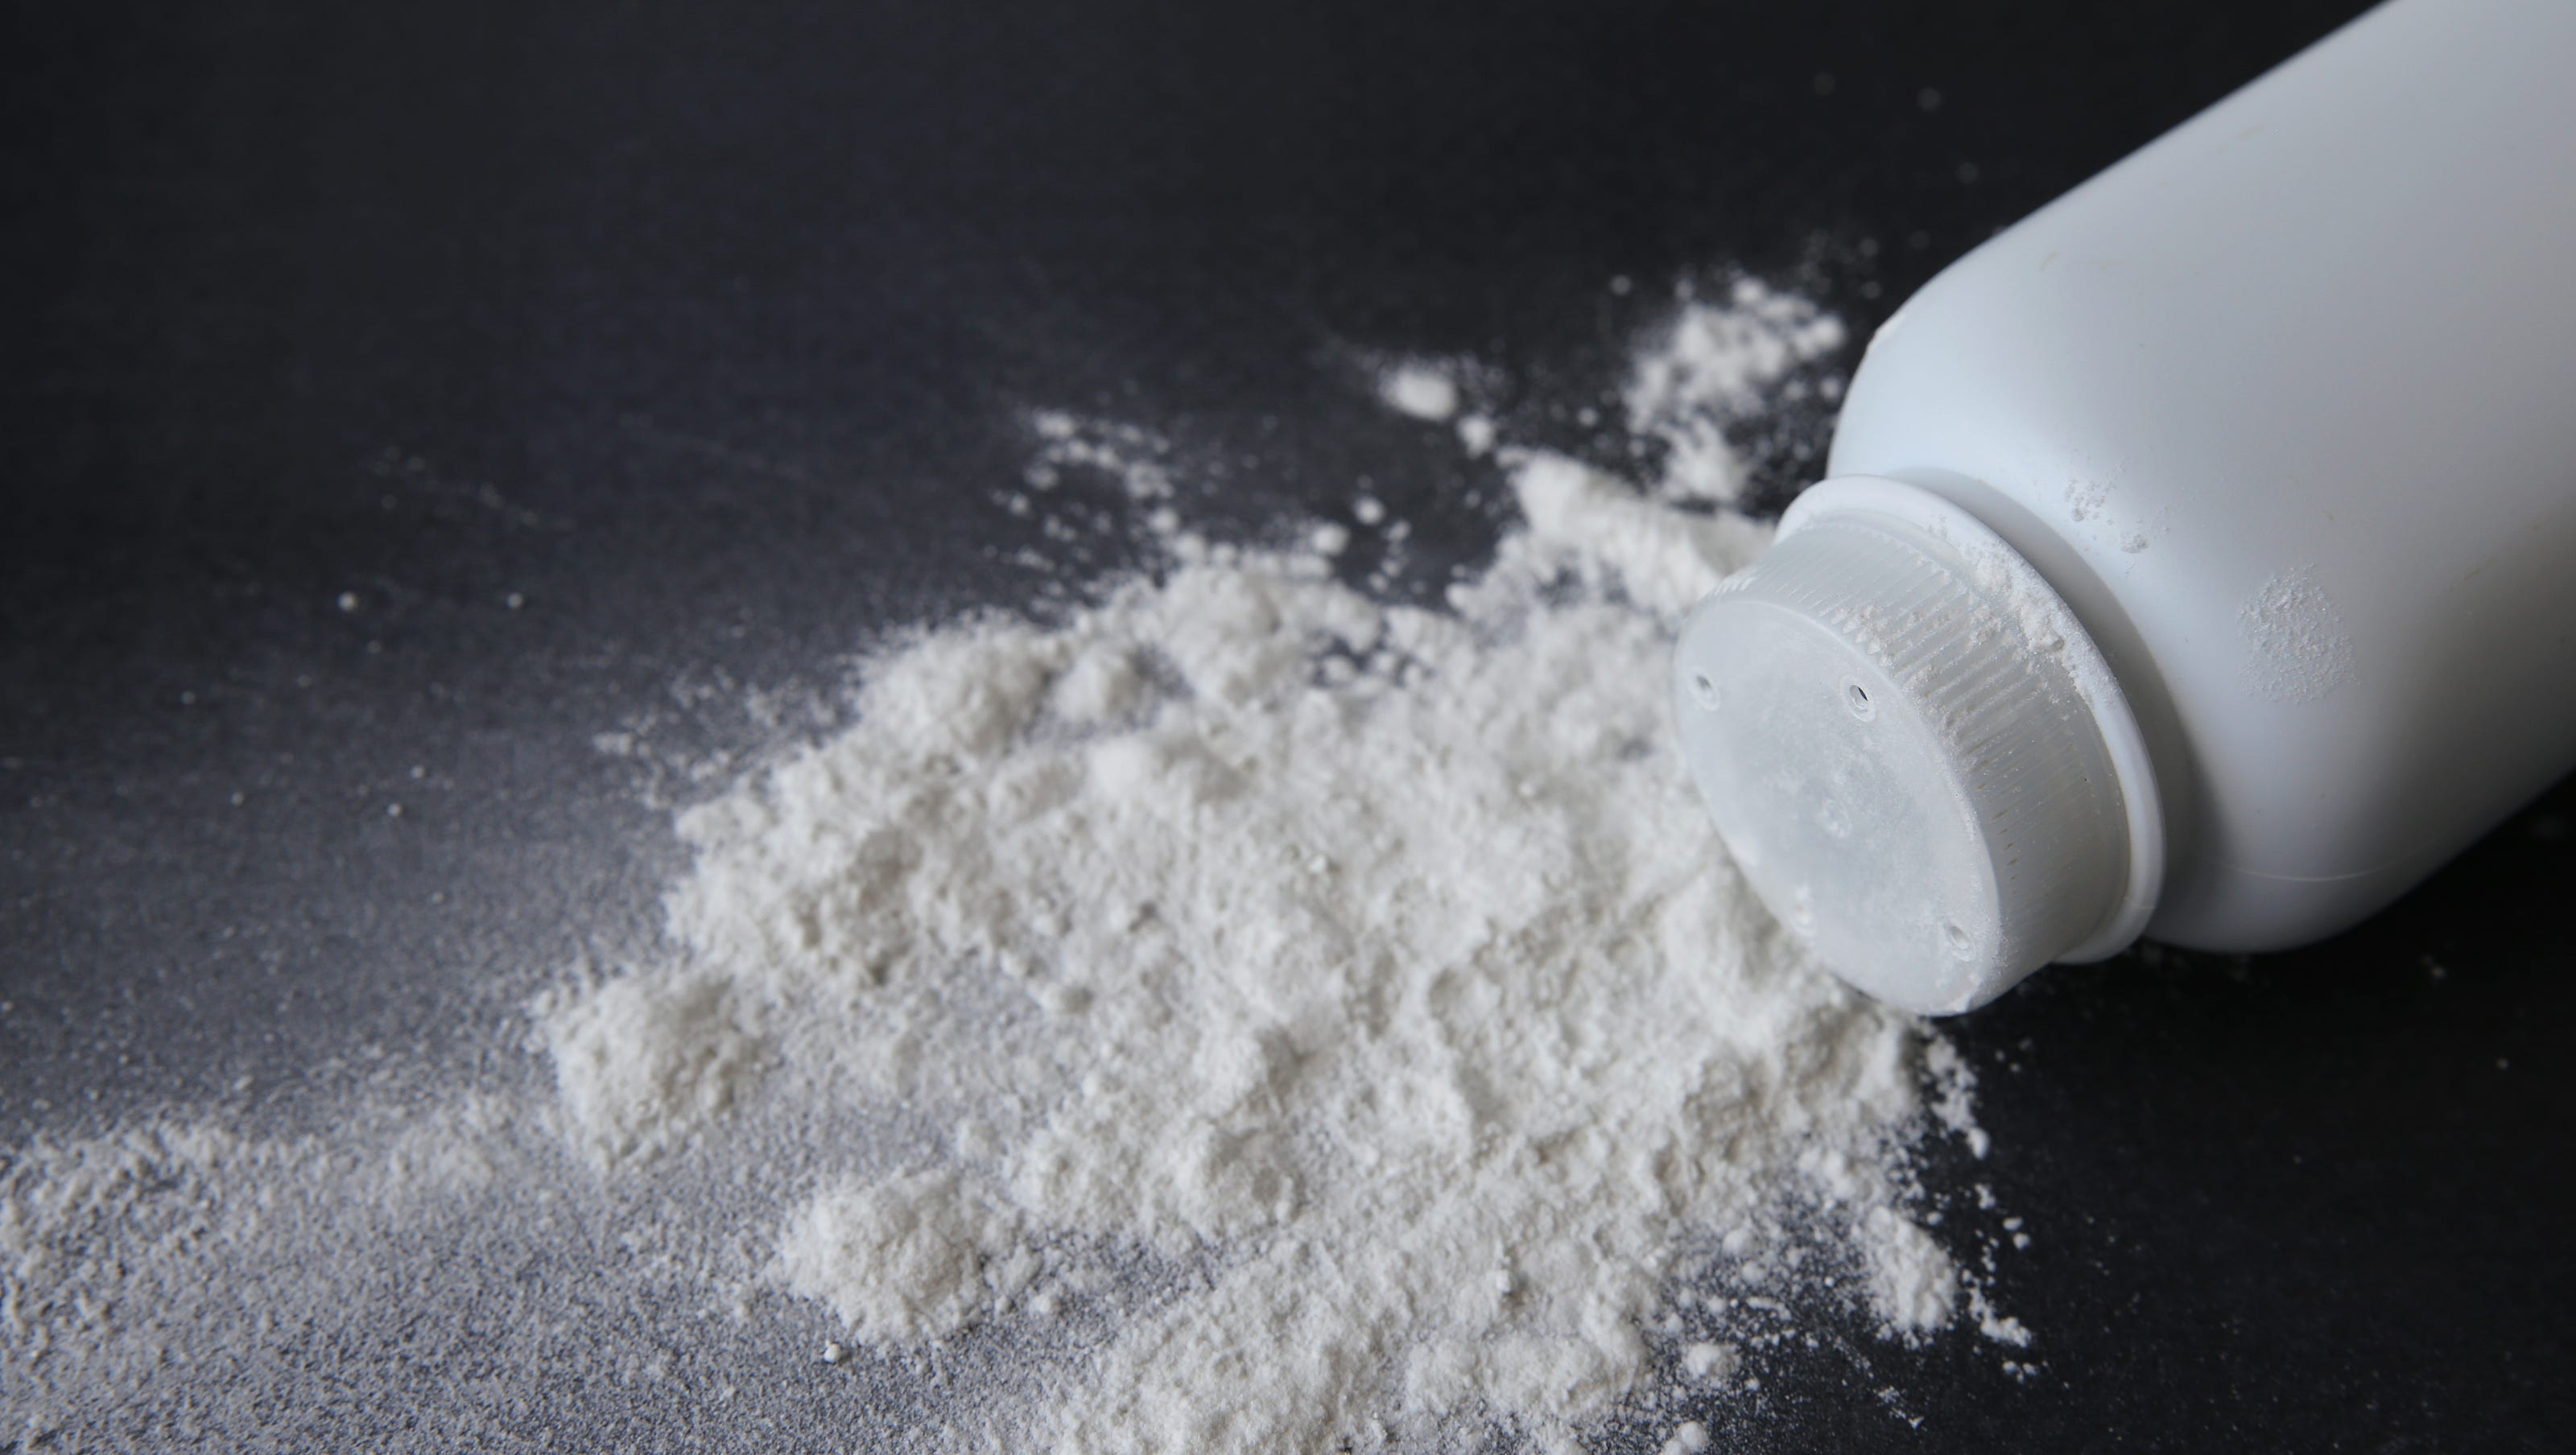
[I found this article on alternate uses for baby powder on a website devoted to frugality.]
Baby powder isn’t just for babies anymore {though, to be fair, I never did use it on my babies}. Turns out, there’s actually lots of way to put baby powder to good use. Here’s my top 10 favorite ways to use it:
Throw a bottle in your beach bag because it helps to get the sand off of your body at the end of the day. Sprinkle it on, it will absorb the moisture and the sand should easily brush right off.
Sprinkle a little in your dish washing/cleaning gloves. It makes it easier to get them on and off.
Sprinkle on the sheets in the summer. It is supposed to give sheets a cool feeling {my guess is that it does more for your sticky summer body than anything else, but it probably still feels soft and luxurious, so I am totally trying it.}
Give your flower bulbs a little baby powder bath before you plant them. The baby powder deters mold in the bulbs and supposedly deters critters from wanting to eat them. Just sprinkle some baby powder in a ziploc bag, add the bulbs and shake.
Get playing cards to stop from sticking. Put the cards and the baby powder in a baggie and shake. Dust the cards off, and they shouldn’t stick anymore.
Give your dog a dry bath. Sprinkle some baby powder on, let it sit a few minutes and then brush your dog. {Hmmm, I know some people I’d like to try this on.}
Use as an aftershave–for men and women. It’s cheaper and leaves skin feeling as soft as, well, a baby’s bottom. Ha.
Untangle knots. Got a necklace that has a knot, or a shoelace that won’t budge. Sprinkle a little baby powder on it, it will help loosen the knot.
Freshen those old books you snagged at a garage sale by sprinkle baby powder in the pages. Let the book sit for a bit, and then shake the baby powder out.
Use to absorb grease stains on clothes. Sprinkle baby powder on the spill and blot the grease out. Repeat until stain is gone, brushing off excess baby powder each time.
By Mavis Butterfield on September 23, 2013 @https://www.onehundreddollarsamonth.com/10-alternative-uses-for-baby-powder/
Today is National Crayon Day, so I went looking for crafts using broken crayons…there are a lot of them! From lip gloss to room candles, if you’ve got broken crayons, you can recycle them. I found this particular craft at TheSuburbanMom.com website. She made the craft, then provided additional tips afterward to make your experience better!
After removing any paper from the crayons. Sharpen crayons with a manual sharpener. Since we were using old broken crayons, while my daughter sharpened the crayons she could, I used a knife to chop up smaller bits.
TIP – The first one I made I used a LOT of shavings, like 5-6 crayons worth. That’s overkill. You only need one crayon for each piece of wax paper. Otherwise, it is too thick and you will lose the translucent sun catcher effect.
For the first few sun catchers we made, we mixed colors. But we discovered that when the colors melted, they became one dark shade of red. So we decided we liked the look of a single color best.
Once you have your shavings, place them on a piece of wax paper – approx 12 x 12 inches. Fold the wax paper in half and then double fold the edges to create an envelope that will contain the shavings. This is very important. Make sure you double fold over your edges or wax will run out when you iron.
Using a low setting, place your wax paper envelope between a large piece of folded parchment or kraft paper. Wax will ooze out — do not skip the parchment or kraft paper. (At first I tried using a rag as a drop cloth, but it got messy. The parchment works well because it contains the melted crayon.)
As you iron, let the melted crayon run in the wax paper envelope filling it with color.
When the melted crayon is more or less evenly distributed, set it aside to cool (just a couple of minutes).
Once cool, use a pencil to draw large hearts on the wax paper envelopes, and then cut out hearts. (I was surprised how easy it is to cut the wax paper with melted crayon inside.) Initially, I was going to trace perfect hearts, but I decided to freehand them and let my daughter cut them out.
Punch a hole in your hearts and hang in the window.
Super pretty, right?
(Pat’s note: This can easily be used to make patriotic suncatchers using a star template or a Halloween/pumpkin one, or whatever.)
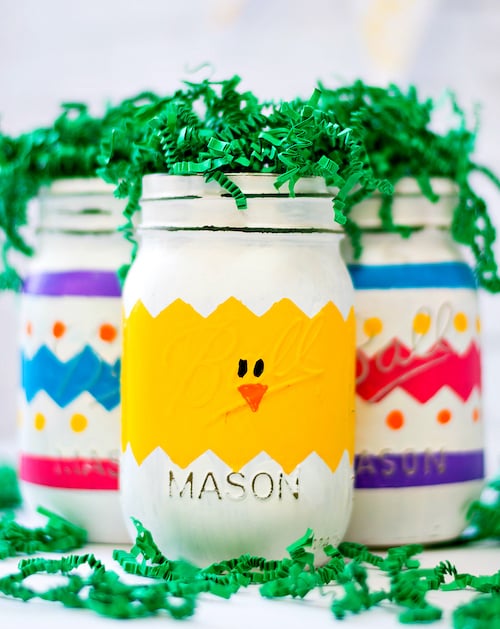
Several years ago, my granddaughter and I made these adorable (and EASY!) Easter jars. They require clean, empty jars, paint, googly eyes, pipe cleaners, a puff ball and some foam or felt scraps.
Of course, there’s ALWAYS Mason Jars to paint…LOL
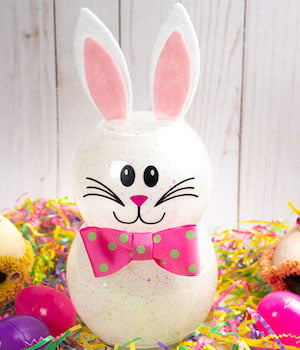
This bunny is basically the same idea only you use 2 small glass globes. I used rounded glass containers that I saved after I burned the candles in them. I microwaved the glasses to liquefy the remaining bits of wax and poured that out. Then I washed them and used them!
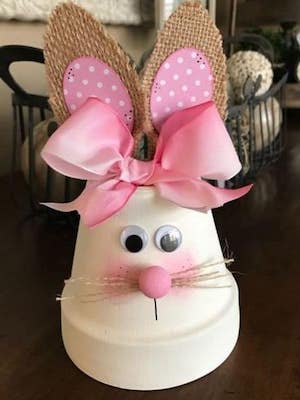
This idea uses a flowerpot, some burlap for the ears, googly eyes, a wooden ball (for the nose) and ribbon!
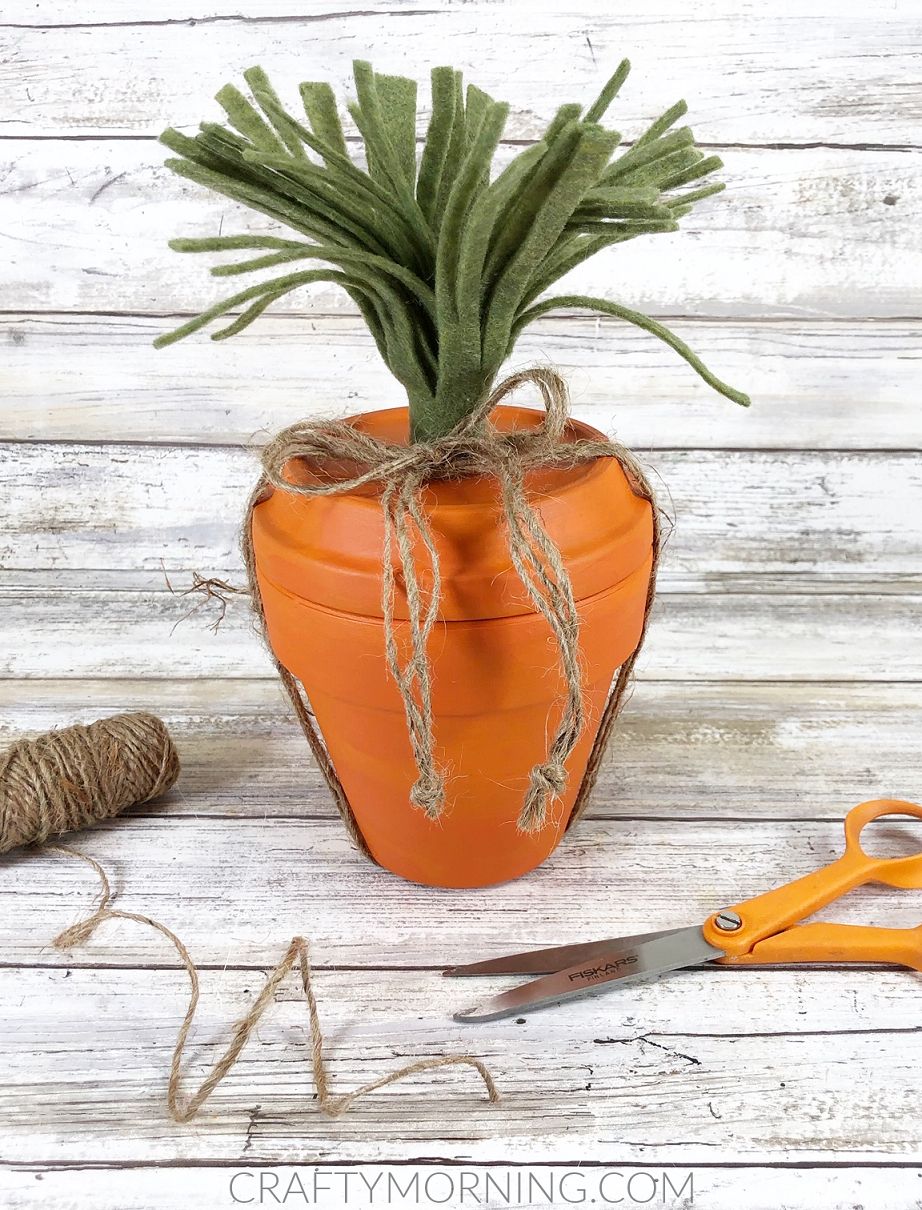
How about a super easy carrot? You’ll need a clay pot and saucer, some twine, felt, acrylic paint and glue.
Lastly, I offer these bunny sachets!!
You’ll need to draw a bunny shape (see picture below) on doubled fabric, and then, starting at the flat bottom part, sew around the edge. (If you want that exact size, add a ¼ to ½ inch around the edge for a seam.) Leave an opening so you can turn the bunny inside out. Turn the sewed bunny inside out and then tie a ribbon at the base of the ears to prevent the filling from going into the ears. Use a funnel to spoon a mixture of dry rice and dried lavender into the bunny head. Stitch the opening closed. Add a face with a fabric marker if desired.
In searching for some tips on fixing something totally unrelated, I happened upon this article by Juliana LaBianca in Reader’s Digest.
The beauty of nail polish
Nail polish can be used for a lot more than just adding a little color to your nails. If you have a few extra bottles lying around the house, check out these clever ways you can use them up.
Smooth out slightly splintered wood
Seal a wooden surface with a coat of clear nail polish (for stained wood surfaces, first find a color that matches the wood). The new finish will stop supplies such as wooden hangers from snagging clothes and keep fingers splinter-free.
Waterproof your garden labels
Make plant labels waterproof by coating them in clear nail polish. You’ll never have to Google how often to water your herb garden again. This trick also works for waterproofing address labels on packages.
Prevent rust stains
Coat the bottom of metal cans (think shaving cream and hair spray) with clear nail polish to prevent rust from developing and staining your sink or medicine cabinet.
Stop a run in tights in its tracks
Keep a small hole from spreading by dabbing the run with clear nail polish.
Prevent frayed fabric from getting worse
Tame frayed fabric, such as the wisps on the cuffs of a nylon-lined jacket or the tiny broken threads on the bottom of a well-worn wool pencil skirt, with clear polish.
Fix peeling pearl buttons
Coat (fake) pearls with clear nail polish to stop them from peeling.
Stop a cracked windshield from getting worse
Stop a small windshield crack in its tracks with clear polish. Working in the shade, paint the crack on both sides of the glass. Move the car into the sun to allow it to dry. You’ll eventually need to repair the windshield, but in the meantime, use polish to buy time and shop around for the best estimate.
Treat an unraveling shoelace
Dip an unraveling shoelace in clear nail polish. Twist it back into shape and allow it to dry.
Protect tarnish-prone costume jewelry
Prevent costume jewelry from tarnishing by brushing over it with clear nail polish. This hack will also stop skin discoloration and irritation from cheap jewelry.
Seal an envelope
Seal an envelope with a brush of nail polish. For a fun letter, such as a party invitation or thank you note, use a bright color.
Hide scuff marks on a shoe or bag
Fill in a scuff with a dab of nail polish that matches the piece. No one will be any the wiser. (Note: If you plan to resell a vintage or designer item, the paint could lower its value.)
Hide a chipped tile
Color in a small chip on a kitchen or bathroom tile with a matching nail polish color. The small brush and variety of colors available will ensure accuracy.
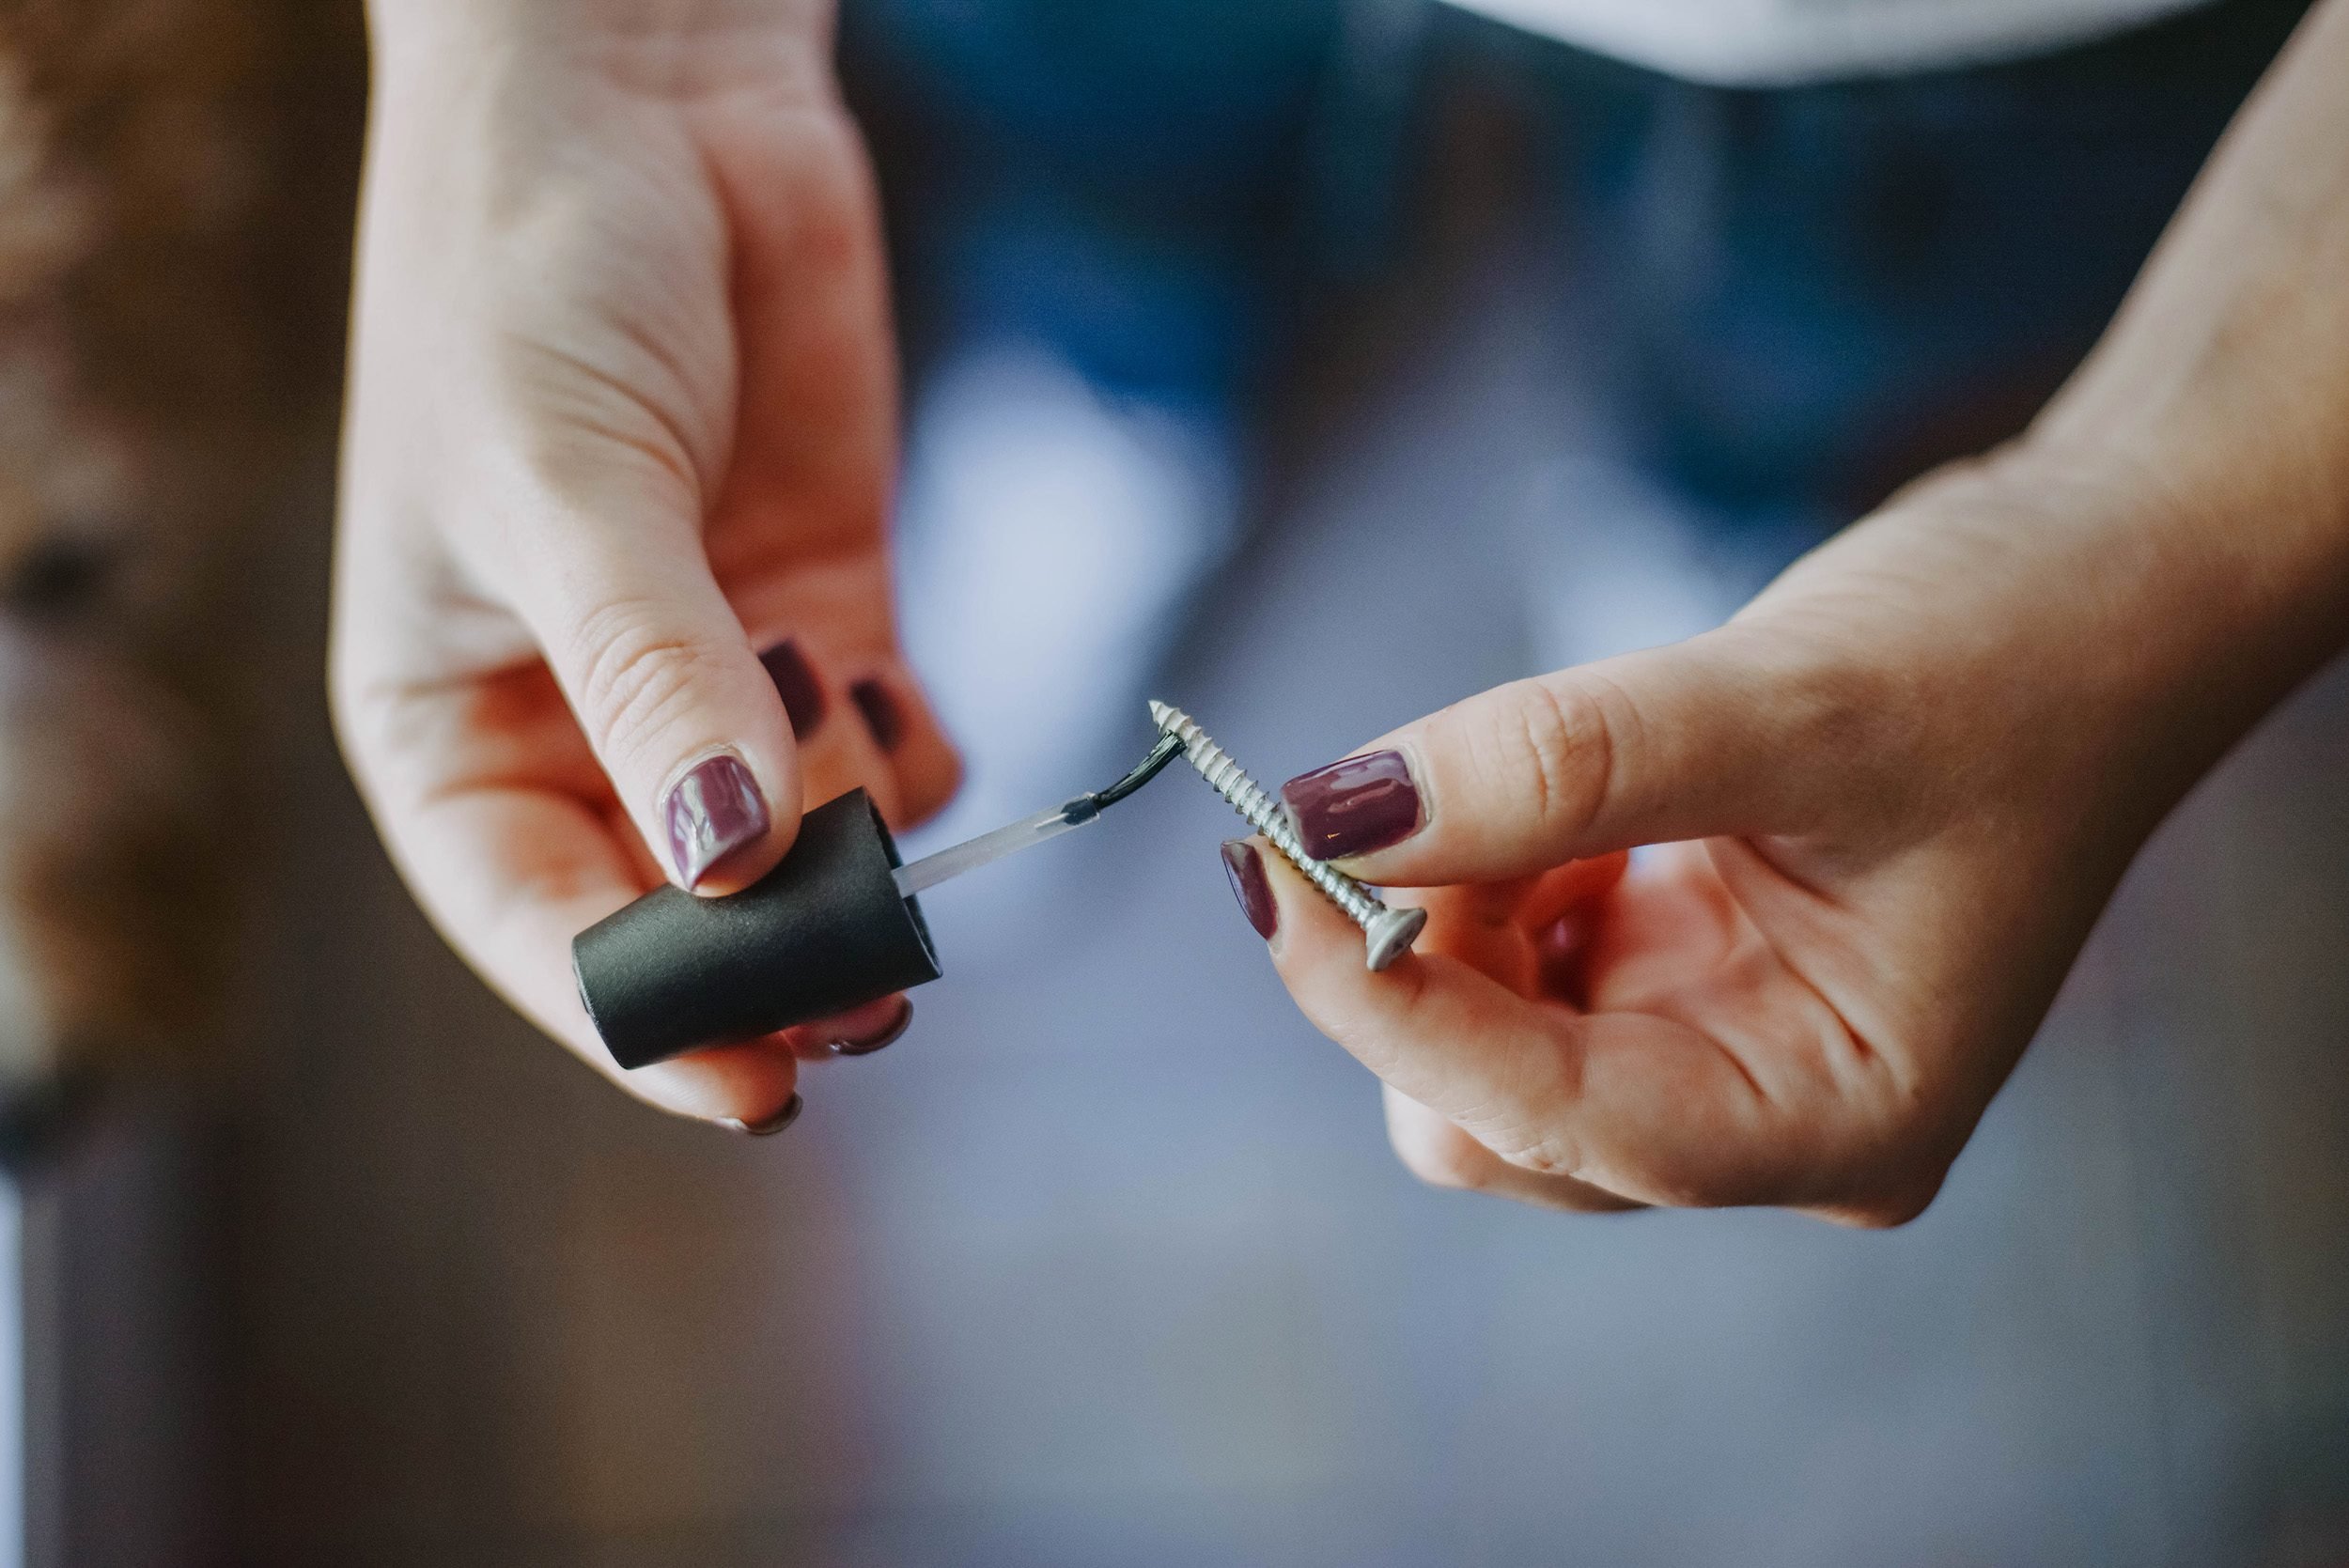
Tighten a loose screw
Secure a screw by first painting it with nail polish, which will give it extra stickiness. Paint over the top of the screw to prevent it from developing rust.
Prevent chipped car paint from rusting
A small indent or piece of chipped paint could develop rust once the spot is exposed to the elements. Seal yours off with a coat of clear nail polish.
Organize a jumbled set of keys
Organize your mess of keys by painting the tops of the most important ones with different colored nail polish. You’ll always know that blue means home and red means gym locker.
Reattach a loose rhinestone
The ultimate wedding must-have? A bottle of clear nail polish. In addition to fixing any manicure fiascos, the polish can also be used to reattach a loose rhinestone or crystal.
Fix a window screen
Mend a torn window screen with a dab of clear nail polish.