DIY: 21 Uses for All Kinds of Plastic Jugs: Part 2

Continuing from FAMILY HANDYMAN:

Laundry Detergent Twine Dispenser

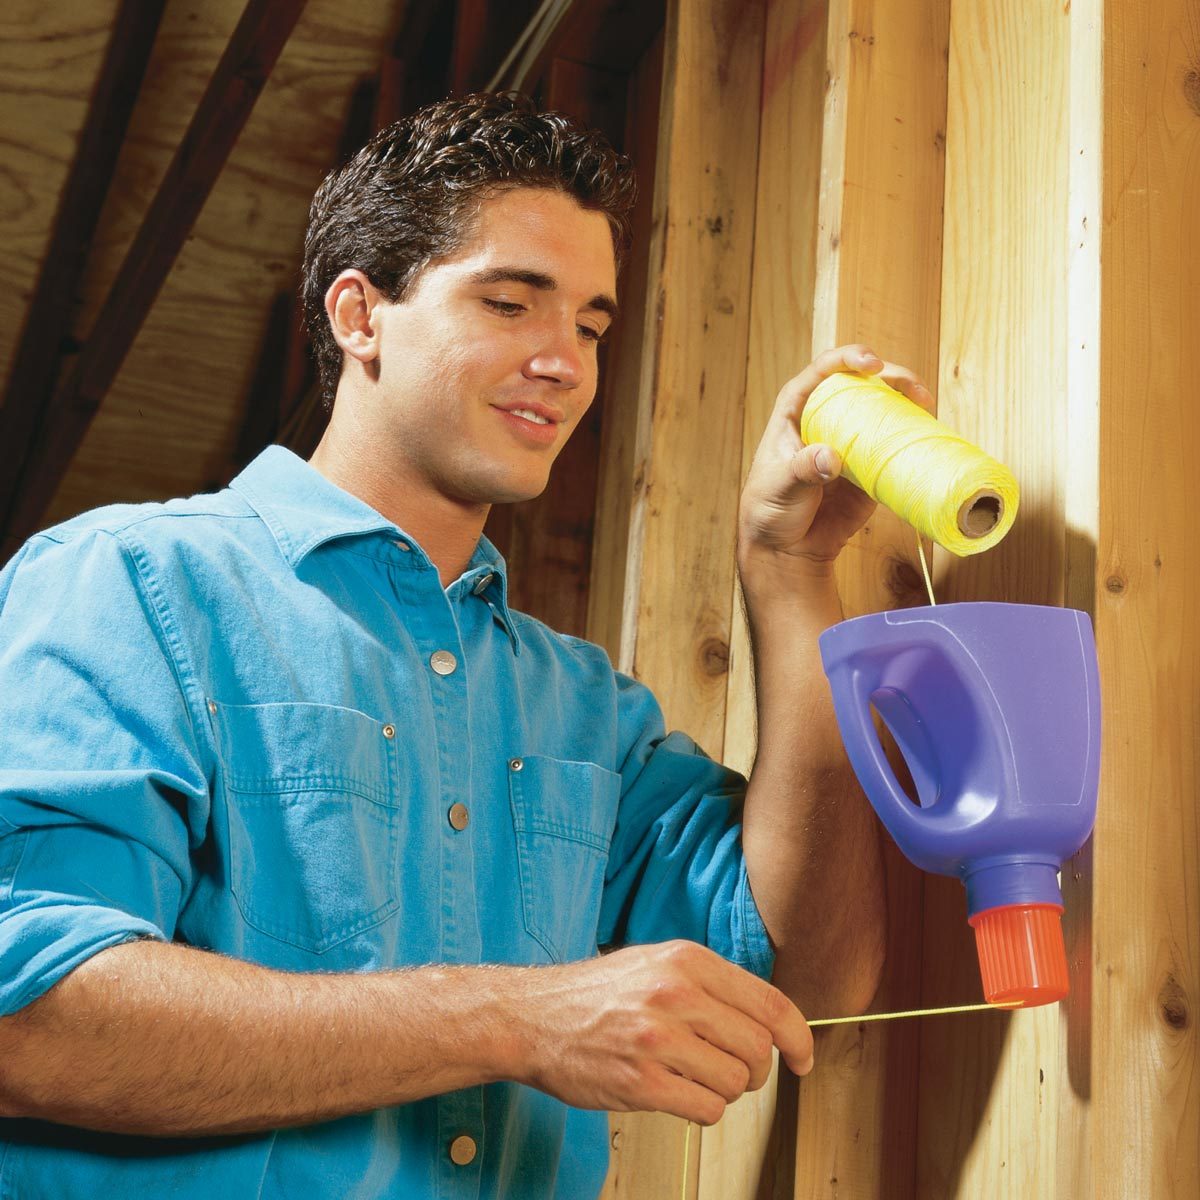
Prevent balls of twine from tangling up by making a twine dispenser from an empty plastic detergent jug. Cut the bottom off the jug and drill a hole in the cap. Screw the jug to your shop wall with the spout facing down. Drop the ball of twine into the jug, thread it through the hole and screw the cap on. — Paul Chupek

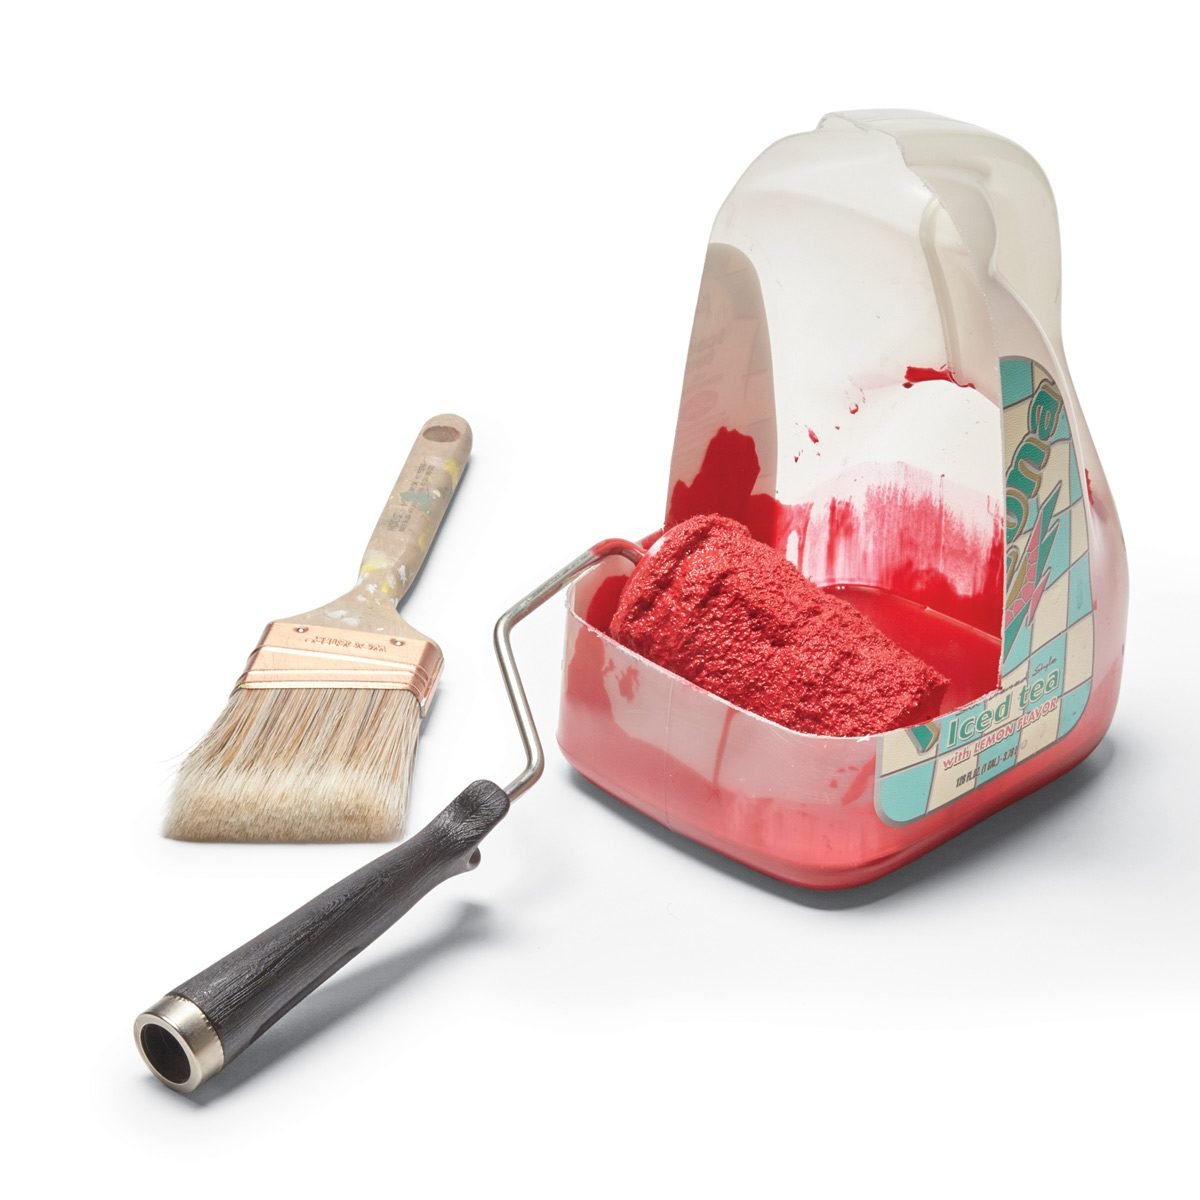
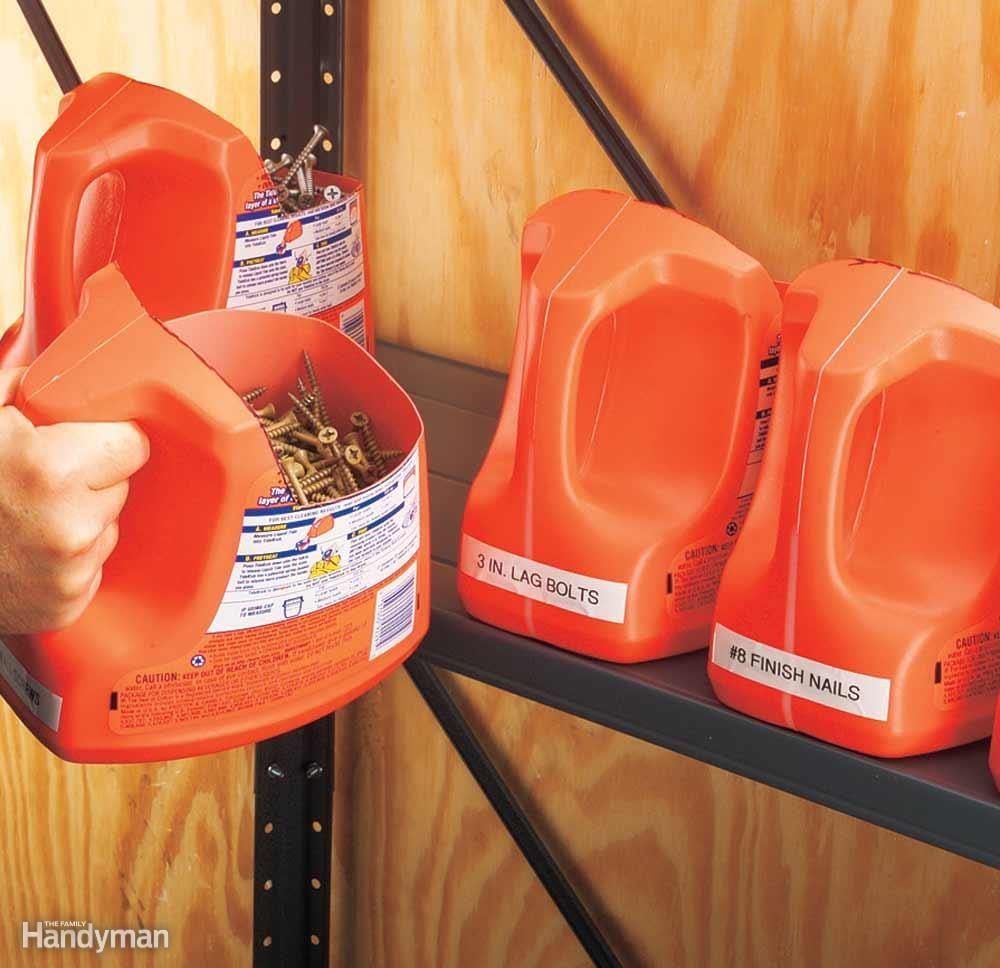
Furniture Stripping Helper

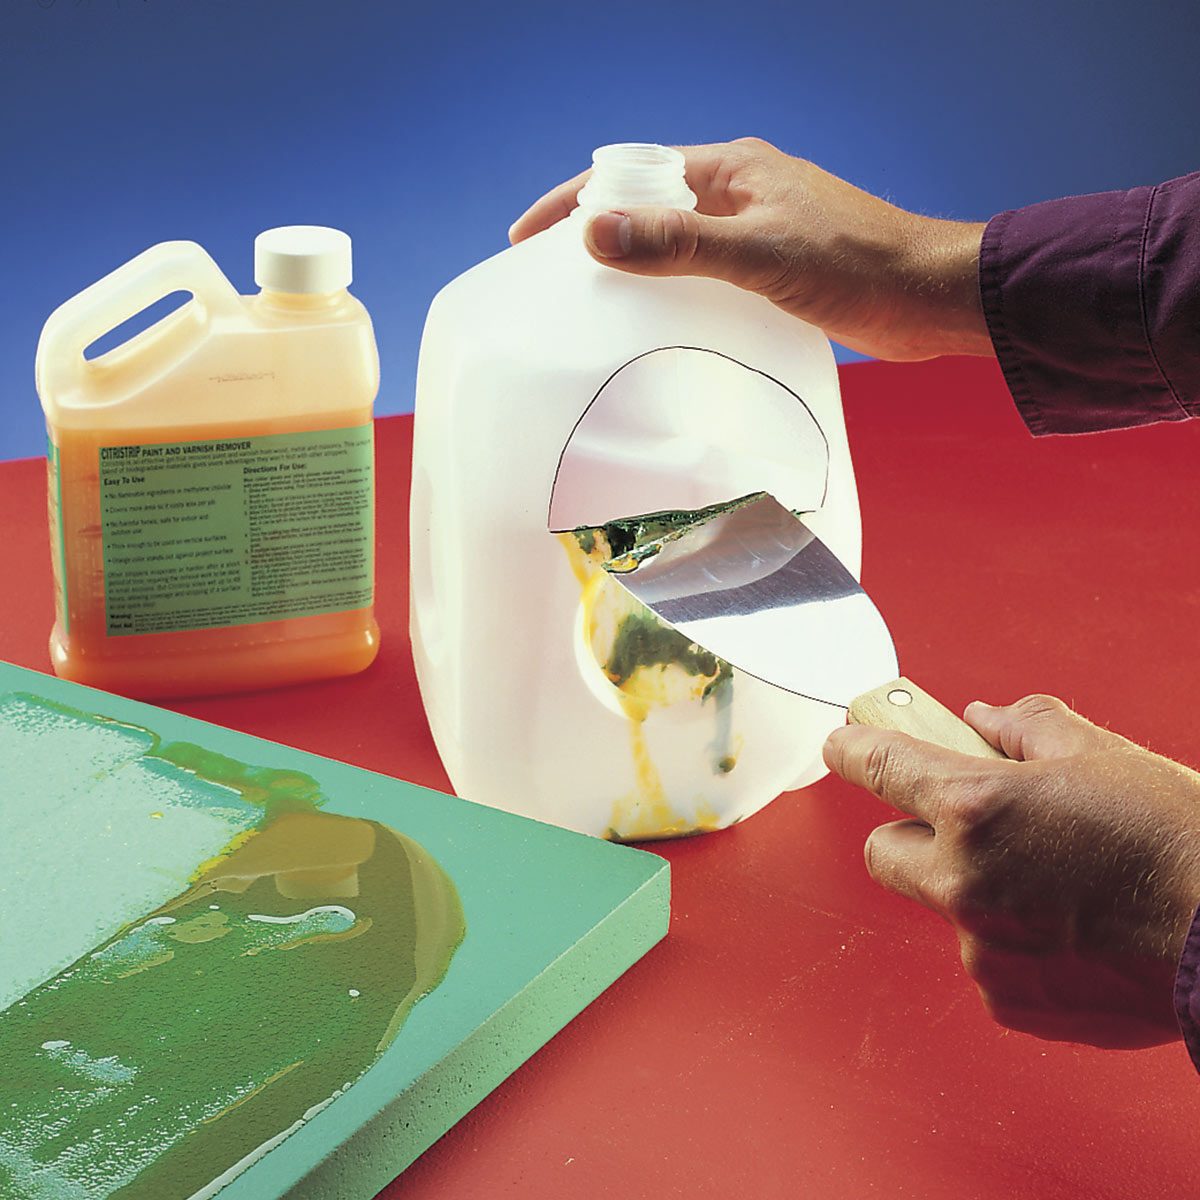
When stripping old paint or varnish, how do you get rid of the stuff once it’s on your putty knife? Cut a semi-circular opening in the side of an empty gallon jug, then clean the loaded scraper on the flat edge of the hole. When you’re done, and you want to reuse some of the stripper, upend the jug and use the neck of the jug as a funnel to pour the stripper into another container.

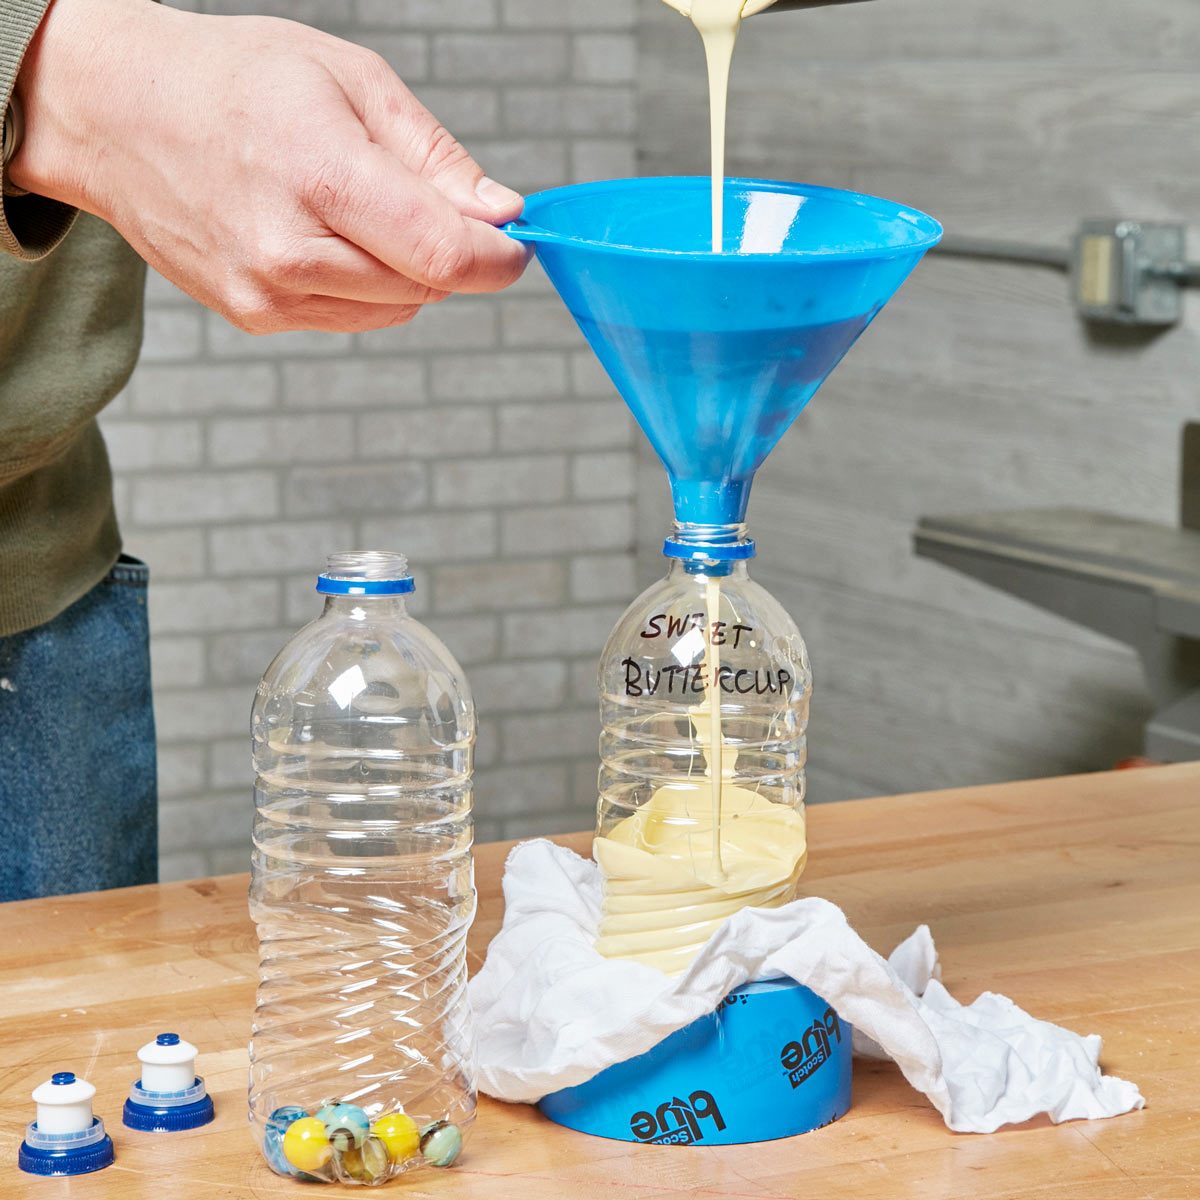
Plastic Bag Dispenser

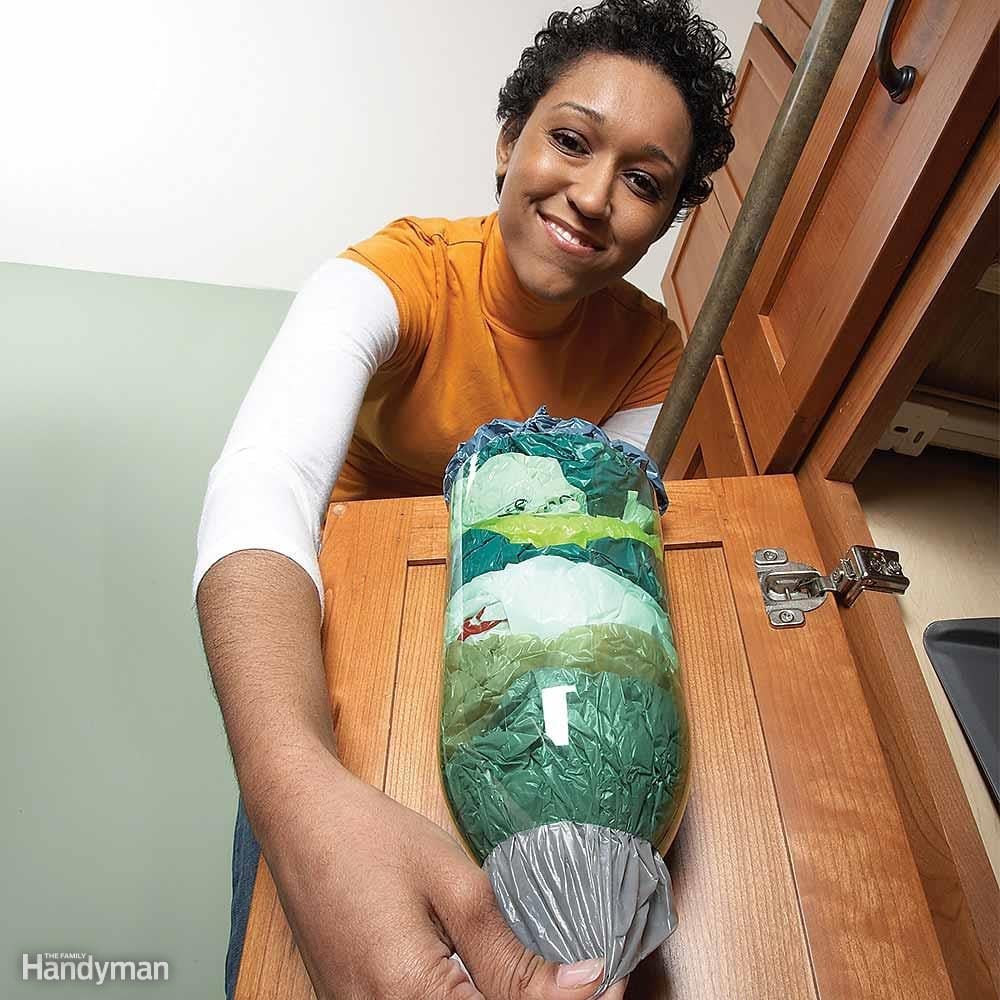
To make it easy to stow and reuse plastic bags, make a dispenser from a discarded 2-liter soda bottle. Cut off the top and bottom with a razor knife. Trim any jagged edges so you don’t tear the bags when you pull them out, then screw the dispenser to a cabinet door or closet wall (or attach with hook-and-loop tape).

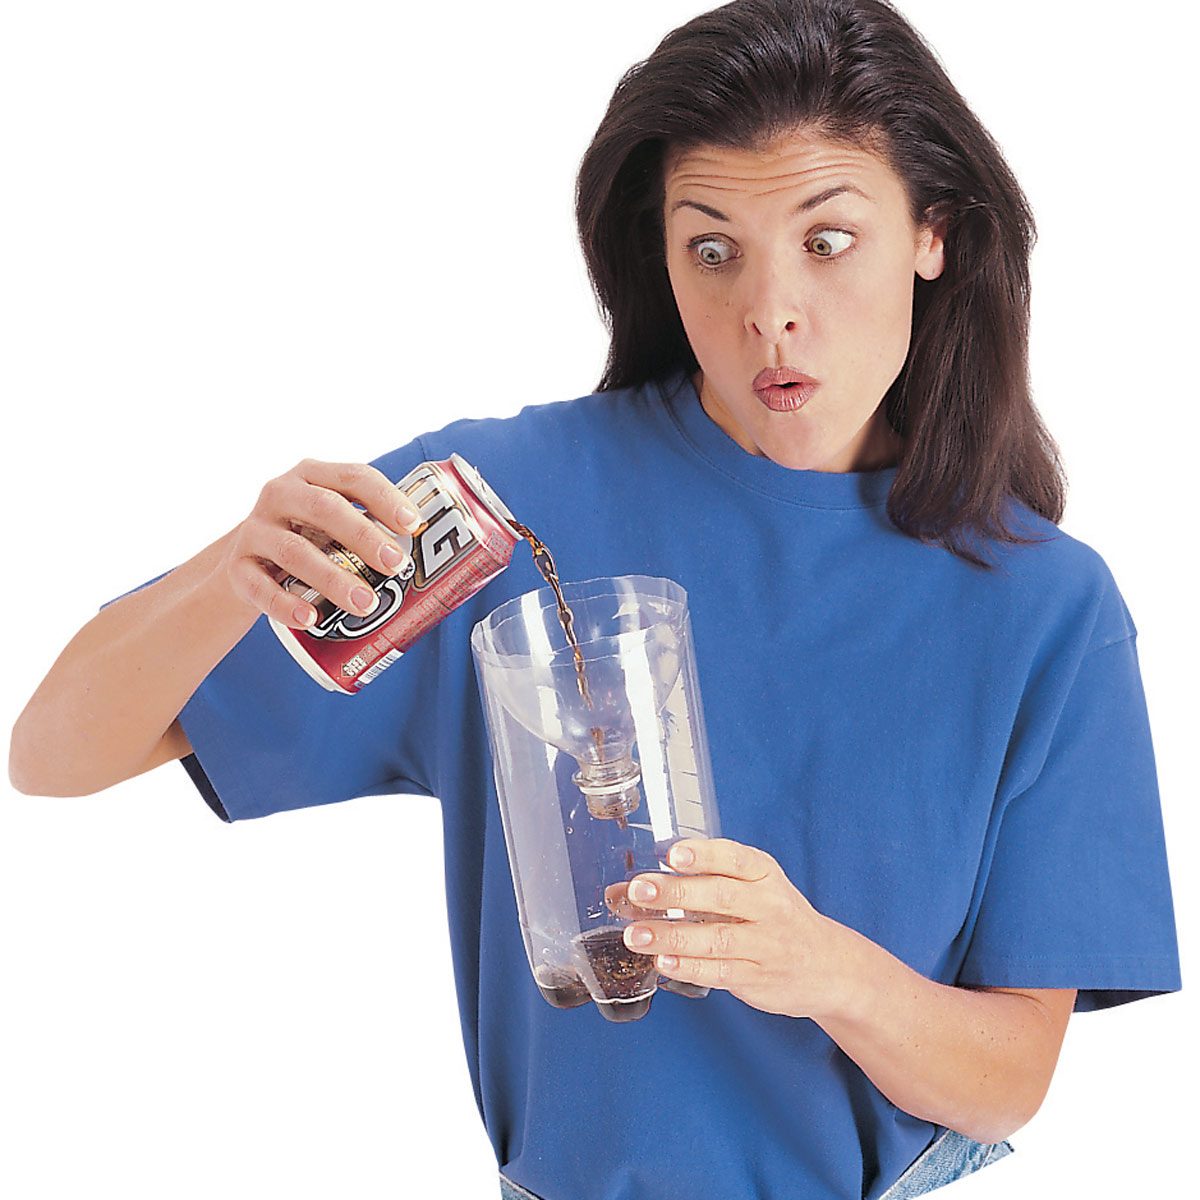
Water Bottle Nail Pouch

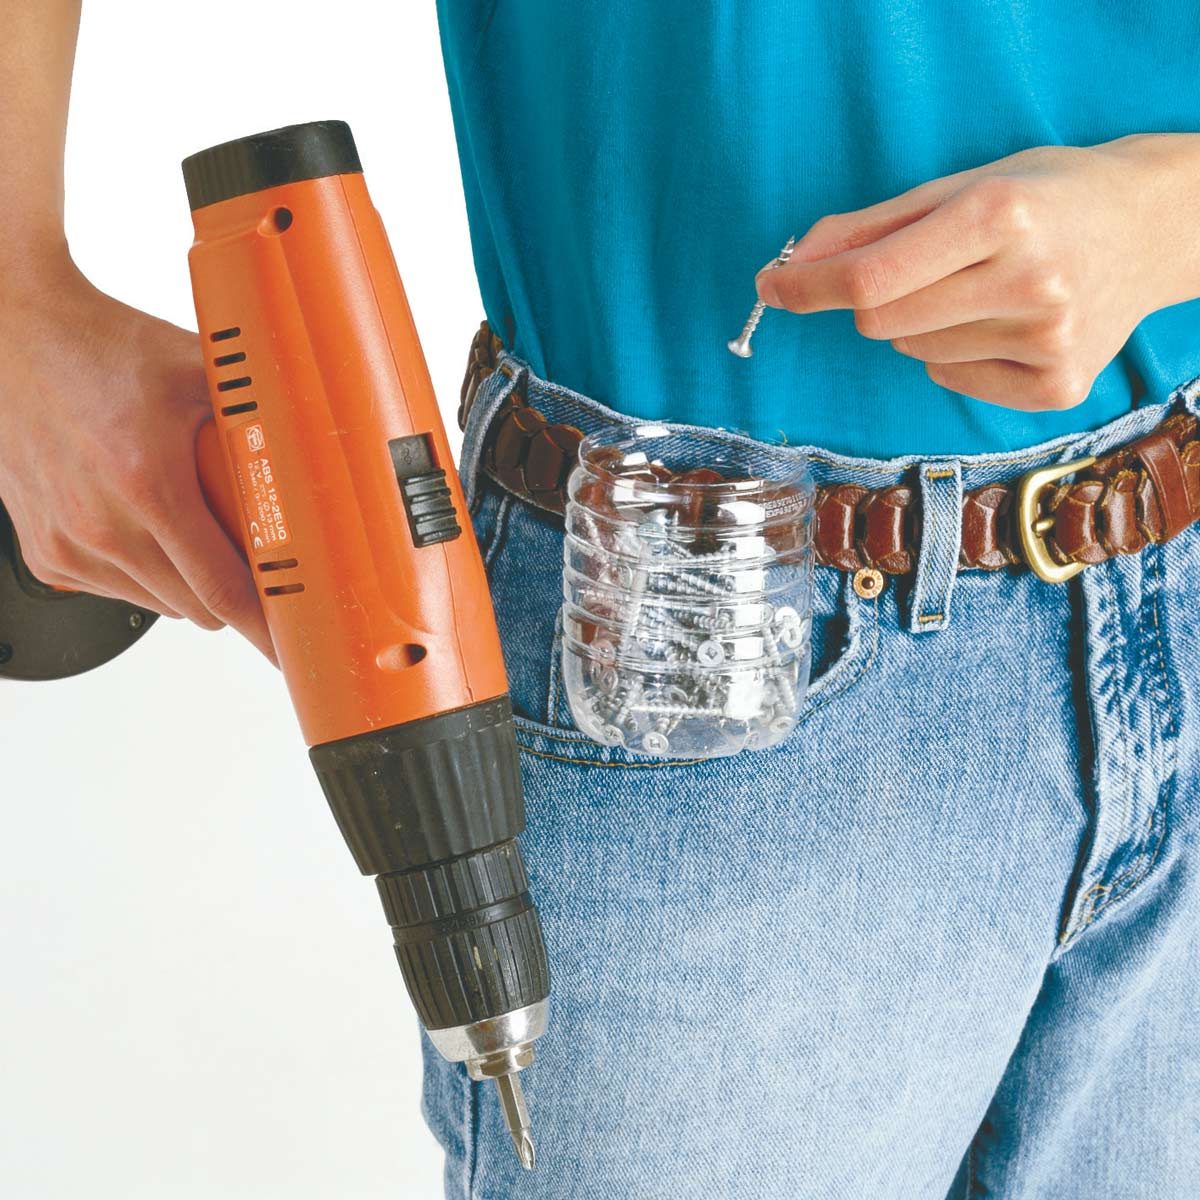
Make a nail holder from a plastic beverage bottle. Cut the top off an empty bottle, leaving a 3-1/2 in. tall container. File off any sharp edges or cover them with tape. Cut two 1-1/2 in. vertical slits 1 in. apart in the center of the side. Slide the end of your belt through the slots for a homemade nail pouch. — R. B. Hines.

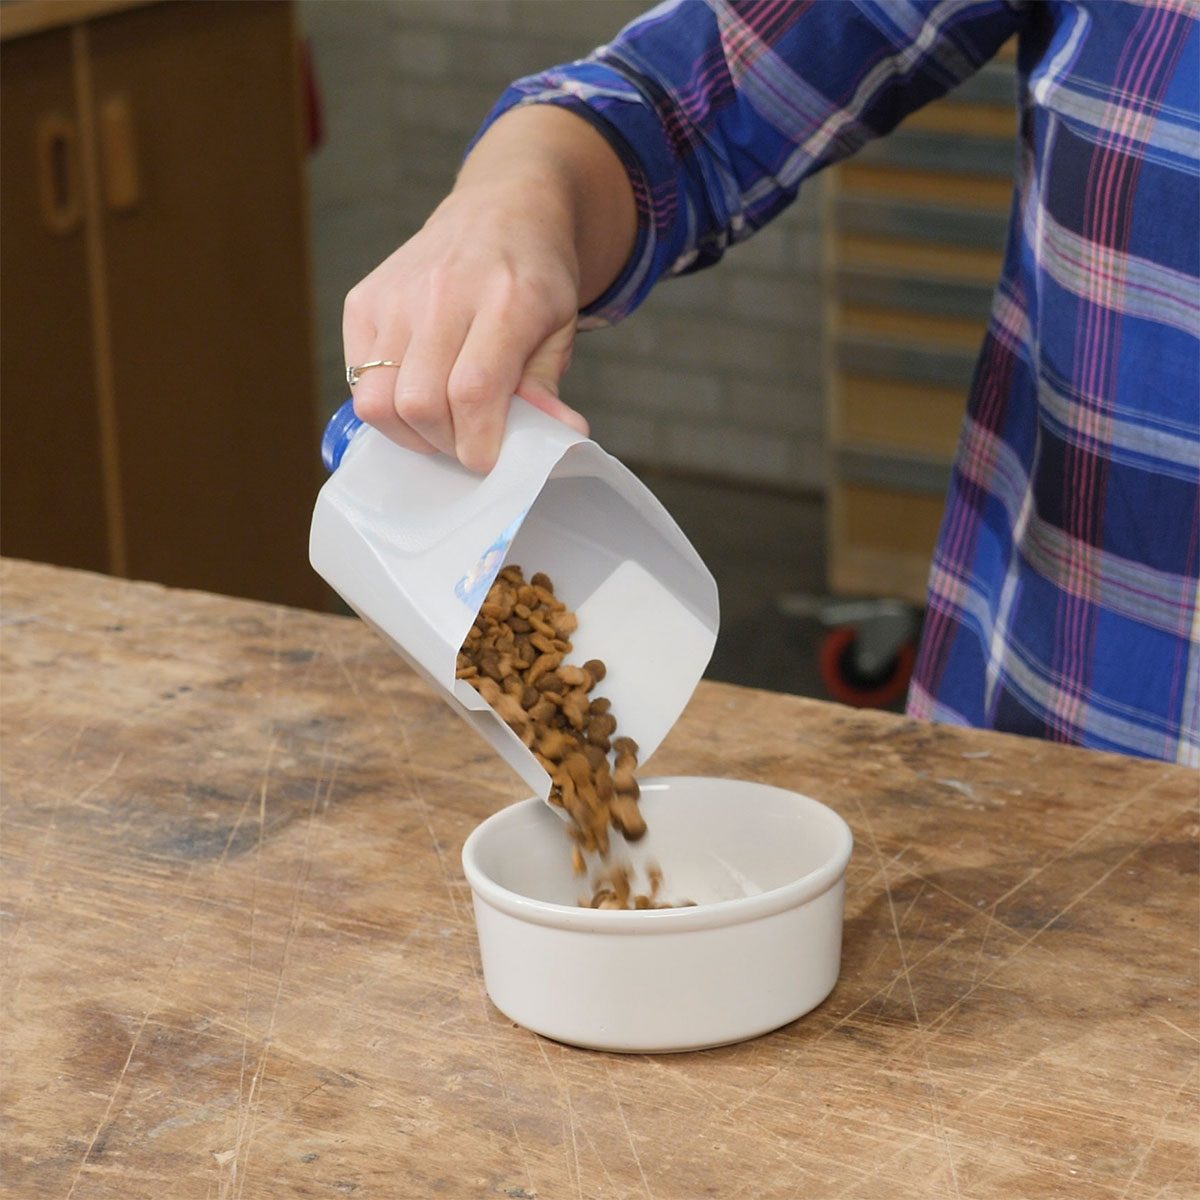
Laundry Jug Watering Can

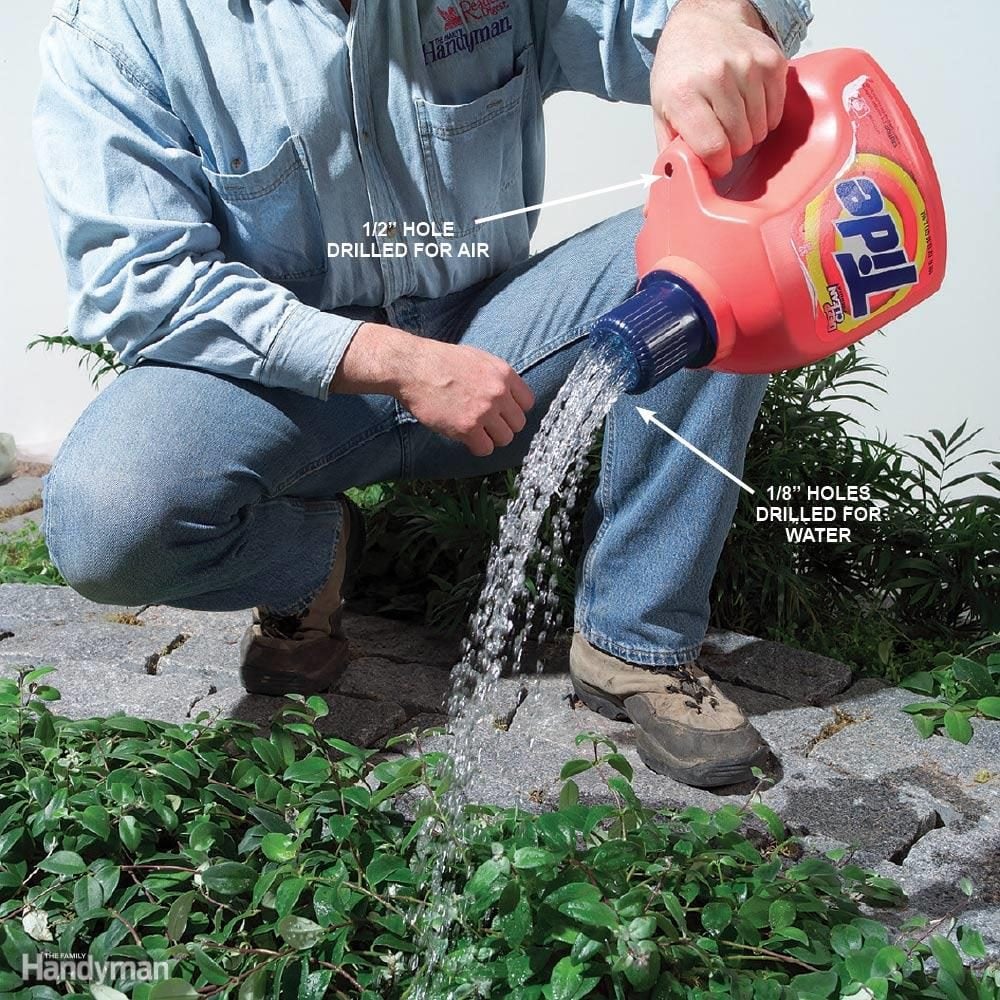
Instead of throwing away empty laundry detergent containers, rinse them out thoroughly and then recycle them for watering plants. Drill 1/8-in. holes in the top of the cap, and a 1/2-in. hole just above the handle to relieve pressure so the water flows freely.

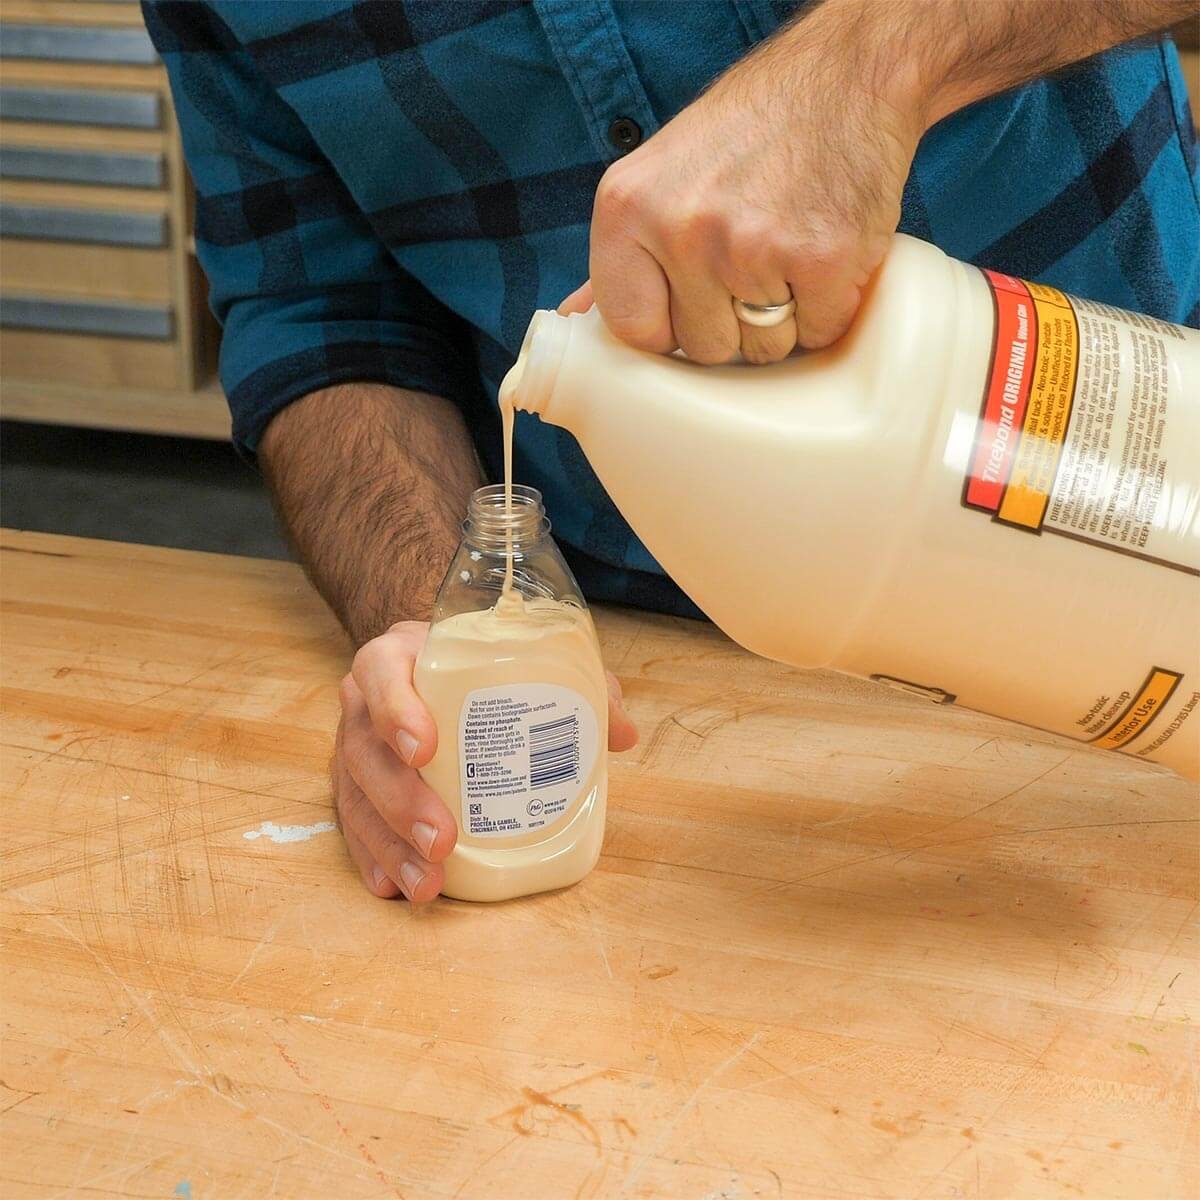
Out with the Mustard, In with the Glue

I no longer put up with the messy “over-designed” carpenter’s glue dispensers. Instead, I use old mustard bottles; they don’t clog and they easily reseal between uses. — reader Richard Painter

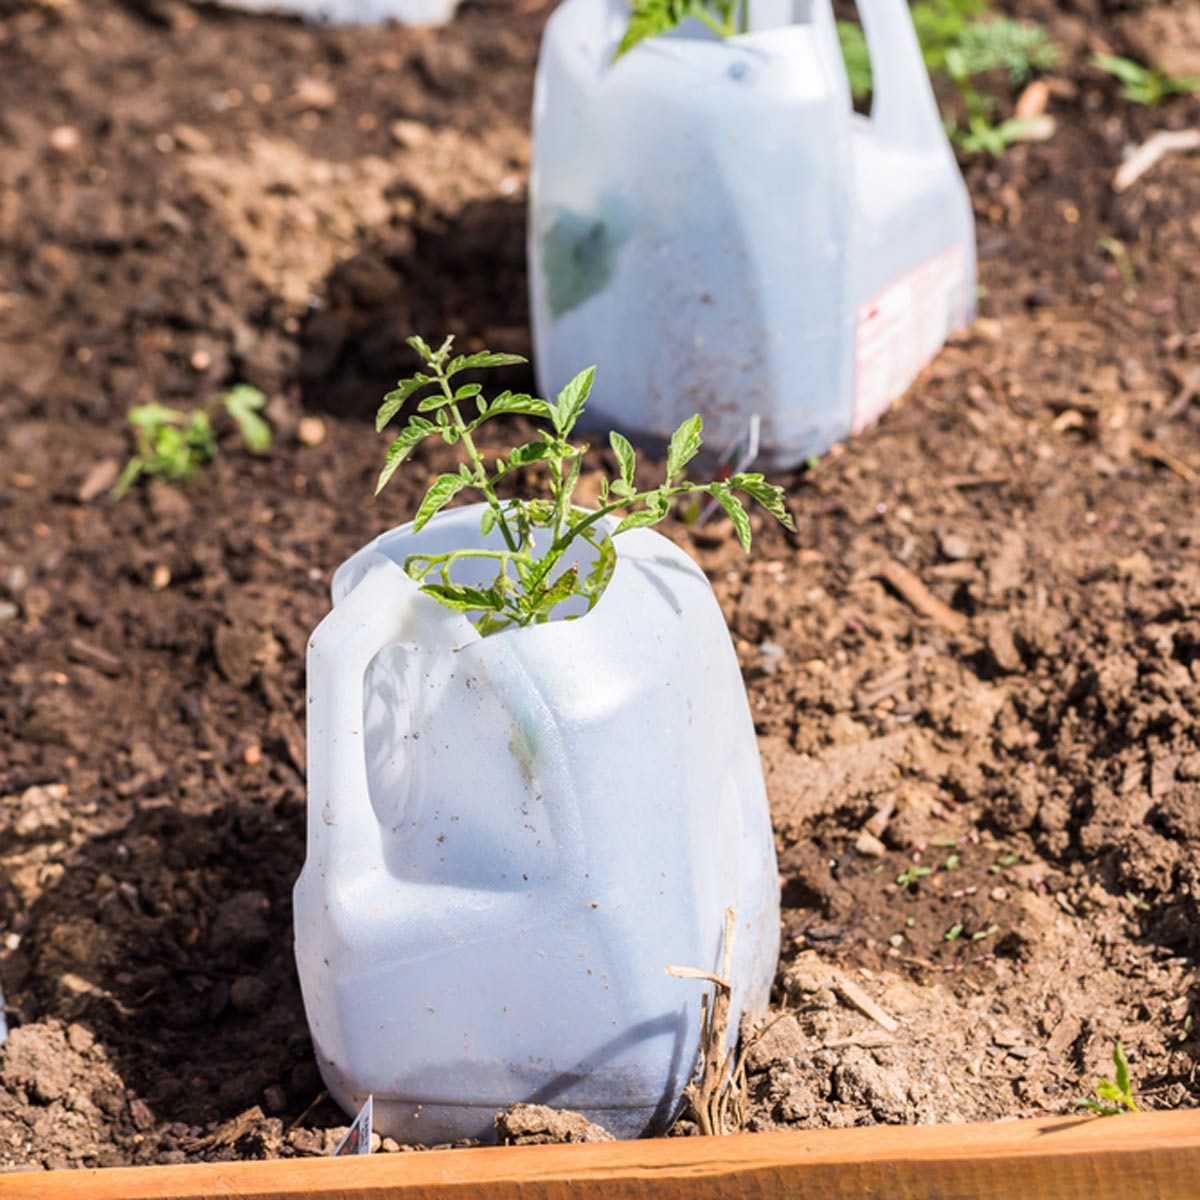
Plastic Jug Planters

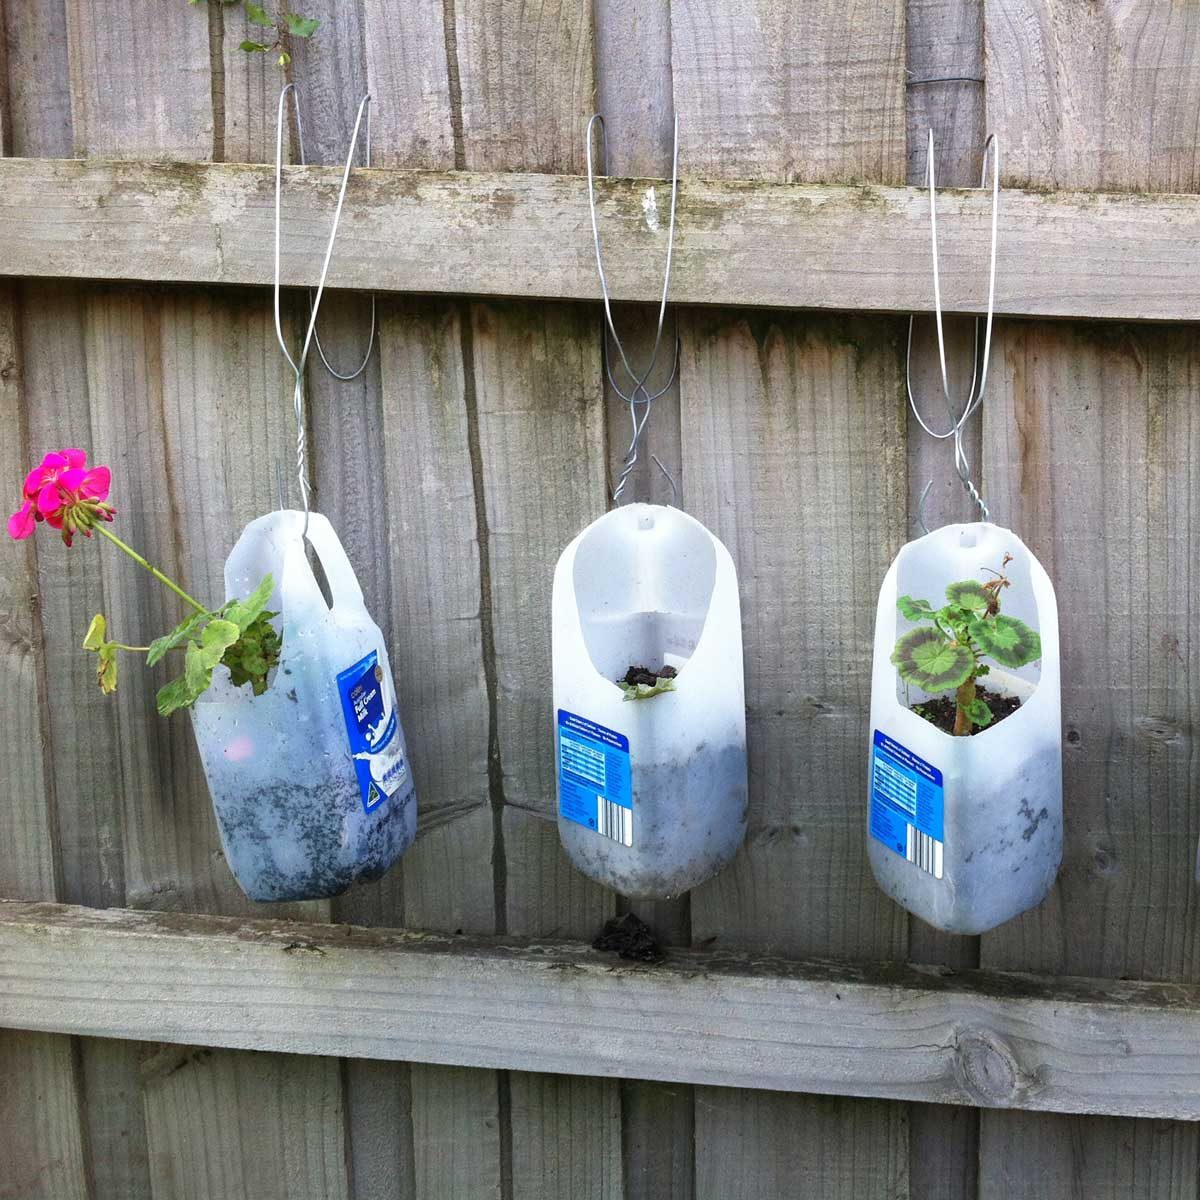
Those plastic milk jugs can be cut and used as planters. Try hanging them from a fence with wire coat hangers, as shown here.

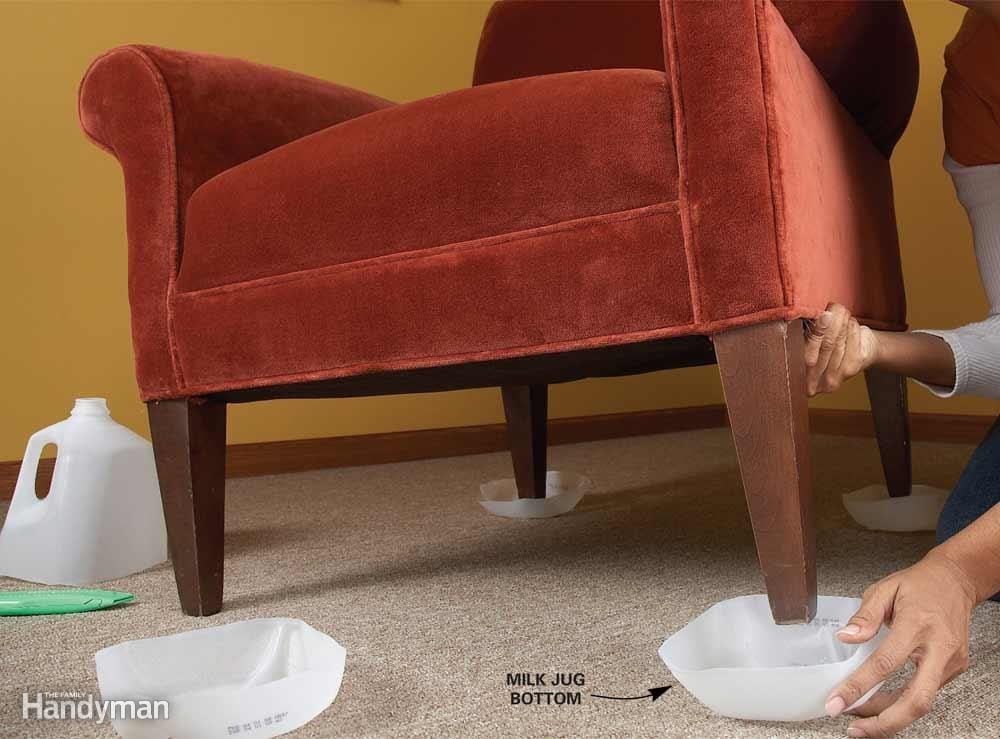
Better Bucket Storage

Stacked 5-gallon buckets fit together so tightly that it’s almost impossible to pull them apart. Prevent the problem by placing a large plastic pop bottle (with top on) or milk jug between each pair of buckets. You can still nest the buckets together, but they won’t stick together anymore.

Better Glue Bottle Cap

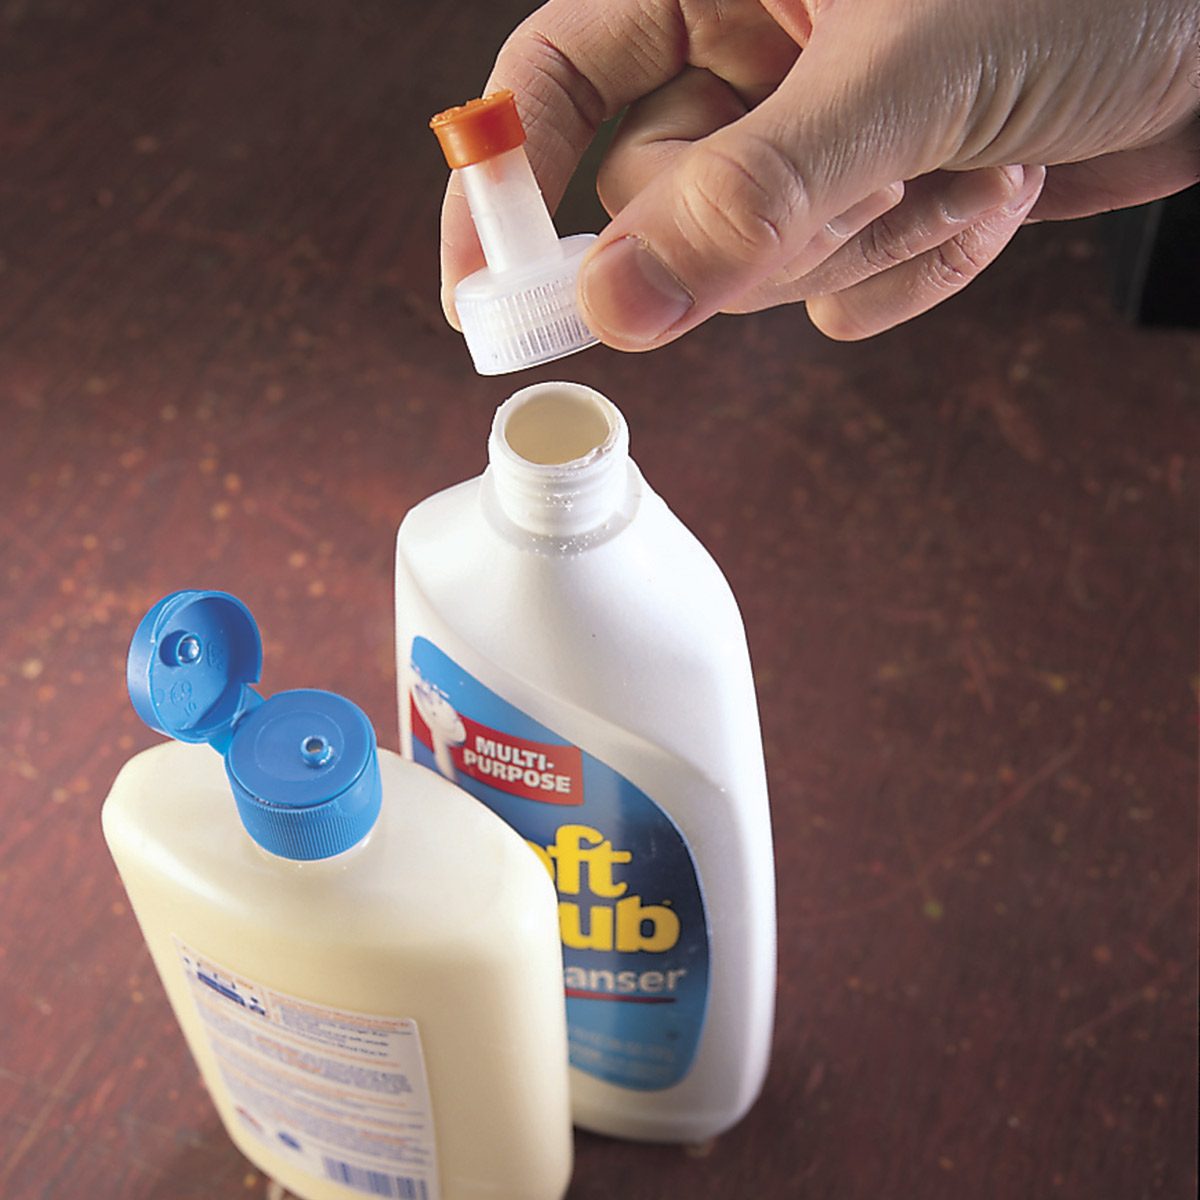
Screw the flip-up, 1-in. inner dia. cap from your shampoo or liquid cleanser bottle onto your glue bottle. The 1-in. cap fits on every glue bottle we tried. Now:

You can’t lose the little cap.

Glue stays fresher because the cap snaps shut.

The cap’s small round hole makes it easier to control the size of the glue bead.

Glue doesn’t harden in the cap and require clearing before use. — reader Dorothy Nanchu
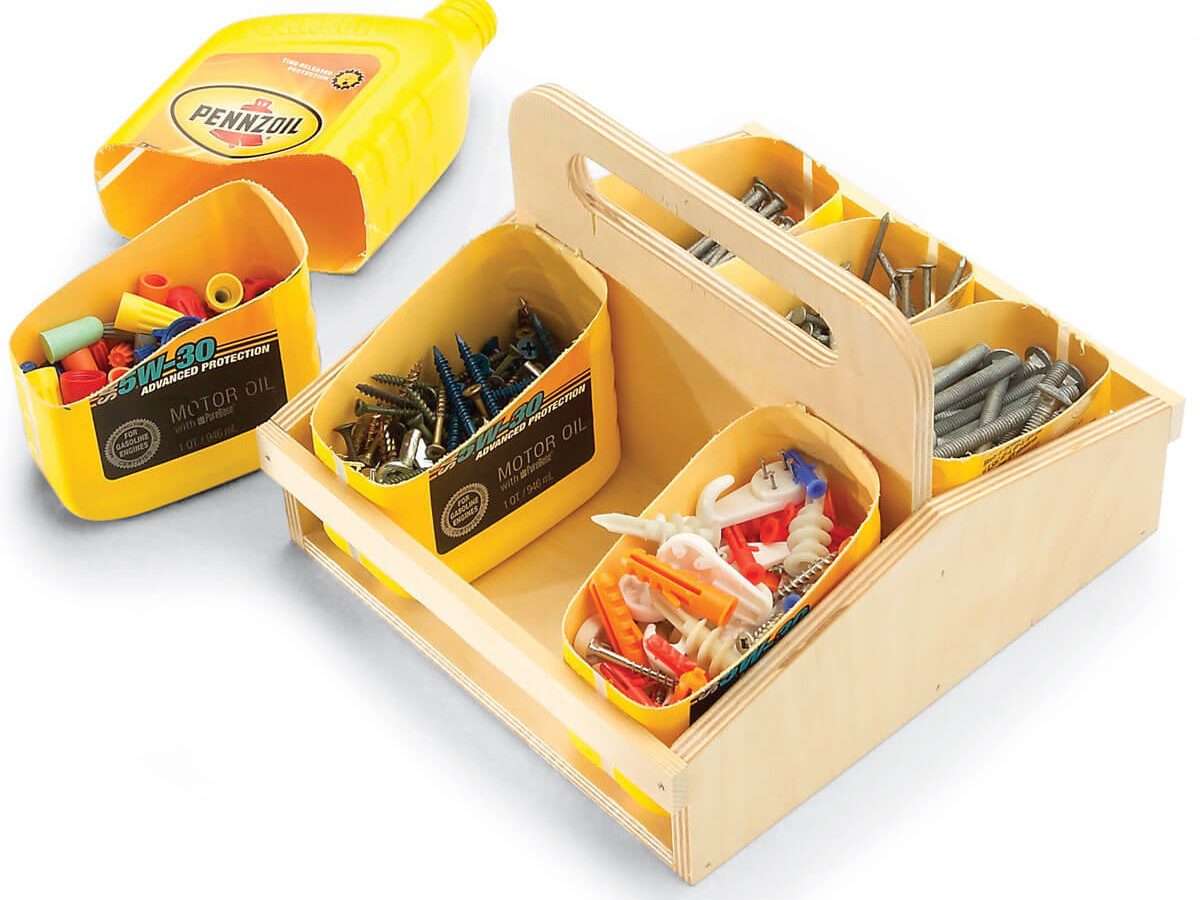
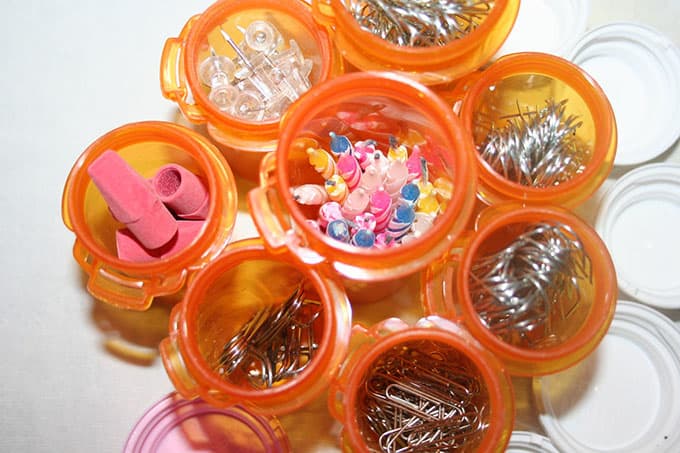
Instant Tool Holder

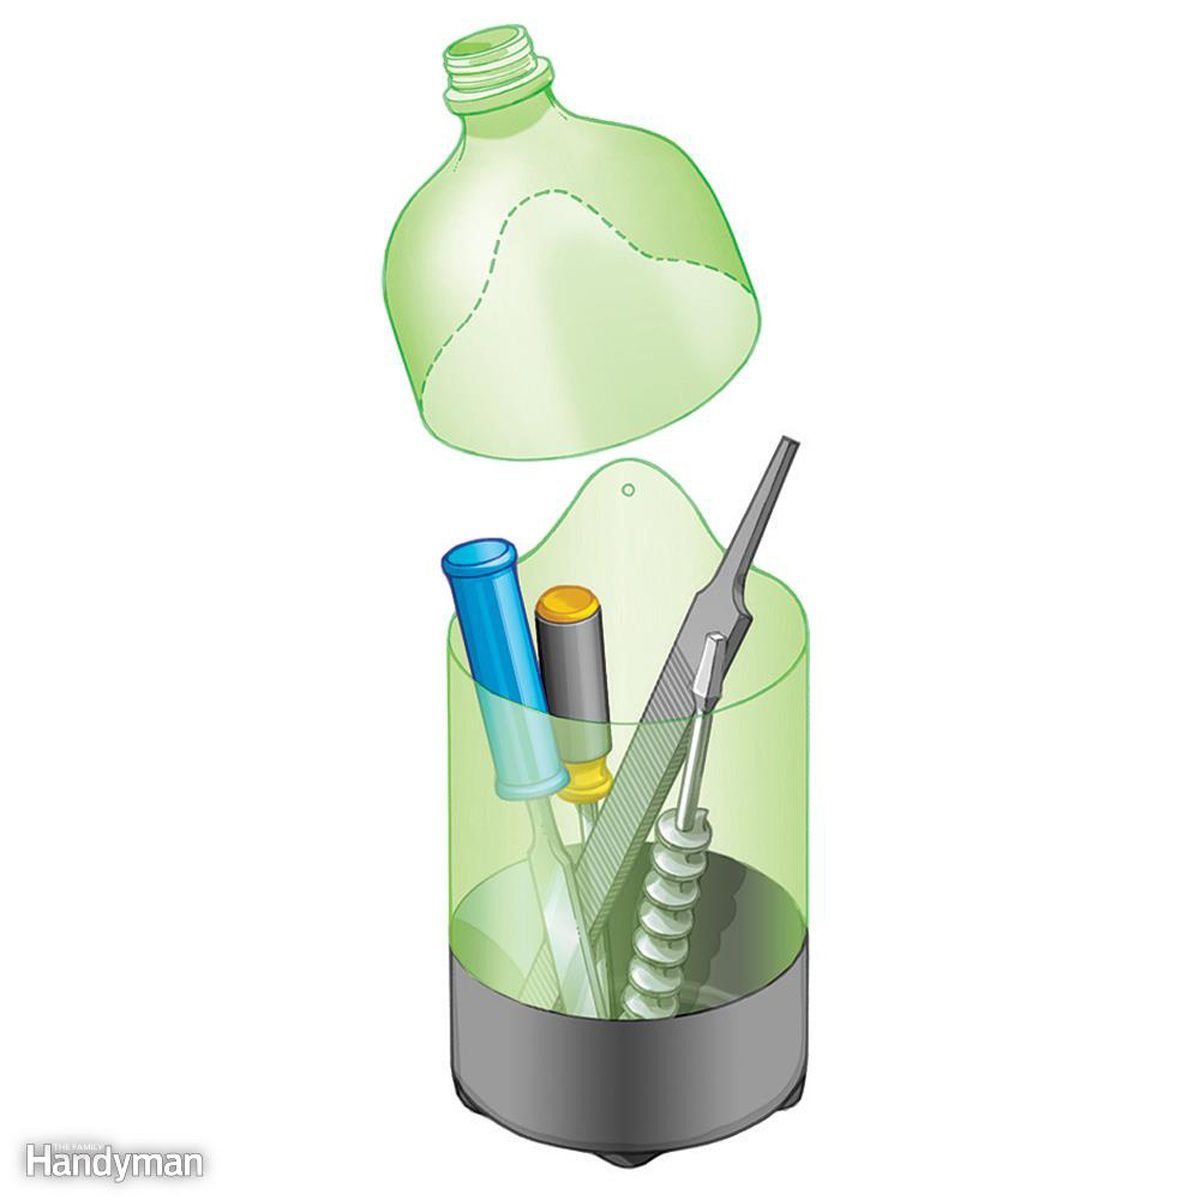
Store chisels, files, large drill bits, screwdrivers and other long tools so they’re both visible and close at hand. Simply cut off the top from a clear 2-liter plastic soft drink bottle, leaving a flap for hanging. Use smaller bottles, which are extremely common household items for smaller tools.

SOURCE: FAMILY HANDYMAN: Jenny Stanley Updated: Dec. 01, 2023

DIY: 21 Uses for All Kinds of Plastic Jugs: Part 1

I found this article on Family Handyman that details some helpful and amazing uses for those plastic bottles you might have.

From Family Handyman:

Give those otherwise useless plastic jugs and bottles new life in your home or workshop. And the best part, these super-resourceful ideas don’t cost a thing!

Make a Paint Tray with a Handle

For small paint jobs, I find that a 4-in. paint roller works great with an old gallon-size iced tea jug serving as a disposable roller tray. I just cut out part of the plastic to create a place to dip the roller. It even has a built-in carrying handle. When I’m done, I just throw the empty gallon jug away. — reader Fred Thies.

Simple Skinny Funnel

If you’re in need an easy to make disposable funnel, we have the perfect solution for you.

Simply cut off the handle from a gallon water (or milk) jug, and use this to serve as a disposable funnel. This funnel will help you to drain anything from your left over wood glue to the old oil in your leaf blower. This handle funnel will help you get to hard to reach places and small bottle openings. When using this funnel to drain old oil, it directs the oil to the drain pan without spilling a drop. It’s also smart to use this disposable funnel for messy projects because you can just throw it away once you are done. It’s so simple and effective!

Soda-Bottle Bee Trap

My husband stumbled on this cheap, effective bee and wasp trap. (Never thought I’d be glad he drinks soda all the time.) Cut the upper one-third off the top of a 2-liter plastic soda bottle with a utility knife. Pour a few ounces of soda pop into the bottom, then invert the top of the bottle and nest it inside the bottom part. Bees and wasps are attracted to the sweet smell and find their way through the bottleneck but can’t find their way out. Eventually they get exhausted, fall into the water and drown. — reader J. Chamberlain

Tangle-Free Twine Storage

Can’t find your twine to bundle that pile of recyclables? Try reader Norm Hoch’s slick solution. Cut the bottom 4 in. off a 1/2-gallon plastic milk or orange juice jug and load the container with a fresh spool of twine that unwinds from the middle. Then thread the twine through the jug opening and tape the jug back together. Cut an “X” in the cap with a utility knife to keep the twine from falling back into the jug.

Portable Storage for Free

You can drop a few bills buying storage totes for supplies like nails, screws and plumbing parts. Or you can make your own with laundry detergent jugs and a utility knife. They’re big, tough and mobile—and they’ll make your workshop stink nice.

Touch-Up Bottle

When there’s only a little bit of latex paint left in the can and I want to save it for touch-ups, I put a half-dozen marbles in an empty water bottle and pour in the leftover paint. When I’m ready to do a touch-up, I shake the bottle and the marbles mix the paint. A roll of tape with a rag draped over it helps hold the bottle steady while I pour the paint into it. Just be sure to use a funnel or you’ll have a mess on your hands. — reader Ron Hazelton

Protect Sprouting Plants

If you cut an empty gallon jug (like a classic plastic milk jug) about two-thirds down the bottom, you can create an effective enclosure to protect planted seeds and new shoots from birds and rodents, which is faster and more effective than trying to use sprays and traps. For busy gardens, get a marker and write the name of the plant on the jug so you know what’s growing beneath without needing to check your seed packets: Remember to eventually take the jugs off as shoots develop to avoid mold. 

Oil Bottle Hardware Storage

Here’s a fun little project to keep your screws, nails, nuts and electrical whatsits handy and neatly organized.

Pet Food Scoop

I’ve read many hints that advise the reader to cut off the tops of gallon-size plastic jugs and use them for funnels. I’ve found that if you replace the cap after cutting the top off, you can use the top for a scoop for handling potting soil, fertilizer or pet food. The no-scratch plastic also makes the jug/scoop ideal for bailing water out of your boat. — reader Ray Dean

For this scoop, we used an empty half-gallon milk jug and angled the cut so that the side opposite the handle is slightly longer, more like a scoop than a funnel. However, as Ray notes above, this scoop can also be used as a funnel by simply removing the milk jug cap. It helps to draw the cut line with a marker first, and then clean up any sharp or rough edges with the scissors after the initial cut.

Dish Soap Glue Bottle

Reuse an empty dish soap container as a refillable glue bottle. The small size and screw-on top with attached cap are perfect for squeezing out wood glue. Be sure to rinse the inside of the container thoroughly (including the lid) and let it dry completely before filling it with glue.

Milk Jug Furniture Movers

When you have to move heavy furniture on carpeting, don’t just drag it around. That’s hard on carpet and you might damage the furniture legs. Make the job easier with these homemade moving pads. Cut the bottoms off four plastic water or milk jugs with a utility knife and rest each furniture leg on its own slider. The rounded, slippery bottoms make them perfect for furniture moving. Yes, you can buy fancier versions of these things—for 15 bucks or more! But these work just as well, and best of all, they’re free!

Tomorrow: PART 2

SOURCE: FAMILY HANDYMAN: Jenny Stanley Updated: Dec. 01, 2023

DIY: Hide-A-Key

I found an interesting article on Crafts By Amanda on repurposing plastic pill bottles.  Many of the ideas were just storage ideas—for small items: buttons, paper clips, needles and so on.  A few were creating traveling sized items—like a sewing kit or for a larger bottle, or a travel first aid kit.  A couple of them though, I thought were very clever and those I wanted to share here.

Hide-a-Key

As you can see from the graphic above, detailed instructions are not really necessary.  Take a cleaned pill bottle (they are water tight—I tried one of mine) and a plain old rock.  Make sure the rock is large enough to cover the lid completely and that it is not unusual in any way (pretty or unusual rocks will draw unwanted attention…lol).  Use a good glue and follow the manufacturer’s instructions on drying time to glue the rock to the lid.  Dig a small hole to accommodate the bottle and you’re good to go!  NOTE: in the comments to the article, someone suggested a pine cone could also be used. 

Campfire Matches

Since the pill bottles are water tight, they make an excellent container for matches for a camping trip—especially if there’s water (as in rafting or canoeing) involved!  The website says you can remove and tuck the striking surface into the bottle OR you can glue to the bottle which I think is the better option.

SOURCE: Crafts By Amanda


DIY: Peep Catapult

I saw these catapults launching everything from peeps to jelly beans to candy corn or even ping pong balls!  They looked like a lot of fun—and not just for the young ones!  This Easter, when my daughter and her family visits, we’re going to have a contest.  First, these instructions on building the catapult will come in an envelope with all the necessary building materials on the table.  Contestants will have to construct their catapult, head to the playing field—the hallway—and try to launch their peeps into the Easter basket at the end of the hallway.  (Each contestant will have different color peeps for ease of scoring.)

You might suspect that my daughter’s family consists of young children—but you would be wrong!  The family of 3, daughter, son-in-law, and teenage granddaughter are very competitive!  They have a family game night every week and this small competition will be perfect.  The prize? A coveted, LARGE bag of Ghiradelli Salted Caramels.

Craft Stick Catapult

Craft Sticks  (7 for each catapult)

Plastic Spoons  (strong spoons work best)

Small Rubber Bands

How to build a craft stick catapult:

Stack 5 craft sticks on top of each other and secure both ends with a rubber band.  This will be your crossbar.

Next, stack 2 craft sticks on top of each other and secure one end with a rubber band.

Carefully open up the 2 craft sticks and slide your stack of 5 in between them.

Then lay a plastic spoon on top of the top craft stick and secure both ends of the spoon to the craft stick.

Finally, criss-cross one more rubber band around the area where the craft sticks intersect, holding it all in place.

This version does not use a spoon at all:

This version uses a plastic cap:

And there are a lot of more difficult designs as well, like this one:

It should be a fun time, although sacrificing my peeps will be difficult…LOL

DIY: Pine Cone Bird Feeders

This is an easy craft for anyone to do…and it comes with a story.  First off, you need pinecones, some twine, peanut butter and birdseed.  Merely tie the twine around the pine cone, spread peanut butter on the pine cones and roll in birdseed.  (I microwaved the peanut butter to turn spreading into dipping—much easier.)

We live in a mature wooded area meaning there are extremely few—if any—trees with low enough branches for us to hang these pine cones on.  (This is also why we have no hanging bird feeders—that and the bears would attack them.)

We wanted to attract and feed birds during the winter, so hubby devised a wooden tree of sorts.  Similar to the one pictured below, but not as tall or full.  We put it in a plastic bucket with some rocks thrown in to make sure the wind would not blow it over and put it on the deck.  I tied about a dozen of these pine cone feeders to it securely with bright red ribbon.  The project was finished around dinner time and we didn’t expect to have visitors till the next day. 

We were wrong!  Watching tv that evening we heard a THUMP! and looked at each other.  We thought for sure wind had blown the pine cone tree over, but it wasn’t windy at all.  We turned on the spotlights and saw squirrels DRAGGING our tree!  They had the pine cones in their teeth and paws and had managed to bring the tree down to the deck where they were trying to drag the tree, bucket and all, off the deck and into the woods.

I was out the door and charging at the little thieves while hubby stood and laughed.  The squirrels took that moment to let go of their treasure.

I picked up some of the rocks that had spilled out of the bucket and was winding up to hurl a couple when I felt hubby grab my arm.  “Let them go,” he laughed.  “You scared them good.  They won’t be back.”

Guess what? He was wrong.  They came back in the middle of the night and CHEWED the ribbons OFF the tree and made off with all 12!!

Sigh.

Uses for Expired Baking Soda

I found this article on the Real Advice Gal.com website and I had to share. She details ways to use up expired baking soda!!! 

From Real Advice Gal.com:

Here are My Top 10 Uses for Baking Powder

For Cleaning

So, you forgot about that baking powder you bought last year and now it’s expired. Don’t throw it away just yet! There are actually a few surprising uses for expired baking powder that might come in handy. And for me, the best way is to use expired baking powder to clean!

Baking powder can be used as a natural cleaner for various household items. It can be mixed with water to make a paste and used to scrub away stains on sinks, countertops, and stovetops.

Use it to soak for pots and pans – Stuck on foods making pots and pans hard to clean? Soak them in a mix of hot water and baking powder and you won’t have to scrub so hard!

As a Crayon Mark remover -Did little one decided to use the wall to make a master piece? Use a mix of hot water and baking powder and gently scrub the marks off with a toothbrush.

As a Cleaner for your Microwave – Put 2 tbsp of baking powder and 2 cups of water in a microwave safe bowl and microwave for 2 minutes. This will loosen any stuck on food and make it where you can easily wipe it clean!

Deodorizer

Baking powder can be used to absorb unpleasant odors in refrigerators, closets, and shoes. Simply place an open container of baking powder in the area and let it absorb the odor.

You can sprinkle some baking powder on your carpets and then vacuum it up to suck up some of those set in odors.  The same can also be done for car seats (fabric, not leather)!

As a freshener for your shoes:Fill a pair of socks with baking powder and tie off the ends. Stick them in shoes you want to keep fresh!

Natural Deodorant

Baking powder can be mixed with water to create a natural deodorant. Apply it under the arms to absorb moisture and neutralize odors.

Detergent Booster

Put a tsp of baking powder in with your clothes and it will help remove odors in the wash.

Degreaser

Got a grease stain on your shirt? Sprinkle some baking powder on the spot and leave it to soak up the grease, wash as usual and the grease spot will be gone!

As a Way to Keep Out Ants

Ants invading your house? Mix an equal amount of baking powder and salt and sprinkle around the outside of doors and windows to deter them.

As a Gas Blocker

A tsp of baking powder in water while cooking dried beans will lesson gas and bloating that comes from eating the beans!

As a Drain Opener

Have a partially clogged drain? Pour in 1/2 a cup of baking powder followed by 1/2 a cup of vinegar and let bubble. Wait a few minutes and follow up with some hot water and the clog should be gone!

Homemade Playdough

Baking powder can be used as an ingredient in homemade playdough recipes. It helps the playdough to rise and become soft and pliable.

Fruits and Vegetables Wash

Baking powder can be used to help remove pesticides and other chemicals from fruits and vegetables. Soak them in water with a teaspoon of baking powder for 10-15 minutes before rinsing them off.

So there you have it, 10 uses for baking powder that you may not have thought of before!

SOURCE: REAL ADVICE GAL.COM

DIY: Stress Balls

From the SPRUCECRAFTS.COM website:

A stress ball is a fun and malleable toy that’s a great tool for portable stress relief. Both adults and children can squeeze the toy in their hands, moving their fingers around to relieve muscle tension, stress, and to exercise the hand. Beyond being a toy, stress balls may help make you feel relaxed and lower your blood pressure. Toss one in your bag before you start a busy day or keep one at your desk for convenient stress relief.

Make your own DIY-crafted stress ball at home. Creating your own stress ball can be a creative way to release pressure and have fun making a squishy and playful item. You can even customize your own by choosing your favorite color (or a calming one, such as blue) and adding stickers or colored patterns.

Equipment / Tools

Funnel

Scissors

Permanent marker (optional)

Materials

Small, round balloon

1 cup Cornstarch

Instructions

Blow up the Balloon

Blow up the balloon until it is about 4 to 5 inches in diameter. Do not tie it, but keep the balloon inflated as best you can.

Pinch It Closed

Pinch the top of the balloon shut, about 1 to 2 inches from the opening, leaving room for the funnel to be inserted into the neck of the balloon. If you don’t have an assistant to help, use a clip to pinch the balloon.

Insert the Funnel

Place a funnel inside the opening of the balloon while still pinching the balloon closed. You may need help securing the funnel inside the balloon. Don’t worry if your balloon deflates a little, as this tends to happen during this step.

Fill Your Balloon With Cornstarch

Fill the top of the funnel with cornstarch using your free hand (or enlist a helper). It works best to add a small amount of cornstarch at a time.

Slowly Release Pinched Fingers

Carefully begin replacing the air with cornstarch by slowly letting go of where you’re pinching the balloon so the cornstarch can slide into it. If you go too quickly, the air leaving the balloon will blow the cornstarch into the air and make a mess.

Continue adding cornstarch to the funnel until the balloon is filled to a depth of about 3 inches. Continue adding small amounts of cornstarch to your funnel, moving slowly, and swirl the cornstarch around with your finger to help work it into the base of the funnel and into the balloon.

Squeeze out the Excess Air

Pull up tightly on the opening of the balloon and pinch out any extra air. In order to have an effective stress ball that won’t pop, it’s important to eliminate any extra air that’s inside your balloon. All of your stress ball’s contents should be cornstarch.

This image has an empty alt attribute; its file name is 7_Squeeze-5c41d30ac9e77c00019dc42f.jpg

Tie the Balloon Closed

Tie the balloon closed as near to the cornstarch as you can. Use scissors to cut off any excess balloon, making sure not to cut too close to the knot on the balloon.

Decorate the Stress Ball

Decorate the stress ball with stickers or permanent markers as desired. Choose your favorite colors to make your new toy your own and add fun patterns to show off your artistic skills. Now you’re ready for stress relief on-the-go with your very own DIY stress ball!

SOURCE: The SPRUCECRAFTS.COM

Surprising Uses for Coffee Filters

On a trip to Walmart, the coffee filters we usually buy were not to be found anywhere.  Instead, they had “natural” ones which quite frankly looked already used—light brown in color. I bought them anyway in case we ran out.  They’ve been in the pantry since then and I wondered if I could use them for anything else.  Lo and behold, I found an article on The Spruce detailing such uses!

From The Spruce:

Coffee filters aren’t just for coffee makers anymore. The inexpensive filters are perfect for tasks from the kitchen to the garden because of their bowl shape, strength when wet, absorbency, and they are lint-free.

We gathered 17 clever uses for coffee filters around the house, and after reading, we’ll bet you find many more reasons to keep the filters on hand.

Protect Dinnerware from Scratches

Constantly stacking dinnerware can cause tiny scratches on the surfaces that look unattractive and weaken the material. Place a single coffee filter between each plate when storing or moving dinnerware to help protect the finishes.

Catch Popsicle Drips and Taco Spills

Eating can be messy, but not if you keep some coffee filters on hand. Cut a small slit in the center of a filter so you can slip in the wooden stick of a popsicle before you hand it over to be enjoyed.  The round filters are also a perfect fit to hold a taco or burger if you’re standing up at a party or eating on the run in your car.

Prevent Rust on Cast Iron Pans

Dampness is the enemy of cast iron pans and cookware. After washing and drying your favorite pan, slip a coffee filter inside to absorb any moisture that might linger. A bonus is that the filter will protect the interior surface from scratches if you stack the pans.

No More Messy Hands When Baking

Most bakeware should be greased before adding the batter to prevent sticking. The process can result in messy hands but not if you use a coffee filter to spread the butter or shortening. Simply use the filter to evenly spread the butter, toss it in the trash, and keep on baking.

Absorb Grease from Foods

Most people use a paper towel to absorb excess grease from bacon, French fries, or fried chicken. But, a few coffee filters work just as well. Line a plate with the filters and watch them soak up the oil.

Make Glassware Sparkle

If your drinkware has spots after removing it from the dishwasher, use a coffee filter to make it shine. The filters are lint-free and slightly textured so they gently scrub away the minerals that leave water spots.

Tip

Coffee filters work well on shower doors and bathroom mirrors with water spots.

Save the Cost of a Plumber

Coffee filters won’t unclog a sink, but they can save you the cost of a plumber to remove the clog.  When cleaning vegetables or scraping plates after dinner, put a coffee filter over the drain. It will catch the small pieces of food and debris that might create a clog. When you are finished at the sink, gather up the filter and toss it away.

Remove Dust from Electronics Screens

The screens on electronics are sensitive and easily scratched by gritty cleaning clothes and stiff paper towels that can leave lint. Coffee filters are perfect for quick clean-ups of television, laptop, and gaming screens. Just use a light touch and dust and fingerprints will be gone.

Prevent Microwave Splatters

We’ve all done it; placed a dish of leftovers in the microwave uncovered and then discovered an oven filled with splatters. Use a coffee filter over foods to catch the mess before it happens.

Spout Some Seeds

If you enjoy fresh chia seed sprouts for salads or just want to get a head start on the successful planting of some types of seeds, use a coffee filter.  Dampen the filter, sprinkle on the seeds in a closed container (glass jar or plastic bag), and place in a warm spot. The seeds will sprout with ease.

Line a Plant Container

Drainage is essential in a plant container but you don’t want soil leaking out of the drainage holes. Whether you are planting a pot or a hanging basket, place a coffee filter (or a few) in the bottom of the container before you add the soil. The water will drain out easily but the soil will stay in place.

Shine Stainless Steel Until it Is Streak-free

After cleaning a stainless-steel appliance or piece of cookware, use a coffee filter to buff the finish. Work in the direction of the grain and because the filters are lint-free, you’ll get a great shine.

Tip

After you clean a stainless-steel kitchen sink, dry it with a coffee filter to prevent water spots and streaks.

Protect Treasured Holiday Ornaments

Even if you have customized containers for storing heirloom holiday ornaments, use a coffee filter to wrap each one to add protection from dust and scratches. The filters are inexpensive and easy to use. You’ll enjoy unwrapping each one year after year.

Get Streak Free Windows

Coffee filters are the perfect last touch when cleaning windows. They will leave a lint-free, streak-free finish as you dry the glass. They also work great on car windows, mirrors, and glass tabletops.

Corral Small Pieces When Assembling Furniture

When you open a DIY furniture kit, use a coffee filter to hold the small screws and pieces. The bowl shape will help you keep them from rolling away and the filters are inexpensive enough that you can use several to sort the pieces. The same tip works great for kid’s game pieces.

Create Pressed Flowers

Coffee filters work beautifully to absorb moisture when pressing flowers in a book or a flower press. The smooth texture will not leave “dimples” like some embossed paper towels and no dye transfer to delicate petals.

Make a Shoe Freshener

To help keep sneakers and shoes smelling fresh between washings, make some odor absorbers using coffee filters.  Put about one-fourth cup of baking soda in the center of a filter. Gather up the edges and tie them with some string or use a rubber band.  Place the pouches in the shoes to absorb odors. After about a month of use, toss the filters and make a fresh batch.

SOURCE: THE SPRUCE: Mary Marlowe Leverette

DIY: Chocolate & Champagne Gift

This clever gift is perfect for Valentine’s Day—chocolate and champagne or wine if you prefer—a housewarming gift or even a baby shower gift, and is super simple to make!

The basic components are:

orange or gold tissue paper

about 48 ferrero rocher candies

greenery for the top (or you can use green tissue paper)

raffia for the tie

glue gun

bottle of champagne or wine

You begin by cutting the tissue paper into squares-large enough to envelope the ferrero rocher candies. Then you glue the candies in the center of the squares and then glue those around the bottle in rows beginning at the bottom and working up.  When you are nearing the top, you glue the greenery (or the green tissue paper cut into leaves) to the neck of the bottle, low enough that the last row of candies will cover the edges.  Then glue on the final row of candies and tie the raffia in a bow.

EASY PEASY!

Alternate Method

I have seen this done using mini cupcake papers instead of tissue paper and covering the bottle itself with tissue paper for easier removal of the candies.

I didn’t include the source for this craft because i have seen many varieties and many websites with the same idea. Some websites use plastic or silk greenery and some sites even used gold wrapped chocolate chunks.

DIY: Winter Luminaries

I came across these easy to make luminaries and thought they’d make a nice winter project!

The idea and instructions come from the Songbird website.

Gather These Supplies

Mason jars

Mod Podge Satin

Epsom salt

Fir branches – collected and trimmed to size with scissors

Small wood slices

Twine

Scissors

Hot glue gun and glue sticks

Flameless candles

Paintbrushes

Spoon

There’s a three-step process to this project. You’re going to prepare the jars, then Mod Podge and salt them, and then add the embellishments. It’s relatively easy!

Prepare the Jars

Basically, you’ll need to make sure that the jars are washed and clean so that the Mod Podge sticks. You have two options:

Clean the glass with mild soap and warm water and let dry

Clean the glass with rubbing alcohol and cotton balls (or similar) and let dry

The reason for the prep is because oils and dirt can get onto glass and stay there, and they can cause problems if you try to Mod Podge the glass. By “problems,” I mean the Podge won’t stick. So please clean the glass before moving on!

Mod Podge and Epsom Salt

I used Mod Podge Satin for this project. You can use any formula really, but I recommend either Satin, Gloss, or Matte. You won’t see the finish of the Mod Podge, so it doesn’t really matter.

Put your epsom salt out on a plate on your work surface.

Paint a medium layer of Mod Podge on the jar in consistent, quick strokes. You want to work quickly because Mod Podge starts to dry pretty quickly, and you don’t want to have to do a bunch of layering of the salt. It will get clumpy on your final luminaries.

Roll the jar in the epsom salt, all the way around. Push down slightly. Bring it up out of the epsom salt.

Use a spoon to pour salt over areas of the jar that may not have gotten salt.

You can also use a small paintbrush to add to blank areas and then sprinkle a little salt on it. Just be careful not to add too much Mod Podge. Clumping salt doesn’t look great, especially with votives.

Keep in mind that if you miss a few areas, it will be hardly noticeable! Let your luminaries dry for several hours.

Adding Embellishments

Cut a length of twine that is long enough to wrap around the jar mouth around 6 – 7 times.

Start wrapping. Tie it once at the halfway point, then tie it again at the end. Tie the twine into a bow.

Use a hot glue gun to attach the branches to the front of your luminaries. Then place the small wood pieces on the front.

Place the LED tea lights into your new mason jar luminaries for a warm glow! You can also use real tea lights if you like, given that the epsom salt and Mod Podge are on the outside of the jar.

SOURCE: SONGBIRD