DIY: Thanksgiving Appetizers

I know, I know Thanksgiving isn’t for weeks yet, but hear me out.  You’ve got family and friends coming over for dinner, you’re busy in the kitchen making a magnificent feast, and everyone keeps wandering into the kitchen to “see what smells so good”.  They’re family, they’re friends, they’re in the way!  So, plan ahead to make these cute and simple appetizers to keep them in another room while you perform your magic!

Let’s start with the basic Turkey appetizer.  There are dozens of varieties and all are easy to make.  The most difficult part is the arranging.

If you have some time, you can attempt a pizza dough cornucopia to fill with veggies, fruits, breadsticks.

(Short version instructions: create a foil cone; wrap slices of pizza crust dough around the cone overwrapping edges; brush with an egg wash and bake.)

For a lighter fare, you could make acorns!

These adorable acorns are just 3 ingredients: use some melted chocolate chips (or peanut butter, your choice) to attach a mini nutterbutter cookie to the flat end of a Hershey kiss.  Let them set a few minutes, then use more melted chocolate to attach a mini chocolate chip (or peanut butter chip) to the other end.  Done!

Another easy appetizer is a pilgrim hat!

Any type of chocolate cookie will work—a plain chocolate wafer or fudge striped cookie will do.  With a bit of frosting attach the chocolate side to a mini peanut butter cup, add some frosting details, and you’re done!

DIY: Halloween Treats

I love to see what new recipes or treats are out there for Halloween parties.  Not that I have them anymore, but I do love to eat!

Acorn Treats

This is a super simple recipe that’s adorable too!  There’s only three ingredients: miniature chocolate chips, Hershey Kisses and Nutter Butter Bites!  You need one Hershey Kiss, one Nutter Butter Cookie and one miniature chocolate chip per treat.  Simply melt chocolate chips to use as the “glue” between the pieces!

Meringue Bones

This is another simple to make recipe with minimal ingredients!  You need 2 large egg whites at room temperature, 1/8 teaspoon cream of tartar and ½ cup sugar. In a small bowl, beat the egg whites with the cream of tartar on medium speed till soft peaks form.  Gradually add the sugar, 1 tablespoon at a time until stiff peaks form.  Place in a heavy-duty resealable plastic bag and cut a small hole in the corner of the bag.  On parchment lined cookies, pipe a 3-inch log. Pipe 2 balls on each end to create the bone shape. Bake at 225* for 1 ½ hours or until firm.

Brownie Spiders

These brownies are cute and so easy to make. Bake up your favorite brownies (from a mix if you like) and after they bake and cool, turn the brownies out onto a cutting board. Using a glass, “cut” circles from the brownies. (The leftover scraps are fair game to munch on!) Use pretzel pieces for legs and purchased eyes from the baking aisle.

ENJOY!

What Shall We Make Today?

Continuing our pumpkin theme, today’s offering is Crunchy Ranch Pumpkin Seeds!

Ingredients

3 cups fresh pumpkin or squash seeds, washed and drained

1/4 cup vegetable oil

1/4 to 1/3 cup ranch salad dressing mix

Directions

In a large skillet, saute seeds in oil for 5 minutes or until lightly browned. Using a slotted spoon, transfer seeds to an ungreased 15x10x1-in. baking pan. Sprinkle with salad dressing mix; stir to coat. Spread in a single layer. Bake at 325° for 10-15 minutes or until crisp. Store in an airtight container for up to 3 weeks.

ENJOY!

What Shall We Bake Today?

Today continues the pumpkin theme with Pumpkin Dessert Cake!

Ingredients

2-1/2 cups finely crushed gingersnaps (about 40 cookies)

1/2 cup butter, melted

1 package (8 ounces) cream cheese, softened

1/2 cup confectioners’ sugar

2 tablespoons milk

TOPPING:

3 cups cold milk

2 packages (3.4 ounces each) instant vanilla pudding mix

1 can (15 ounces) solid-pack pumpkin

2-1/2 teaspoons pumpkin pie spice

2 cups whipped topping

Additional whipped topping, optional

Directions

In a large bowl, combine gingersnap crumbs and butter; press into an ungreased 13-in. x 9-in. baking dish. Bake at 325° for 10 minutes. Cool.

In a large bowl, beat the cream cheese, confectioners’ sugar and milk until smooth. Spread over the crust. In another large bowl, whisk milk and pudding mix for 1 minute. Add pumpkin and pie spice; whisk until well blended.

Fold in whipped topping. Spread over the cream cheese layer. Refrigerate for at least 3 hours. Cut into squares; garnish with whipped topping if desired.

ENJOY!

What Shall We Bake Today?

October is PUMPKIN month!  Let’s start off with my favorite Pumpkin Bread!

Ingredients

2/3 cup shortening

2 2/3 cups sugar

4 eggs

1 can (1 pound) pumpkin

2/3 cup water

3 1/3 cups all-purpose flour

2 teaspoons baking soda

3/4 teaspoon salt

1/2 teaspoon baking powder

1 teaspoon ground cinnamon

1 teaspoon ground cloves

2/3 cup chopped walnuts

2/3 cup raisins

Directions

Preheat oven to 350°. In a large bowl, cream shortening and sugar until fluffy. Stir in the eggs and pumpkin and water. Blend in flour, soda, powder, salt, cinnamon, and cloves. Stir in the nuts and plumped * raisins.

Pour into 2 greased 9×5-in. loaf pans or 3 8×4 loaf pans. Bake until a toothpick inserted in center comes out clean, 65-70 minutes. Cool in pans 10 minutes before removing to a wire rack to cool completely.

  • To plump raisins to make them soft measure raisins in a bowl and cover with very hot water.  Allow to sit for 10 minutes.  Squeeze excess water from them before adding to mixture.

ENJOY!

What Shall We Bake Today?

Continuing with “apple month”, today’s offering is a simple Apple Bread!

Apple Bread

Ingredients

3 cups all-purpose flour

2 cups sugar

2 teaspoons ground cinnamon

1 teaspoon baking soda

1/2 teaspoon baking powder

1/2 teaspoon salt

4 large eggs, room temperature

1 cup canola oil

1/2 teaspoon vanilla extract

2 cups chopped peeled apples (about 2 medium)

1 cup coarsely chopped walnuts

Directions

Preheat oven to 350°. Line 2 greased 8×4-in. loaf pans with parchment; grease paper.

Whisk together first 6 ingredients. In another bowl, whisk together eggs, oil and vanilla; add to flour mixture, stirring just until moistened (batter will be thick). Fold in apples and walnuts.

Transfer to prepared pans. Bake until a toothpick inserted in each center comes out clean, 50-55 minutes. Cool in pans 10 minutes before removing to wire racks to cool.

Apple Bread Variations

Add dried fruits: Ingredients like regular or golden raisins, dried apricots, or dried dates would be wonderful additions to any apple bread recipes. Just know, you may want to cut back on the sugar to compensate for the extra sweetness.

Use a different kind of sugar: Different types of sugar provide distinct flavors and textures that you may enjoy. For example, you can substitute brown sugar for the granulated cane sugar, using a 1-to-1 ratio.

ENJOY!

Weird Fruits: Cherimoya

I found this article on inthekitchenwithmatt.com!

Where does the Cherimoya come from and where does it grow?

The cherimoya (Annona cherimola) also spelled, chirimoya, chirimuya also goes by the name custard apple although the custard apple is a different fruit belonging to the same family (Annona reticulata.) It is closely related to the sweetsop and soursop fruits which all belong to the family Annonaceae.

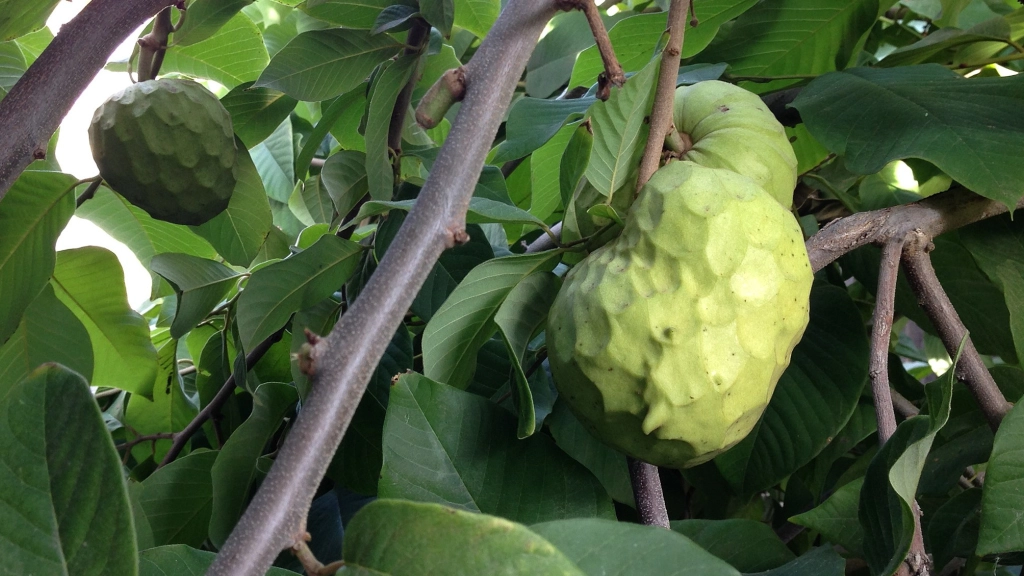
It is native to Peru, Ecuador, Colombia, Chile, and Bolivia. However, it is cultivated all around the world in Central America, South America, Southern California, Florida, Hawaii, South Asia, Australia, North Africa, Portugal, Southern Spain, in the Mediterranean, Cuba, Jamaica, Puerto Rico, India, Thailand, to name several of them. There are other places and countries that grow it as well. Cherimoya trees thrive in the tropics at higher elevations, between 4000 and 8000 feet but do not like frost and snow. It is believed that it originated first in Central and South America, then it spread to other countries. As explorers returned back to their homelands with this amazing fruit.

It doesn’t grow very well in the Phoenix desert where I live, after a few years of struggling in a pot, my sapling died on me. The Atemoya, which is a hybrid between the Cherimoya and the sugar apple is a little better suited to growing where I live.

What are the nutritional benefits of the Cherimoya?

The cherimoya is loaded with nutritional benefits. Below are a few of them:

Rich in vitamin C

High in fiber

Moderate amount of lutein

May reduce inflammation

Support the immune system

Moderate amounts of potassium and magnesium

How to eat the Cherimoya?

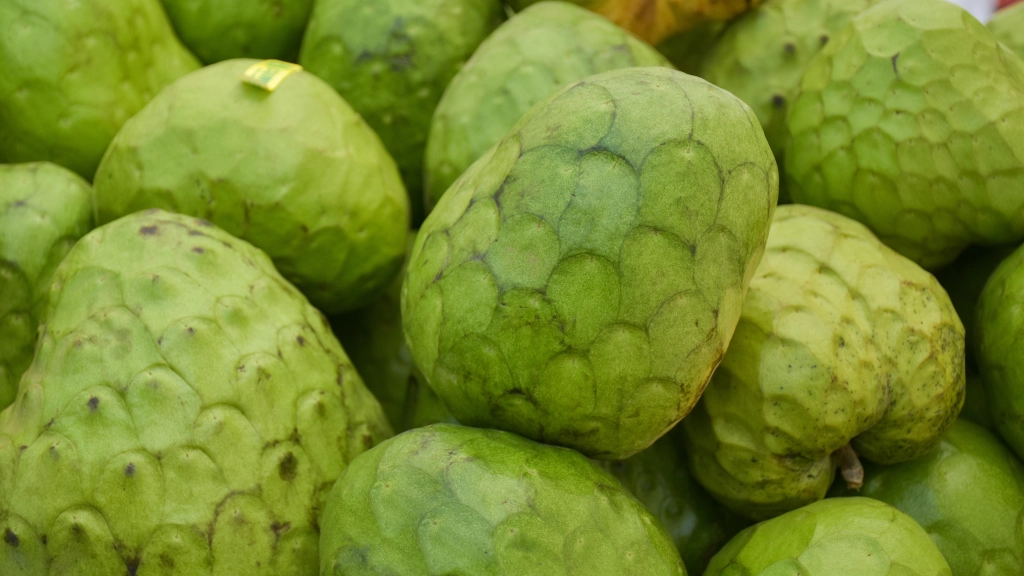
The cherimoya is a fairly good-sized fruit that is green with hints of brown and black. The shape is very similar to a heart. The outside skin is somewhat smooth and has a scaly look to it. It kind of reminds me of a dragon’s egg.

How do you know when it is ripe?

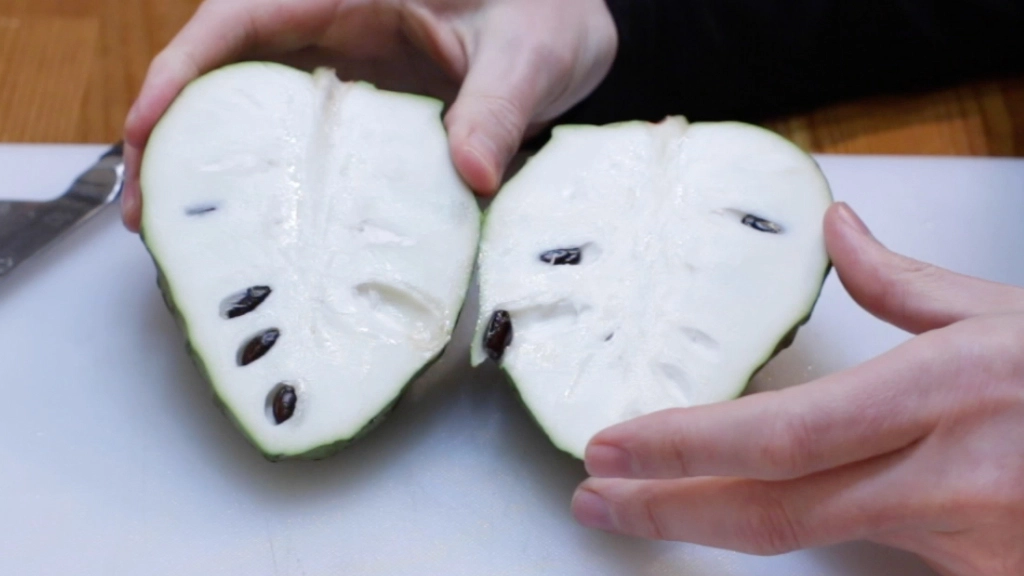
You will know when it is ripe when you gently squeeze it with your palms it should give to the pressure, similar to avocado and pear. There should not be too much black or brown coloring on the skin. They are normally picked before being fully ripe so they can last longer before they are sold. Most likely when you buy it at the supermarket you will want to let it sit at room temperature for a few days to soften up and ripen more. To eat it, just cut it in half with a knife.

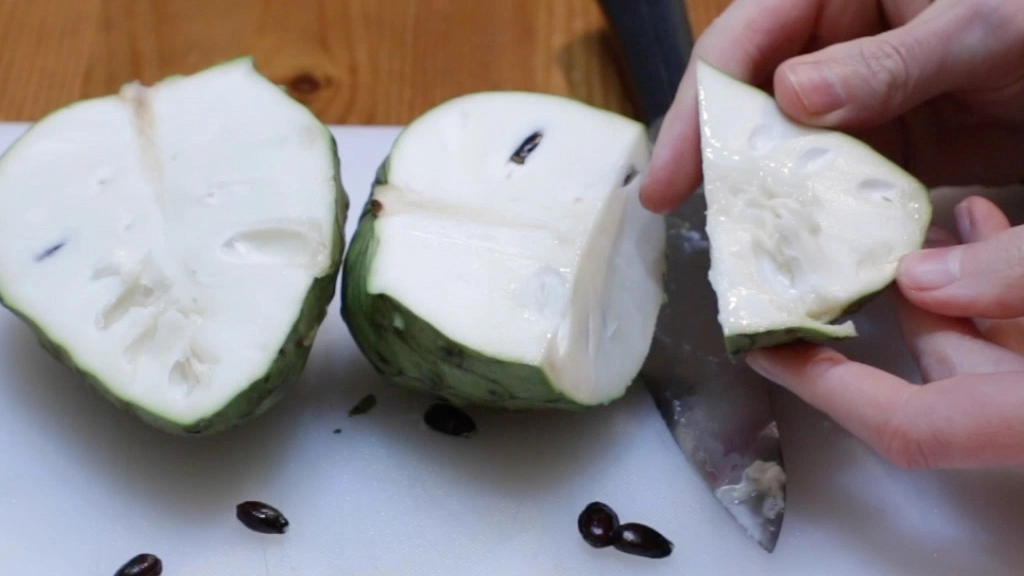
Then you will seed smooth black or dark seeds. Use a knife or spoon and scoop those out. They are not edible, do not eat them. They may be poisonous. The skin is not edible either. Inside you will see a beautiful white custard-looking flesh. It should be soft, if it is too hard the fruit is not ripe yet. Cover it with plastic wrap and place it in the fridge for a few more days to soften more. You can cut it into chunks and eat it that way. Or a lot of people will just dig the flesh out with a spoon and eat it. The Cherimoya or custard apple is commonly eaten fresh/raw or put in smoothies, ice cream, and yogurt.

What does Cherimoya or Custard Apple taste like?

When ripe the flesh will be soft and custard-like. The texture will be similar to custard as well with a little bit of stringiness to it. To me, the texture is extremely pleasant. Taste is very subjective, but it has been described by others as tasting like a mix between a pineapple, banana, strawberry, papaya, and peach. I am inclined to agree with them. The Cherimoya tastes very similar to that to me. And since those are some of my favorite fruits, that puts this fruit in my top favorite fruits category right up there with the mangosteen. The strawberry has long since been my favorite fruit of all time, but the mangosteen, pineapple, mango, are a very close second place.

SOURCE: INTHEKITCHENWITHMATT.COM

What Shall We Bake Today?

Today is National Cinnamon Raisin Bread Day and this recipe makes 3 loaves!

Ingredients

1 12 cups milk

1 cup warm water (must be between 110-115 degrees)

2 (1/4 ounce) packages active dry yeast

3 eggs

12 cup white sugar

1 teaspoon salt

12 cup unsalted butter, softened

1 cup raisins

8 cups all-purpose flour

2 tablespoons milk

1 cup white sugar

3 tablespoons ground cinnamon

2 tablespoons butter, melted

directions

Warm the milk in a small sauce pan on the stove until it just starts to bubble, stirring occasionally.

Remove from heat.

Let cool until lukewarm, about 120-125 degrees.

Dissolve yeast in warm water and set aside until yeast is frothy, about 10 minutes or so (make sure your water is at the correct temperature or the yeast won’t activate.) Then mix in eggs, sugar, butter salt and raisins (stir in the cooled milk slowly so you don’t cook the eggs.) Add the flour gradually to make a stiff dough.

Knead the dough on a lightly floured surface for a few minutes until smooth.

Place in a large, buttered, mixing bowl and turn to grease the surface of the dough.

Cover with a warm, damp cloth and let rise (I like to let my bread rise in the oven with the light on. It has just the right amount of heat and keeps the bread out of drafts.) Allow to rise until doubled, usually about 1 1/2 hours.

Roll out on a lightly floured surface into a large rectangle 1/2 inch thick.

Moisten the dough with 2 tablespoons milk and rub all over the dough with your hands.

Mix together 1 cup of sugar and 3 tablespoons cinnamon and sprinkle mixture evenly on top of the moistened dough.

Roll up tightly (the long way).

The roll should be about 3 inches in diameter.

Cut into thirds, and tuck under ends and pinch bottom together.

Place loaves into well greased (you can use Crisco or butter for this) 9 x 5 inch pans and lightly grease tops of loaves.

Let rise in warm place, uncovered, again for about an hour.

Bake at 350 degrees for 45 minutes or until loaves are lightly browned and sound hollow when tapped.

Remove from oven and let cool on rack.

Take melted butter and spread over tops of loaves.

After about 20 minutes, lay loaves on their sides and remove from pans.

Allow to cool before slicing.

ENJOY!

What Shall We Make Today?

Today’s recipe has a lot of steps, but it’s not too hard…Copycat Dairy Queen Ice Cream Cake!

This recipe comes from the liveloveandsugar.com website.  It’s certainly harder than just buying an ice cream cake; however, the price of a smallish ice cream cake is now around $35!

Ingredients

Chocolate Cookie Crunchies

3/4 cup Oreo crumbs (about 9 Oreos)

1 1/2 tbsp butter, melted

Ice Cream Layers

1.5 quart container vanilla ice cream

1.5 quart container chocolate ice cream

Chocolate Fudge

1 cup semi-sweet chocolate chips*

3 tbsp light corn syrup

1/2 tsp vanilla extract

1/2 cup heavy whipping cream

Whipped Cream

2 cups heavy whipping cream, cold

1 cup powdered sugar

1 1/2 tsp vanilla extract

Sprinkles


Instructions

Preheat oven to 350 degrees. Line a cookie sheet with parchment paper or a silicone baking mat and set aside.
Combine the Oreo crumbs and melted butter and stir until well combined. Spread the crumbs evenly onto the prepared cookie sheet.
Bake for 8-10 minutes, then allow to cool. Use your fingers to break any big clumps into smaller ones. Set aside.
Line an 8×3 inch cake pan* with clear wrap that covers the bottom and goes above the sides of the cake pan. I used two pieces.
About 20 minutes before you need it, set the chocolate ice cream out to soften. Once softened, stir it up until smooth and creamy. Add the softened chocolate ice cream to the prepared cake pan and spread into an even layer. Freeze for 30 minutes.
To make the fudge layer, add the chocolate chips, corn syrup and vanilla extract to a medium sized bowl.
Heat the heavy whipping cream just until it begins to boil, then pour it over the chocolate chips. Allow to sit for 2-3 minutes, then whisk until smooth.
Remove the cake pan with the chocolate ice cream from the freezer, then pour the chocolate fudge over the ice cream and spread into an even layer. Freeze for about 10 minutes.
Add the cookie crumbles to the top of the fudge layer, then freeze for about 2 hours, until mostly firm.
About 20 minutes before you need it, set the vanilla ice cream out to soften. Once softened, stir it up until smooth and creamy. Add the vanilla ice cream to the top of the cake, then freeze until firm, 2-3 hours.
Use the clear wrap to lift the frozen cake out of the pan, then place it on a cardboard cake circle or a serving plate. Set it back in the freezer.
To make the whipped cream, add the heavy whipping cream, powdered sugar and vanilla extract to a large mixer bowl. Whip on high speed until stiff peaks form.
Frost the cake with the whipped cream and decorate as desired. I used Ateco tip 844 for piping the borders.
Freeze the cake until ready to serve. Cake is best when stored well covered and eaten within 4-5 days.


Notes

I like using the 8×3 inch cake pan and having a taller cake, but if you don’t have one of those pans on hand and don’t want to purchase it, you could also use a 9 inch pan (including a springform pan). The cake just won’t be as tall.

Semi-sweet chocolate must be used, not milk chocolate or another, for the fudge layer to set properly

SOURCE: liveloveandsugar.com

What Shall We Make Today?

In honor of National Ice Cream Pie Day, today’s recipe is another no bake summer dessert…Ice Cream Pie!

Ingredients

1 carton Ice Cream, 1 – 1.5 QT (Breyer’s Vanilla Ice Cream)

1 tub (8oz) Frozen Whipped Topping (like Cool Whip)

Your Favorite Toppings (You can use chopped Oreos, Reese’s Peanut Butter Cups and Hershey’s Syrup)

1 Graham Cracker Crust, store bought (or Keebler’s Oreo Crust)

Instructions

Soften the ice cream and frozen whipped topping to room temperature so it is easy enough to mix.

Once ice cream is soft, mix with cool whip and your favorite toppings. Pour into crust

Top with extra toppings of your choice and freeze for about 1-2 hours. Serve frozen.

The possibilities are endless…

ENJOY!